Difference between revisions of "Fees Management"
| Line 63: | Line 63: | ||
By clicking on a '''Fee''' name from the Fees portion of the screen, you can see payments/adjustments to the fee highlighted. | By clicking on a '''Fee''' name from the Fees portion of the screen, you can see payments/adjustments to the fee highlighted. | ||
| − | To '''Edit''' an amount entered for payment on a fee, you must '''Delete''' it using the <span style="color:Red"> Delete line</span> under the Delete column. | + | To '''Edit''' an amount entered for payment on a fee, you must '''Delete''' it using the <span style="color:Red"> Delete line</span> under the Delete column on the '''History''' for the fee. |
[[File:history fee2.jpg]] | [[File:history fee2.jpg]] | ||
Revision as of 11:28, 31 March 2015
File:Example.jpgFee Management lets you enter fees on individual students and update accounts receivable.
On the left navigation panel, select Student Master, Entry, and Fee Management.
Setup Box Options
To find definitions for standard setup values, follow this link: Standard Setup Options.
Other set up values not listed in the standard set up list:
Show Only Open Fees - show fees that have balances due.
The page is divided into two sections: Fees and History.
A. Fees are where you add your fees to a student. You can add an unlimited number of fees to a student and keep track of payment.
- Find the student using the Find tab at the bottom of the screen.
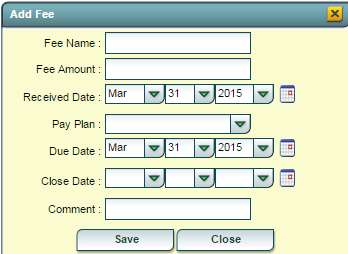
- Click the Add Fee tab to display a box to enter the information about fee to be added.
- Fee Amount - the amount of the fee.
- Received Date - accounts receivable date
- Pay Plan - 0-Due Now, 1-30 Days, 2-30/60 Days, 3-30/60/90 Days, 4-Monthly Due, 5-Monthly Accrued, 6-Monthly Reduced
- Due Date - Date fee is due
- Close Date - The actual payoff date of the fee.
- Comment - any comment(s) about the fee.
- Save - Save the transaction.
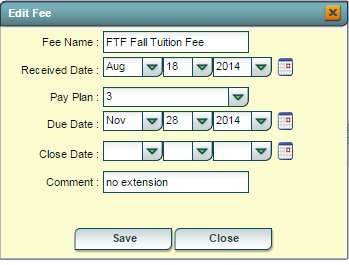
Once a fee has been added, it can be edited by:
- Clicking on the symbol that looks like a sheet of paper under the Edit column.
- Make changes to your Edit Fee page and
- Click Save
The only way to delete a fee added is to Delete it using the Delete line under the Delete column. Once you click the delete field, you will get the following confirmation question.
B. History is where payment(s)/adjustment(s)s are made to fees.
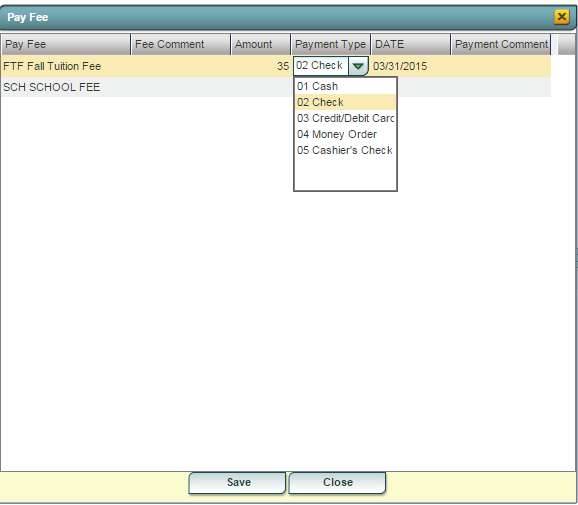
- Click Pay fee tab at the bottom and a list of fee(s) owed by the student will appear.
- Put in the Amount to be paid on the fee
- Payment Type
- Date fee paid
- Comment if any about the payment.
- Save
By clicking on a Fee name from the Fees portion of the screen, you can see payments/adjustments to the fee highlighted.
To Edit an amount entered for payment on a fee, you must Delete it using the Delete line under the Delete column on the History for the fee.


