Difference between revisions of "Sponsor Site Editor"
From EDgearWiki
Jump to navigationJump to search| Line 33: | Line 33: | ||
[[File:SponorAction.PNG]] | [[File:SponorAction.PNG]] | ||
| − | |||
| − | |||
| − | |||
| − | |||
| − | |||
| − | |||
| − | |||
| − | |||
'''To Print this Report''' | '''To Print this Report''' | ||
| − | #Click | + | #Click on'''Print''' in Action |
| − | #A | + | #A print preview window will appear. |
| − | |||
| − | |||
#'''To get the print icon''' on this window, hover the mouse in the bottom right area of the preview. A grey rectangle will appear with several icons. | #'''To get the print icon''' on this window, hover the mouse in the bottom right area of the preview. A grey rectangle will appear with several icons. | ||
#Click the print icon at the right end of this rectangle. Another print preview will appear. | #Click the print icon at the right end of this rectangle. Another print preview will appear. | ||
| Line 52: | Line 42: | ||
| − | + | ||
| + | '''Tabs at the Bottom''' | ||
| + | |||
| + | [[File:Tabs.PNG]] | ||
Revision as of 05:09, 27 June 2014
UNDER CONSTRUCTION!!!
- On the left, click on System
- Under Entry, select Sponsor Site Editor
- If you need instructions for setup values to be used, follow the link for Standard Setup Options.
- Click the Ok button.
For the top portion of the page, add the demographic information.
Year -
District -
School Name -
School -
Established -
Closed -
Principal
- Title -
- First -
- Last -
- Email -
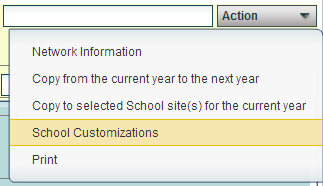
Action
To Print this Report
- Click onPrint in Action
- A print preview window will appear.
- To get the print icon on this window, hover the mouse in the bottom right area of the preview. A grey rectangle will appear with several icons.
- Click the print icon at the right end of this rectangle. Another print preview will appear.
- Click the print button at the top left to print the report. Close the print preview.
Tabs at the Bottom

