Difference between revisions of "Print Student Request Forms"
From EDgearWiki
Jump to navigationJump to search| Line 9: | Line 9: | ||
| − | Choose a student(s) by placing a check in the box to the left of the student's name. You can also use the "Select All" box to the right of the Name column. Click on "Print" at the bottom of the page and you will see the box below '''↓''' | + | Choose a student(s) by placing a check in the box to the left of the student's name. You can also use the "Select All" box to the right of the Name column. Click on "Print" at the bottom of the page and you will see the box below. '''↓''' |
| Line 23: | Line 23: | ||
| − | '''For year and Credit Options:''' | + | |
| + | == '''For year and Credit Options:''' == | ||
Revision as of 03:44, 13 June 2014
This program will allow the user to quickly print all student`s request forms.
- On the left, click on Scheduling.
- Under "Lists", select "Print Student Request Forms"
- If you need instructions for setup values to be used, follow the link for Standard Setup Options.
- The next item is not found on the standard setup options document.
- Print Comments - Check this box if you want to add comments to the request forms. Then click on "Enter Comments" to type in your comments.
- Click OK to move to the next screen.
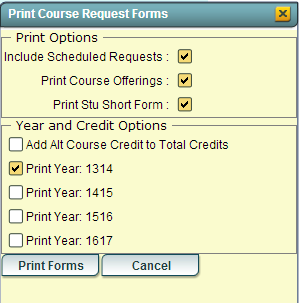
Choose a student(s) by placing a check in the box to the left of the student's name. You can also use the "Select All" box to the right of the Name column. Click on "Print" at the bottom of the page and you will see the box below. ↓
For Print Options:
Check the first box if you want to see scheduled requests as well as unscheduled requests.
Check the second box to print all course offerings at the end of each student's request forms.
Check the third box if you want to print the student's short form with every request form.
