Difference between revisions of "Scan Error Report"
From EDgearWiki
Jump to navigationJump to search| Line 6: | Line 6: | ||
==Menu Location== | ==Menu Location== | ||
| − | [[scanentrymenu.png]] | + | [[File:scanentrymenu.png]] |
| Line 13: | Line 13: | ||
Go to '''Action''', '''Staff''', and click on '''Scan Error Report'''. | Go to '''Action''', '''Staff''', and click on '''Scan Error Report'''. | ||
| − | [[scanerror.png]] | + | [[File:scanerror.png]] |
==Setup Options== | ==Setup Options== | ||
Revision as of 09:01, 26 June 2018
This report will provide a user with a list of staff members who have scanned into a location, but have not scanned out. The staff member will have an odd number of scans. You will be able to add the scan out information via this report.
How To:
Menu Location
On the left navigation panel, select Attendance > Entry > Location Scanning.
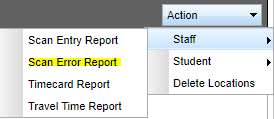
Go to Action, Staff, and click on Scan Error Report.
Setup Options
To find definitions for standard setup values, follow this link: Standard Setup Options.
- Click OK
- A list of employees will be displayed that have NOT scanned out.
- The entries in this list can be edited with a scan out time which will remove them from this report.
- To remove an entry, click in the ADD field.
- An Add New Scan popup will appear.
- Click in the Location field and make a selection from the list of available locations.
- The popup will display the current time. This will be the time of the scan out that will be inserted into this person's record.
- To edit the time out, click in the time field on the popup and enter the time at which the employee scanned out.
- When you click OK this record is no longer an error and will be automatically removed from this error report.
- You are finished when all of the records have been removed from this report.
