Difference between revisions of "Fees Auto Loader"
| Line 1: | Line 1: | ||
| + | __NOTOC__ | ||
'''This program allows you to add, delete or create a fee to a group of students at a time'''. | '''This program allows you to add, delete or create a fee to a group of students at a time'''. | ||
| + | ==Menu Location== | ||
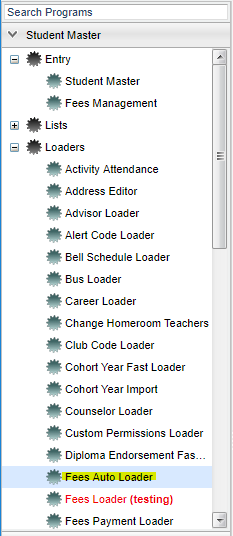
| − | + | [[File:nanfeesmenu.png]] | |
| − | ''' | + | On the left navigation panel, select '''Student Master''' > '''Loaders''' > '''Fees Auto Loader '''. |
| + | |||
| + | |||
| + | ==Setup Options== | ||
To find definitions for standard setup values, follow this link: '''<span style="background:yellow">[[Standard Setup Options]]</span>'''. | To find definitions for standard setup values, follow this link: '''<span style="background:yellow">[[Standard Setup Options]]</span>'''. | ||
Revision as of 05:08, 16 March 2018
This program allows you to add, delete or create a fee to a group of students at a time.
Menu Location
On the left navigation panel, select Student Master > Loaders > Fees Auto Loader .
Setup Options
To find definitions for standard setup values, follow this link: Standard Setup Options.
NOTE--To load a fee to a small group of students, click the Student field on the Setup box. Select the student(s) using the check box found to the left of the student names. This box will provide you with Student ID, Student Name and the Student's Grade.
Click Next.
On the next page you will have the option to add a fee, delete a fee or create fees from the Master Schedule.
Add a Fee
Only one fee can be added at a time.
- Fee Name - The name of the fee. The fee is chosen from a drop down box.
- Fee Amount - The amount of the fee.
- Received Date - Accounts receivable date.
- Pay Plan - Payment plan for the fee. Choose from the drop down box if you choose a payment plan.
- Due Date - The date the fee is due.
- Comment - Comment about the fee.
- Back - If you need to go back and change something on the previous setup page.
Click OK and you will get a question box stating that you are about to add a fee to a number of students. Do you wish to continue? You will need to respond yes or no.
Delete a Fee for a single student
- Fee Name - Choose a fee name from the pick box that you want to delete.
- Received Date - Choose your received date.
To delete a few for a large group of students
- Return to the setup box and complete the information.
- Click Next.
- On the next page select delete.
- Click OK.
- Click in the Fee field and select the fee to be deleted from the pick list.
- Enter the date recieved for the fee being deleted.
- Click OK.
- The names of the students that owe this fee will be displayed on the next screen.
- Select all students from the list, unselect all students then select the few that need to have this fee deleted.
- Click the delete button at the bottom right of the screen.
- You will be given a confirmation stating the number of records that will be deleted.
- Click Yes if this is accurate; otherwise, return to the setup box and start the delete process over.
Create a Fee from the Master Schedule
This process will create a new class fee for every student that is in a Master Schedule section that has a fee attached to that section. Fees will need to have previously been posted in the Fee column in the Master Schedule.
- Fee Name - This will only work for class fees and you can't change to another kind of fee.
- Received Date - Choose your received date.
- Due Date - Choose your due date.
This will also save the year, course name and section number in the fee comment.
Click OK.
Based on the setup pages, a list of students with the fee and the amount chosen will be generated.
Print Options
To find the print instructions, follow this link: Standard Print Options.


