Difference between revisions of "Program Update Loader"
(→How-to) |
(→How-to) |
||
| Line 29: | Line 29: | ||
| − | Double click on the '''POOID''', '''PO1ID, ...''' | + | Double click on the '''POOID''', '''PO1ID, ...''' in the column fields in the Program Update Loader to type a Program ID. |
Revision as of 09:48, 6 April 2017
The Program Update Loader allows the user to quickly assign, edit, or remove program codes to groups of students at one time.
Video How-to
How-to
In the left navigation panel of WebPams, click on Student Master, Loaders, then Program Update Loader.
Setup Box Options
To find definitions for standard setup values, follow this link: Standard Setup Options.
For other set up values not listed in the standard set up list:
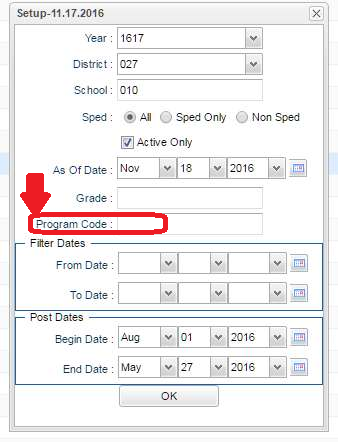
- Filter Dates: Only needed if the user wishes to limit students who have program begin/end dates within a specified date range. If not needed, leave blank.
- Post Dates: Can be left blank if the user is loading program codes only. However, if the user wishes to load begin and end dates to the programs assigned to students, enter the begin date and end date here.
- Note: Not all program codes need an end date. End dates can be blank. Check with your data coordinator for correct use of the end date with programs in your school/district.
Click OK to begin the loader.
On the left will be a listing of students. Currently associated programs will display in the columns in the middle. On the right will be a listing of Program codes to select from.
A student can have up to 14 programs associated with the student. The user can scroll to the right on the screen to see that there are 14 sets of columns that follow the pattern below:
- "PO0", "POOID", "Beg Date0", "End Date0" (This represents row 1 of a student's program screen)
- "PO1", "PO1ID", "Beg Date1", "End Date1" (This represents row 2 of a student's program screen)
- "PO2", "PO2ID", Beg Date2", "End Date2" (This represents row 3 of a student's program screen)
- "PO3", "PO3ID", "Beg Date3", "End Date3" (This represents row 4 of a student's program screen)
- Pattern continues to...
- "PO13", "PO13ID", "Beg Date13", "End Date13" (This represents row 14 of a student's program screen)
Double click on the POOID, PO1ID, ... in the column fields in the Program Update Loader to type a Program ID.
To load a program code to a selected group of students (and begin / end dates if entered in setup box), select a set of columns that do not have data to be overwritten, such as columns PO5 or so.
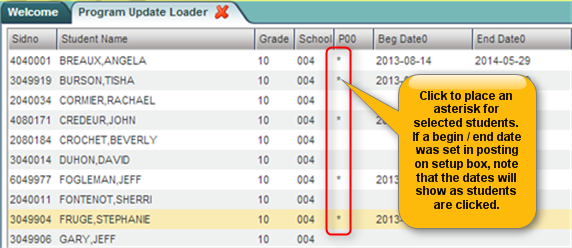
Click in cell in the "POx" column for the students who are to have this program code. There will be an asterisk (*) in the program cell of each student selected.
- Note below that the "Begin" and "End" dates are displayed as well. This is because the setup box had "Post" dates in the Begin and End fields.

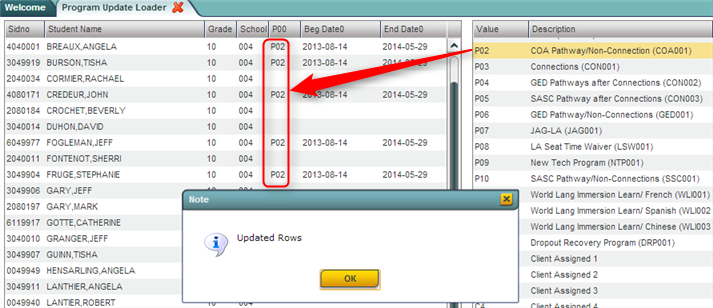
After marking desired students with an asterisk (cell click), on the right, locate the desired Program code to assign to the students. Click on the code.
A confirmation message will be displayed and the asterisks will change to the Program Code abbreviation as shown below.
Need a Report of Students with a Specific Program Code or Codes?
- At the setup box, click in the Program Codes field and select the desired Program code(s) to report against.

- TIP: If desired, enter From Date and To Date to further limit the report to students with a specific Program code that have Begin/End dates within the "From" and "To" date range.
Print Options
To find the print instructions, follow this link: Standard Print Options.
