Difference between revisions of "Oregon Export (Dibels)"
| (22 intermediate revisions by the same user not shown) | |||
| Line 1: | Line 1: | ||
__NOTOC__ | __NOTOC__ | ||
| − | + | '''This program will create two different versions of a file that the user can then upload to the University of Oregon for DIBELS. This program can also be used to create rosters to export to Amplify rather than hand entering rosters.''' | |
| − | |||
| − | |||
| − | |||
| − | '''This program will create the | ||
==Menu Location== | ==Menu Location== | ||
| − | + | '''Student > Interfaces > Oregon Export (Dibels)''' | |
| − | |||
| − | |||
| − | ''' | ||
==Setup== | ==Setup== | ||
| − | [[File: | + | [[File:dibelssetupnan.png]] |
| − | '''Year''' | + | '''Year''' - Defaults to the current year. A prior year may be accessed by clicking in the field and making the appropriate selection from the drop down list. |
| − | '''District''' - Default value is based on | + | '''District''' - Default value is based on the user’s security settings. The user will be limited to their district only. |
| − | '''School''' - Default value is based on | + | '''School''' - Default value is based on the user's security settings. If the user is assigned to a school, the school default value will be their school site code. |
| − | + | '''Grade''' - Click in the box to select grade(s). | |
| − | + | ||
| − | + | '''Version''' - Select a version. | |
| − | + | *Select Version 1 to use the original version containing four tabs of information for exporting, with each displaying different format choices. | |
| − | ''' | + | *Select Version 2 to use a newer version containing two tabs of information for exporting, one basic Student information and another tab for Class information. |
| − | |||
| − | |||
'''Export State ID Type''' - Check this box to export the student's state ID on the Alt ID tab. Leave the box unchecked to export the student's sidno on the alt id tab. | '''Export State ID Type''' - Check this box to export the student's state ID on the Alt ID tab. Leave the box unchecked to export the student's sidno on the alt id tab. | ||
'''As of Date''' - This choice will list only those students who are actively enrolled as of the date selected in the date field. | '''As of Date''' - This choice will list only those students who are actively enrolled as of the date selected in the date field. | ||
| − | |||
The pink area of the setup box gives instruction regarding which student identification will be sent - the local ID or the SSN. Instructions below will provide a more through explanation of | The pink area of the setup box gives instruction regarding which student identification will be sent - the local ID or the SSN. Instructions below will provide a more through explanation of | ||
this feature. | this feature. | ||
| − | |||
'''Course''' - Name(s)/Codes(s) of the course(s) in which the student is enrolled or as listed in the Master Schedule or Course Catalog | '''Course''' - Name(s)/Codes(s) of the course(s) in which the student is enrolled or as listed in the Master Schedule or Course Catalog | ||
| Line 44: | Line 33: | ||
'''OK''' - Click to continue | '''OK''' - Click to continue | ||
| − | + | To find definitions for standard setup values, follow this link: [[Standard Setup Options]]. | |
| − | To find definitions for standard setup values, follow this link: | ||
==Main== | ==Main== | ||
| Line 51: | Line 39: | ||
[[File:oregonmain.png]] | [[File:oregonmain.png]] | ||
| − | ===Column Headers=== | + | ===Column Headers from Dibels Tab and from Dibels Alt ID Tab=== |
'''Note:''' Column Headers for Dibels and Dibels Alt ID tabs are the same. | '''Note:''' Column Headers for Dibels and Dibels Alt ID tabs are the same. | ||
| Line 101: | Line 89: | ||
'''Full Achievement Level (Core, Strategic, ''' - Intentionally left blank | '''Full Achievement Level (Core, Strategic, ''' - Intentionally left blank | ||
| − | |||
| − | |||
| − | |||
| Line 144: | Line 129: | ||
| − | '''Dibels''' | + | '''Dibels''' - This is the original format of the file to be exported. The local ID will be included in the file. |
| − | '''Dibels Alt ID''' | + | '''Dibels Alt ID''' - This will also provide the original format of the file to be exported. The difference is that the SASID will be used instead of the local ID. |
| − | '''Dibels Next''' | + | '''Dibels Next''' - Requires additional security in User Management in order to see this tab. This is the new version of the file format. |
| − | + | '''[[Standard Print Options | Print]]''' - This will allow the user to print the report. | |
==Bottom== | ==Bottom== | ||
| Line 157: | Line 142: | ||
[[File:oregonbottom.png]] | [[File:oregonbottom.png]] | ||
| + | '''Setup''' - Click to go back to the Setup box. | ||
| − | ''' | + | '''Help''' - Click to view written instructions and/or videos. |
| − | |||
Latest revision as of 14:24, 5 June 2024
This program will create two different versions of a file that the user can then upload to the University of Oregon for DIBELS. This program can also be used to create rosters to export to Amplify rather than hand entering rosters.
Menu Location
Student > Interfaces > Oregon Export (Dibels)
Setup
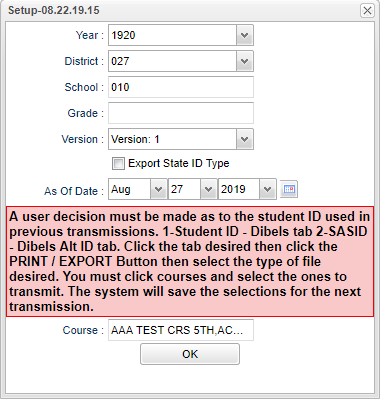
Year - Defaults to the current year. A prior year may be accessed by clicking in the field and making the appropriate selection from the drop down list.
District - Default value is based on the user’s security settings. The user will be limited to their district only.
School - Default value is based on the user's security settings. If the user is assigned to a school, the school default value will be their school site code.
Grade - Click in the box to select grade(s).
Version - Select a version.
- Select Version 1 to use the original version containing four tabs of information for exporting, with each displaying different format choices.
- Select Version 2 to use a newer version containing two tabs of information for exporting, one basic Student information and another tab for Class information.
Export State ID Type - Check this box to export the student's state ID on the Alt ID tab. Leave the box unchecked to export the student's sidno on the alt id tab.
As of Date - This choice will list only those students who are actively enrolled as of the date selected in the date field.
The pink area of the setup box gives instruction regarding which student identification will be sent - the local ID or the SSN. Instructions below will provide a more through explanation of this feature.
Course - Name(s)/Codes(s) of the course(s) in which the student is enrolled or as listed in the Master Schedule or Course Catalog
OK - Click to continue
To find definitions for standard setup values, follow this link: Standard Setup Options.
Main
Column Headers from Dibels Tab and from Dibels Alt ID Tab
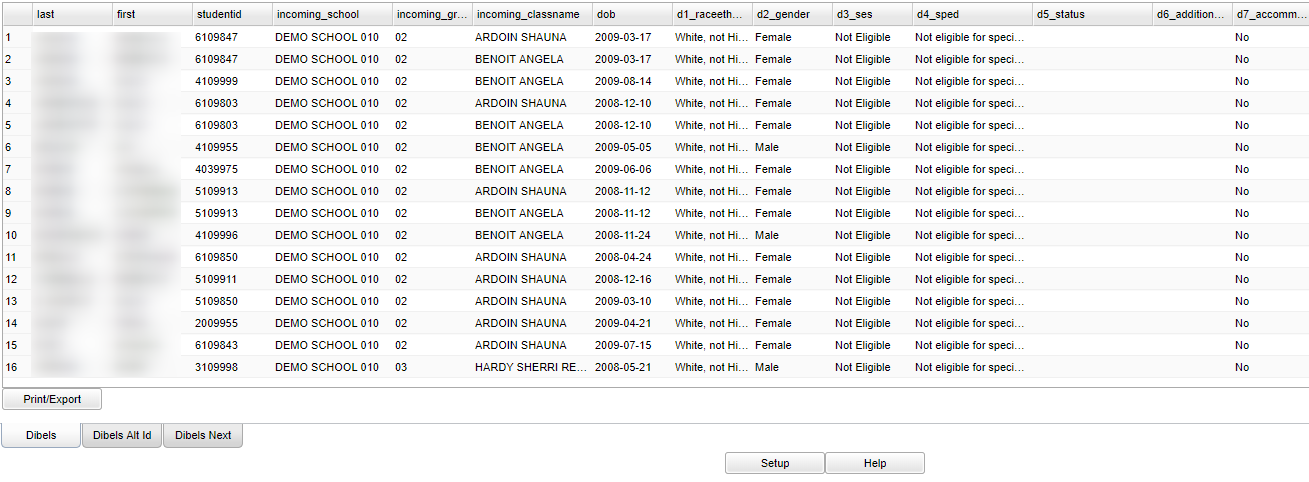
Note: Column Headers for Dibels and Dibels Alt ID tabs are the same.
last - Student's last name.
first - Student's first name.
studentid - On the Dibels tab this is the local identification number.
studentid - On the Dibels Alt ID tab this is the student's social security number.
incoming_school - Student's school of enrollment
incoming_grade - Student's grade of enrollment
incoming_classname - Course teacher's name
dob - Student's date of birth
d1_raceethnicity - Student's race/ethnicity
d2_gender - Student's gender
d3_ses - Student's lunch eligibility
d4_sped - Student's SPED eligibility
d5_status - Intentionally left blank
d6_additionalcodes - Intentionally left blank
d7_accommodations - Student's accommodations
Column Headers for the Dibels Next Tab
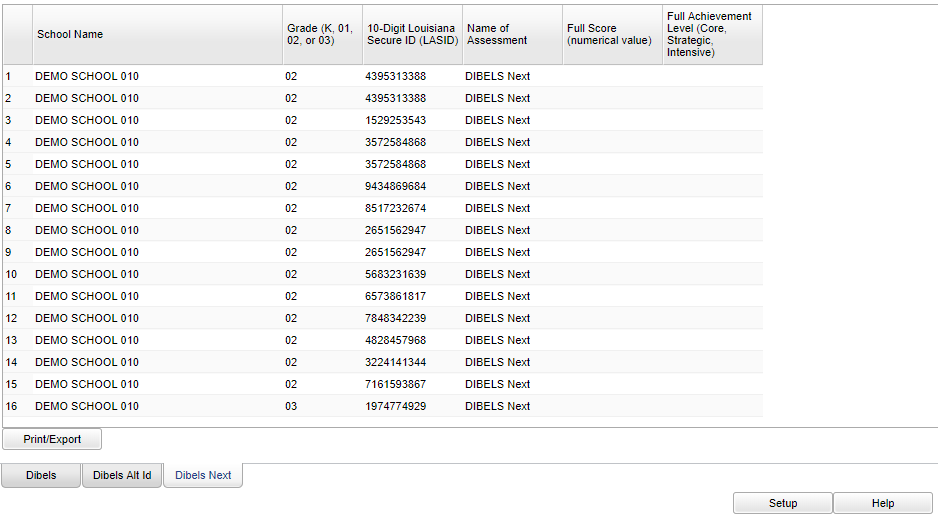
School Name - Student's school of enrollment
Grade (K, 01, 02, 03) - Student's grade of enrollment
10-digit Louisiana Secure ID (LASID) - Student's state identification number that is assigned through eScholar
Name of Assessment - Name of the assessment tool being reported
Full Score (Numerical value) - Intentionally left blank
Full Achievement Level (Core, Strategic, - Intentionally left blank
Process of Creating the Export File
After completing the setup box continue with the following steps.
Decide whether or not the students' local ID numbers or the La Secure IDs are to be sent. The next step will be based on that decision.
If you ARE NOT sending La Secure IDs the active tab should be the Dibels tab.
Click the Print/Export button at the bottom left.
Select the CSV print option. The name of the file will be created for you. The name format will be Dibels_YYYY-MM-DD.
Click Print. The file will be automatically saved in the Downloads folder usually found in My Documents folder.
If you ARE sending the La Secure IDs the active tab should be the Dibels Alt Id tab.
Click the Print/Export button at the bottom left.
Select the CSV print option. The name of the file will be created for you. The name format will be Dibels_Alt_Id_YYYY-MM-DD.
Click Print. The file will be automatically saved in the Downloads folder usually found in My Documents folder.
Continue the export process using your instructions from the University of Oregon.
If you are using the new Dibels format, click the Dibels Next tab.
Click the Print/Export button at the bottom left.
Select the CSV print option. The name of the file will be created for you. The name format will be Dibels_YYYY-MM-DD.
Click Print. The file will be automatically saved in the Downloads folder usually found in My Documents folder.
Left Bottom
Dibels - This is the original format of the file to be exported. The local ID will be included in the file.
Dibels Alt ID - This will also provide the original format of the file to be exported. The difference is that the SASID will be used instead of the local ID.
Dibels Next - Requires additional security in User Management in order to see this tab. This is the new version of the file format.
Print - This will allow the user to print the report.
Bottom
Setup - Click to go back to the Setup box.
Help - Click to view written instructions and/or videos.


