Difference between revisions of "Post Excuse"
From EDgearWiki
Jump to navigationJump to search| (58 intermediate revisions by the same user not shown) | |||
| Line 3: | Line 3: | ||
[[media:AT-PostExcuse.mov|Post Absence Excuse video]] | [[media:AT-PostExcuse.mov|Post Absence Excuse video]] | ||
| + | ===How add a Doctor Excuse To a Student's Absence(s)=== | ||
| − | + | #To mark a student's attendance record with a doctor excuse, go to '''Post Attendance''' and find the student. | |
| − | + | #Next, click in the column with column header of '''Dr''', on the same row as the student's name. | |
| − | + | #A popup box will appear with a list of the student's absences. | |
| − | + | #[[File:mb271.png]] | |
| − | ''' | + | #'''Single Absence''' - To post a doctor excuse for a single absence for a student, locate the absence to be excused. |
| − | + | #Next, click in the '''DrCd''' field, a popup box will appear to select the reason the student is excused. | |
| − | + | #If a medical reason is selected (*), an additional popup box will appear with a list of medical reasons. | |
| − | + | #[[File:mb280.png]] | |
| − | + | #Next, find the medical reason for the student. | |
| − | + | #Then, next to each description, clarify if the reason is: MI - Mild, MO - Moderate, and SE - Severe, by checking in the correct box. | |
| − | + | #If the wrong reason was selected, simply select the '''DrCd''' box again to make the change. | |
| − | + | #Once the correct selection has been made, the doctor's code and note will automatically fill in the rest of the corresponding fields. | |
| − | + | #If the excuse was placed on the wrong absence, a red cell is located to the right. Click on the red cell to delete the excuse. | |
| − | + | #After clicking the red delete cell, a deletion verification box will appear. Click '''Yes''' if you are sure you would like to delete the excuse for the displayed date. Click '''No''' to cancel. | |
| − | + | #'''Multiple Absences per Student (not Multiple Students)''' - To post a doctor excuse for multiple absences, locate the absences to be excused. | |
| − | + | #Next, <u>check all check boxes in the Sel (Select) column of the corresponding dates to excused</u>. Then follow the above instructions. | |
| − | ''' | ||
| − | |||
| − | |||
| − | [[File: | ||
| − | |||
| − | |||
| − | [[File: | ||
| − | |||
| − | |||
| − | |||
| − | |||
| − | |||
| − | |||
| − | |||
| − | |||
| − | |||
| − | |||
| − | |||
| − | |||
| − | |||
| − | |||
| − | |||
| − | |||
| − | |||
| − | |||
| − | |||
| − | |||
| − | |||
| − | |||
| − | |||
| − | ''' | ||
| − | |||
| − | ''' | ||
| − | |||
| − | ''' | ||
| − | |||
| − | |||
| − | |||
| − | |||
| − | |||
| − | |||
| − | |||
| − | |||
| − | ''' | + | '''Print''' |
| − | + | Click "Print" and it will display a "Print Servlet" of the doctor excused "Absentee Authorization Form" for current date only. Click "Print" to print out the form. | |
| + | NOTE: The check boxes in the column "Sel" (Select) are not there for printing purposes as they are for posting of multiple doctor excuses. | ||
| − | |||
| − | ''' | + | ---- |
| + | [[Post Attendance|'''Post Attendance''' Main Page]] | ||
| − | ''' | + | ---- |
| + | [[Attendance|'''Attendance''' Main Page]] | ||
| − | + | ---- | |
| − | + | [[WebPams|'''JCampus''' Main Page]] | |
| − | |||
| − | |||
| − | |||
| − | |||
| − | [[ | ||
| − | |||
| − | |||
| − | |||
| − | |||
| − | |||
| − | |||
| − | |||
| − | |||
| − | |||
| − | |||
| − | |||
| − | |||
| − | |||
| − | |||
| − | |||
| − | |||
| − | |||
| − | |||
| − | |||
| − | |||
| − | |||
| − | |||
| − | |||
| − | |||
| − | |||
| − | |||
| − | |||
| − | |||
| − | |||
| − | |||
| − | |||
| − | |||
| − | |||
| − | |||
| − | |||
| − | |||
| − | |||
| − | |||
Latest revision as of 16:38, 30 November 2022
Video How-to
How add a Doctor Excuse To a Student's Absence(s)
- To mark a student's attendance record with a doctor excuse, go to Post Attendance and find the student.
- Next, click in the column with column header of Dr, on the same row as the student's name.
- A popup box will appear with a list of the student's absences.
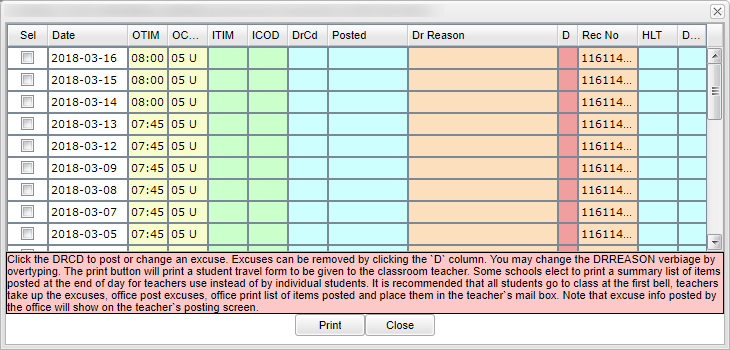
- Single Absence - To post a doctor excuse for a single absence for a student, locate the absence to be excused.
- Next, click in the DrCd field, a popup box will appear to select the reason the student is excused.
- If a medical reason is selected (*), an additional popup box will appear with a list of medical reasons.
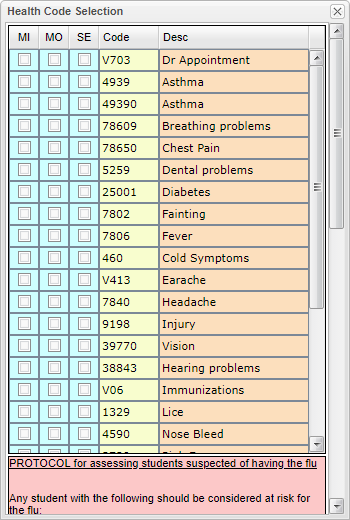
- Next, find the medical reason for the student.
- Then, next to each description, clarify if the reason is: MI - Mild, MO - Moderate, and SE - Severe, by checking in the correct box.
- If the wrong reason was selected, simply select the DrCd box again to make the change.
- Once the correct selection has been made, the doctor's code and note will automatically fill in the rest of the corresponding fields.
- If the excuse was placed on the wrong absence, a red cell is located to the right. Click on the red cell to delete the excuse.
- After clicking the red delete cell, a deletion verification box will appear. Click Yes if you are sure you would like to delete the excuse for the displayed date. Click No to cancel.
- Multiple Absences per Student (not Multiple Students) - To post a doctor excuse for multiple absences, locate the absences to be excused.
- Next, check all check boxes in the Sel (Select) column of the corresponding dates to excused. Then follow the above instructions.


Click "Print" and it will display a "Print Servlet" of the doctor excused "Absentee Authorization Form" for current date only. Click "Print" to print out the form. NOTE: The check boxes in the column "Sel" (Select) are not there for printing purposes as they are for posting of multiple doctor excuses.