Difference between revisions of "Calendar Editor"
| Line 67: | Line 67: | ||
Using the blank top row, add your information. | Using the blank top row, add your information. | ||
| + | |||
| + | Holidays/Not Attended: | ||
'''Delete''' - Will delete that row only. | '''Delete''' - Will delete that row only. | ||
Revision as of 10:11, 9 February 2022
This program will provide the user with a way to add or update school calendar information.
- A school can have more than one calendar, if needed, as long as the calendar code number is different.
- The calendar code is important not only because it uniquely identifies the calendar set but also because it links individual students to a specific calendar which is then used for calculating grades and minutes of instructions.
Menu Location
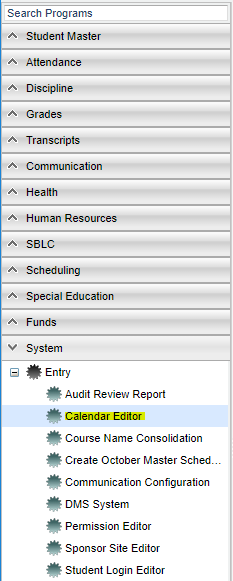
On the left navigation panel, select System > Entry > Calendar Editor.
Setup Options
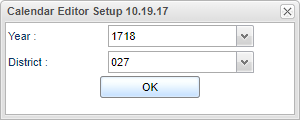
Year - Defaults to the current year. A prior year may be accessed by clicking in the field and making the appropriate selection from the drop down list.
District - Default value is based on the user’s security settings. The user will be limited to their district only.
OK - Click to continue.
To find definitions for standard setup values, follow this link: Standard Setup Options.
Main
The calendar code is important not only because it uniquely identifies the calendar set but also because it links individual students to a specific calendar which is then used for calculating grades and minutes of instructions.
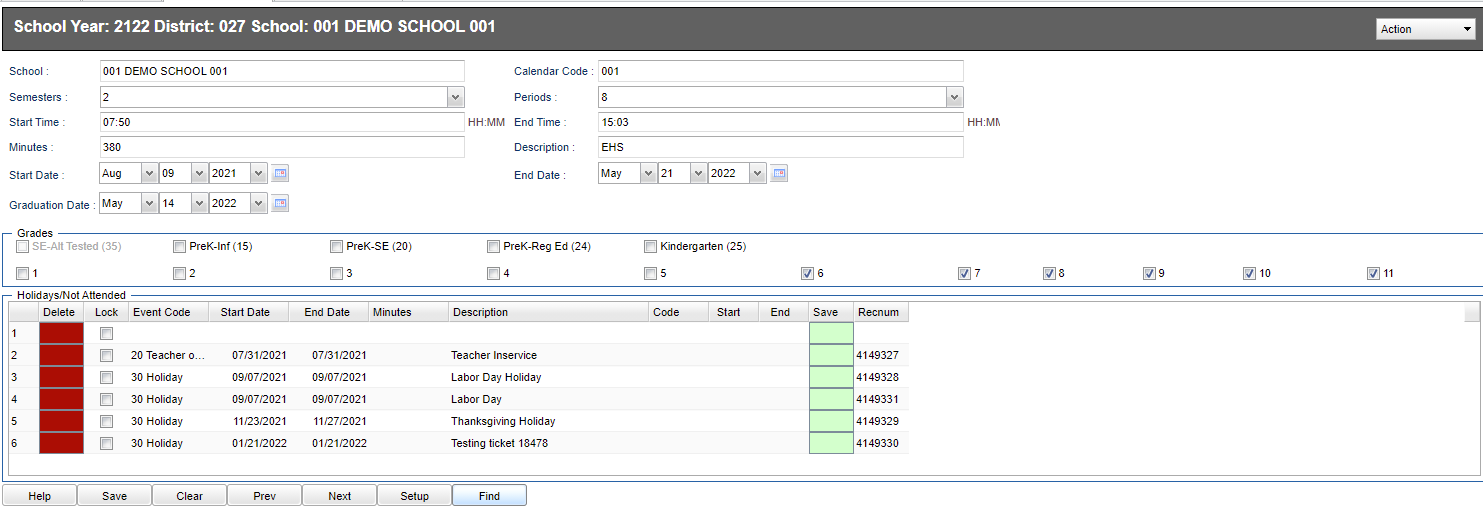
Adding Information to the Record Type 10
Type 10 is the heading information ONLY at the top of the screen. Every calendar must have one (and only one) calendar record type 10.
School - School site number
Calendar Code - State reporting code for description, a unique number between 001 and 999.
- A school can have more than one calendar, if needed for different grade levels, as long as the calendar code number is different. But a school can only have one calendar per grade level(s) per school.
- The calendar only affects what days students are in school, not what happens during the hours. Calendar start and end times are not reported to the State. The state uses the set number of minutes for a day on the calendar record.
Semesters - Choose how many semesters
Periods - Choose the number of periods in a school day.
Start Time - Enter the military time the day starts.
End Time - Enter the military time the day ends.
Minutes – This is the number of instructional minutes per day for the entire year.
- The SIS coordinator should have a worksheet to assist in finding the correct number of minutes.
- The minutes field on the Calendar does affect attendance calculations.
- It does not include minutes used for time between classes, recess, lunch, or homeroom.
- If you have bad weather days, do not make changes to these minutes as it would reflect all year. Only add minutes in the for make up days in the lower portion of the calendar. The state does not look at the start and end time but minutes only.
Description – Add a description name. Ex: Basic Calendar, Basic Calendar grades K-3, etc.
Start Date – Event start time (HH:MM). Only for type 40 and 60 records.
End Date – Event end time (HH:MM). Only for type 40 and 60 records.
Graduation Date - This is the actual date the graduation is held and students walk across the stage.
- If you are editing an elementary school calendar, use last day of school.
Grades – Indicate grade levels
- Grades 35 (and 40) are no longer valid grade levels. They are only available for selection in the Sponsor Site Editor for historical data purposes, but are grayed out in Calendar Editor.
Adding Dates to Record Type 20-60
Using the blank top row, add your information.
Holidays/Not Attended:
Delete - Will delete that row only.
Lock - Check to prevent the event record from being overwritten by a multi delete or copy feature. Use this feature if there is a unique event for this site. (Be sure to Save after checking)
Event Code - Make your choice from below. Choose the Event code for the day(s) students are not in school. But for the minutes column, add the minutes that they are in school.
20 - Teacher Only
30 - Holiday
40 - Early Dismissal
50 - Emergency Whole Days
60 - Make-up days
Start Date Enter the start date of the event
End Date - Enter the end date of the event
Minutes - Minutes apply only to Calendar Event codes 40 & 60 where parts of days are involved. Enter the instructional minutes that students are in school.
- Enter the minutes of instruction only if it is less than the minutes on the Basic Calendar or leave blank if Minutes of instruction are equal to the minutes reported in the Basic Calendar.
- You can add minutes to make up for snow days for every week from now to end of school. Enter your extra minutes for 'minutes per day'.
Description - Enter a description of the event.
Code - State reporting code for description.
Start – Event start time (HH:MM). Only for type 40 and 60 records.
End – Event end time (HH:MM). Only for type 40 and 60 records.
Save - Will save that row only
RecNum - Is the record number
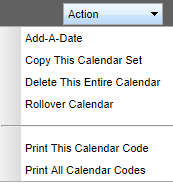
Using the Action Button
Add a Date - allows you to add dates to multiple schools as opposed to just one when you are using the top blank row line method.
Copy This Calendar Set - This copies the calendar to schools by choosing the school(s) and the record type(s). Most likely, you would choose all schools and all of the record types, except type 10, as this information may differ from school to school.
Delete This Entire Calendar - deletes the calendar
Rollover Calendar - rolls this year's calendar to next school year. Type 10 records can be copied without copying Type 20-60 records.
Print This Calendar Code - prints one calendar
Print All Calendar Codes - prints all of the calendars
Bottom
HELP - Click to view written instructions and/or videos.
Save - Click to save your information.
Clear - Click to clear unwanted information.
Prev - Click for previous screen.
Next - Click for next screen.
Setup - Click to go back to the setup box.
Find - Click to find other calendars.
Resources
Creating the Calendar in SIS Module: Guide for creating Calendar information and files in the JPams version of the software.


