Difference between revisions of "Report Card"
| Line 81: | Line 81: | ||
# '''Display GPA Line:''' Click to display GPA information on the report card. | # '''Display GPA Line:''' Click to display GPA information on the report card. | ||
# '''Display Current Year Cumm GPA:''' Click to show the current year cumulative GPA. After selecting, click the drop down arrow to the right to choose the desired type of cumulative GPA display. Choices are described below: | # '''Display Current Year Cumm GPA:''' Click to show the current year cumulative GPA. After selecting, click the drop down arrow to the right to choose the desired type of cumulative GPA display. Choices are described below: | ||
| − | #* '''Grading Periods:''' | + | #* '''Grading Periods:''' The average is calculated from each grade in all marking periods. |
| − | #* '''Semesters:''' Semester | + | #* '''Semesters:''' The average is calculated from each grade in the Semester columns. |
| − | #* '''Finals:''' Final | + | #* '''Finals:''' The average is calculated from each grade in the Final column. |
#*[[File:Report_Card_Setup_GPA_options.png]] | #*[[File:Report_Card_Setup_GPA_options.png]] | ||
Revision as of 07:40, 28 October 2013
The Report Card generator can generate two types of grade reports:
- Traditional Report Card
- Progress Report with grades only, no detailed assignments
Video How-to
How-to
Getting There:
On the left navigation pane of WebPams, click on the Grades button, then Lists, then Report Cards.
A screen with setup box options will be displayed. Explanations of the setup box options are explained below.
Setup Directions: Student Selection
This is the left side of setup screen. This section deals with student selection criteria.
- Year and Grade: Set to desired Year, then set Grade level(s) of students in the report.
- Special Codes through Team: Set to further limit students in the report.
- As of Date: Date to determined enrolled students. Typically set for end of grading period if doing report cards.
- Display Date: Date displayed on report card. Typically set for official date of report cards going home.
- Sped: For Special Education students, set to desired selection.
- 504: For 504 students, set to desired selection.
- LEP: For Limited English Proficient students, set to desired selection.
- Hold Card: For students with a special code of "HRC Hold Report Card" in Student Master, set to desired selection.
- Order by: Set to desired order of printing. Most locations commonly choose “Homeroom”.
- Show Remote Scheduled: Click to include students who are enrolled at other sites, but take classes at this school location.
- Students: Click to select specific students in the groupings set above.

Setup Directions: Options
This is the upper right side of setup screen. This section deals with the print details of the report.
- Type to Print: Select Report Card, Final Report Card, or Progress Report.
- Note: Selecting Final Report Card will add any Student Master SBLC code to the report, as well as a "Promoted" or "Retained" indicator on the report card.
- Order Courses By: Select either Class Period order or Course Name order.
- HS Grading Period / Elem Grading Period: Set to the grading period the report is being generated for.
- Show School Name: Select to show school name on report
- Show Grading Scale: Select to show grading scale on the report.
- Show Address Line: Select to show student address line
- Show Comments: Select to show Comments posted by teachers from Gradebook
- Show Homeroom Teacher: Select to show Homeroom teacher on report.
- Show Counselor: Select to show Counselor associated with student in Student Master.
- Show Advisor: Select to show Advisor associated with student in Student Master.
- Show Team: Select to show Team associated with student in Scheduling system.
- Show EOC Scores: Select to show EOC scores student earned this year. Note: Scores need to be imported into system by JPams District Coordinator first.
- Highlight Course Line: Simply puts a shaded green row on alternating rows to help readability.
- Show Class Period: Select to show class period of course.
- Show Active Courses Only: Select to show only grades from currently scheduled classes. Dropped classes are filtered out.
- Show F (non-numeric) on policy failure: With this option selected, the report card would not display the numeric value (e.g. 75C* or 75C#), but would display the alpha character of F (e.g. F* or F#).
- Top Margin Spacing: If a blank header space is desired to make room for a letterhead on stock paper, click and select the number of rows to move the report card information down on the page.
- SBLC Description: For Final Report Cards only – Will show Promoted or Retained information.
- PS Mail Return Address: If using a PS Mail envelope system, select either Central Office or School address to show on folded report card for mail out purposes.
- Show Guardian Signature: Select to place a line for Guardian Signature. In the box on the right, fill in the label for the line such as “Parent / Guardian”.
- Show Principal Signature: Select to place a line for Principal Signature: In the box on the right, fill in the label for the line such as “Principal”, “Acting Principal”, etc….
- Principal’s Message: Click to enter a message that will appear under the grades.
- Bottom Message: Click to enter a message that will appear in the lower portion of the report near the signature lines.

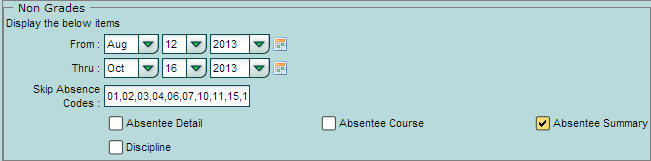
Setup Directions: Non Grades
This is the middle right section of the setup screen. This section deals with attendance and discipline options for the report.
- Display the below items: From / Thru: Set the date range to show attendance or discipline information.
- Skip Absence Codes: Select the desired attendance codes to skip when reporting attendance information.
- Absentee Detail, Absentee Course, Absentee Summary, Discipline: Select desired attendance or discipline option to show on report.
- Absentee Detail: Show attendance by day records for date range.
- Absentee Course: Show counts of absences by course for date range.
- Absentee Summary: Show attendance by day summary counts for date range.
- Discipline: Show discipline records for date range.

Setup Directions: GPA options
This is the lower right section of the setup screen. This section deals with GPA display options for the report.
NOTE: If displaying GPA information, be sure to do a GPA calculation beforehand. Click the Calculate Current Year GPA button to perform this task.
- Display GPA Line: Click to display GPA information on the report card.
- Display Current Year Cumm GPA: Click to show the current year cumulative GPA. After selecting, click the drop down arrow to the right to choose the desired type of cumulative GPA display. Choices are described below:
- Grading Periods: The average is calculated from each grade in all marking periods.
- Semesters: The average is calculated from each grade in the Semester columns.
- Finals: The average is calculated from each grade in the Final column.


Setup Options: Buttons at Bottom
- Print: Click to create the report cards. If a large number of report cards are being created, give it some time. Print preview will be given in a pdf view.
- Mass Calc Sem/Final Grades: Click to get quick access to the program for calculating semester / final averages.
- Warning: Performing this step can overwrite existing semester/final averages. Should only be done by the Grades Coordinator of the school site.
- Calculate Current Year GPA: Click to get quick access to the program for calculating current year grading period averages.
- NOTE: Perform this step if choosing to display GPA averages on report cards.