Welcome tab
In User Management for the Welcome tab, the user needs a school of 700 in combination with a profile of AD, S0, PR and/or SI, to post messages for employees to read.
- Graphs will also display on the Welcome tab. See Enrollment graph information below.
Create a Notification
Paper icon - To create a notification, click on the icon below the Welcome tab that looks like a sheet of paper with a yellow asterisk to create an announcement.
Show All - To see messages for all schools, regardless of the end date, check the box labeled Show All. But if a message has been posted for a future date, it can only be seen/edited by a JCampus programmer. The user must have a profile of AD, SI, SO, or PR to see the "Show All" checkbox.
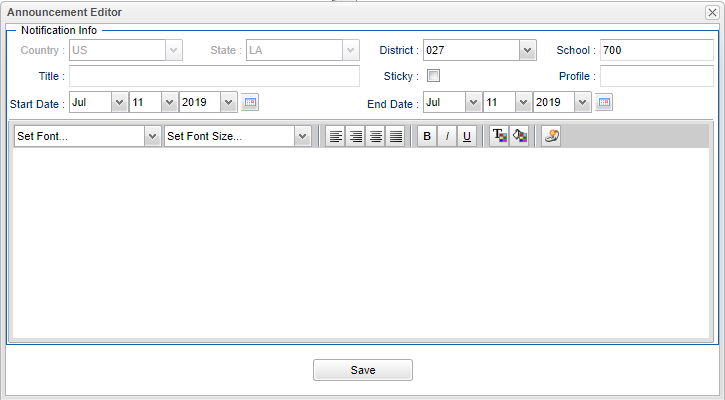
The Announcement Editor will display.
Country, State and District should be pre-set based on security.
School
- If a user is at the school level, School will be pre-set as well.
- For district level users (700), School will be editable. To show the message to all schools, select all schools in the school selection list. Otherwise, select only the desired schools from the pick list. Also, 700 users will only see messages created for school 700.
Title - Type a brief description of the message.
Sticky - Check the box to make sure the most recent message will always be at the top.
Profile - User with an AD, SO, PR or SI security.
Start Date - The date that the message will be visible.
End Date - The date that the Sticky (see above) expires and the message drops back to it's original order of when it was added to announcements. Note that messages never completely disappear from the Welcome page.
Message - Type the message in the blank area.
- Use the set of tools for selecting the font and font size, justify options, to make bold, italic or underlined and to change the font and background color.
Save - Click when the message is complete.
The message will appear immediately on the Welcome tab page.
Click on the paper/pencil icon to edit or change an existing message.
Click on the printer icon to print an existing message.
Click on the trash can icon to delete an existing message.
Edit the Enrollment Graph
- To edit the enrollment graph on the Welcome Tab for current day counts, go to the Dashboard tab.
- NOTE: If the user does not have permission to Dashboard, then contact their district personnel. See below.
- Select the "Welcome Screen" (not tab) from the top center selector area.
- If the Welcome Screen is not already displaying, then click in the top center selector area to see the "User Dashboard(s)" popup box and choose "Welcome Screen".
- Click on the "i" inspector icon to get the "Dashboard Inspector Setup" box.
- At the top, make sure the school "Year" field is the current year in numbers and not the words "Current Year".
- At the bottom, Active Only checkbox should be checked.
- Change the "As Of Date" to be blank.
- Click the "OK" button.
- This will now show the correct enrollment numbers.
- Then return the word "Current Year" to the "Year" field so as time goes by, the enrollment date will stay current.
Permissions to create Dashboards and add Graphs related to enrollment totals, students demographics, attendance, discipline, health and communication
- In User Management, select Dashboard from the Category area. From there, additional permissions are available as well.
- Principals and 700 users will be able to view the tab by default, but will need to have security set to use the program.
- Teachers (TE profile) cannot be given access. They will use this program in their Classroom program with Classroom security. The program is designed so the teacher only sees counts of the students they teach.
- Other non-teacher users will need to be given security access before they can view the tab.

