Transportation Code Loader
This program is a fast loader for student's transportation codes and can also be used as a list after the codes have been loaded to the students.
Menu Location
Student > Loaders > Transportation Code Loader
Setup Options
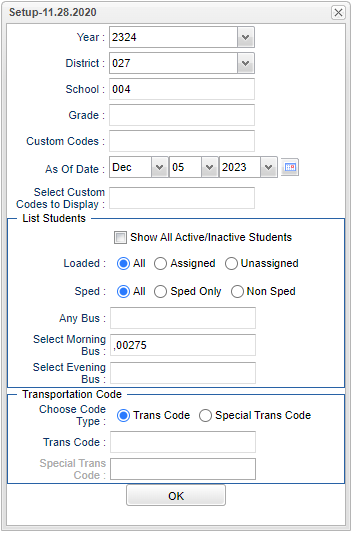
Year - Defaults to the current year. A prior year may be accessed by clicking in the field and making the appropriate selection from the drop down list.
District - Default value is based on the user’s security settings. The user will be limited to their district only.
School - Default value is based on the user's security settings. If the user is assigned to a school, the school default value will be their school site code.
Grade - Leave blank or select all to include all grade levels. Otherwise, choose the desired grade level.
Custom Codes - Select the custom codes created in the Custom Codes Management to filter the student list.
As-of-date - Limits the list to those students who are actively enrolled as of the date selected.
List Students:
Show All Active/Inactive Students - Check the box to show all students regardless of status.
Loaded:
All - Display students based on whether they are assigned to a bus or not.
Assigned - This will display only student's with assigned transportation.
Unassigned - This will display only student's without assigned transportation.
SPED:
All - This will display all students.
Sped Only - This will display only sped students.
Non Sped - This will display only non sped students.
Any Bus - Click inside the box for a list of buses to choose from.
Select Morning Bus - Click inside the box for a list of buses to choose from.
Select Evening Bus - Click inside the box for a list of buses to choose from.
Transportation Code Types - You can toggle between the two codes and choose codes in the perspective fields.
Trans Code - This will display Regular Transportation Codes.
Special Trans Code - This will display Special Transportation code.
To find definitions for standard setup values, follow this link: Standard Setup Options.
OK - Click to continue.
Main
Column Headers
Left Main
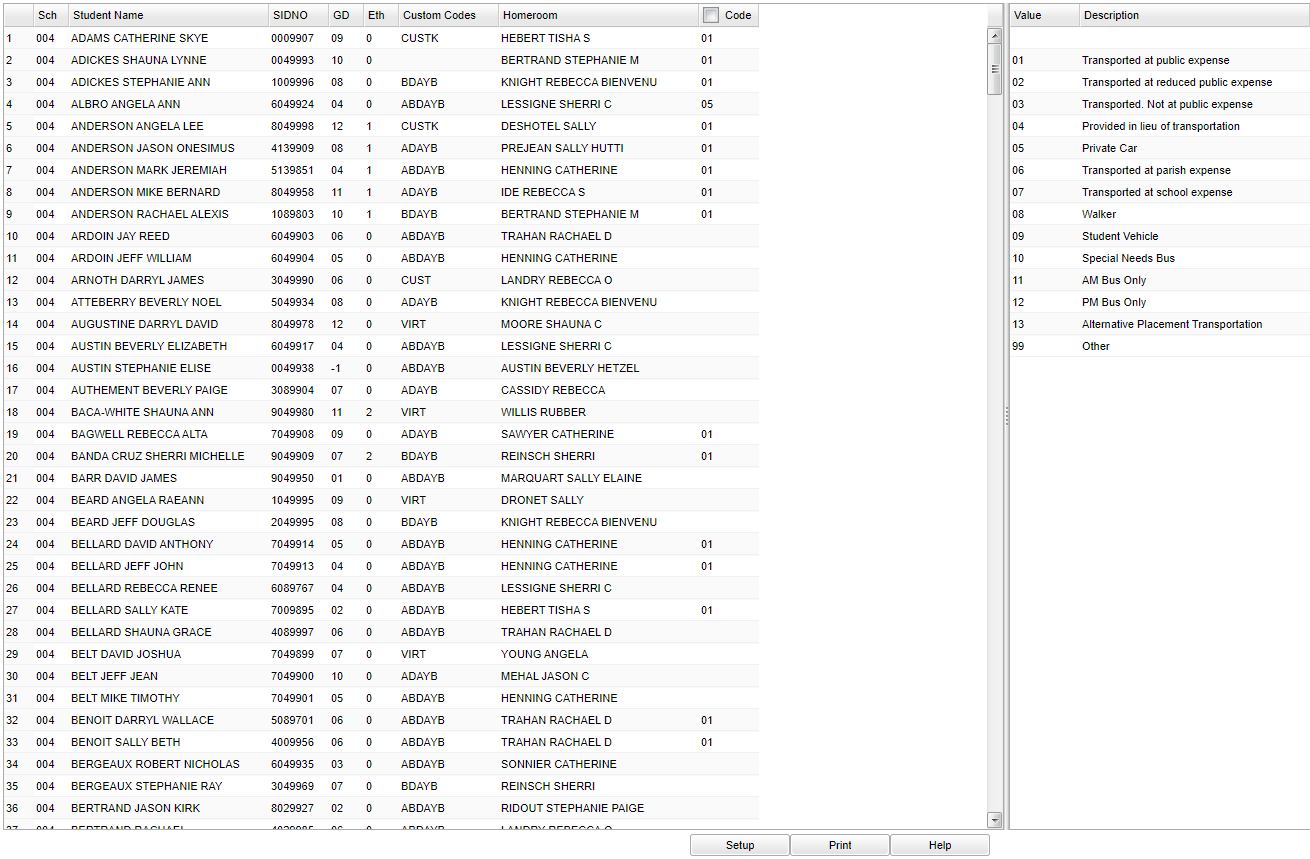
Sch - School of enrollment.
Student Name - Student's name.
SIDNO - Student identification number.
GD - Grade level of student.
Eth - Ethnicity of student.
Custom Codes - Select the custom codes created in the Custom Codes Management to filter the student list.
Homeroom - Student's homeroom teacher's name.
Code - This is the student's transportation code that is assigned to them.
Right Main
Value - This is the transportation code.
Description - This is the transportation description.
To find definitions of commonly used column headers, follow this link: Common Column Headers.
Assign individual students or a small group of students to Transportation using the following steps.
- Click in the blank code field beside the name(s) of the student(s) to indicate their transportation.
- An asterisk (*) will appear in the field.
- After selecting the students that need the same code, click the name on the right side of the screen.
- A message will appear indicating that rows have been updated.
- Ok - Click to continue.
Assign all students to the same transportation using the following steps.
- Click the check box at the top of the Code column.
- An asterisk (*) will appear in the all cells in this column.
- Click the transportation type on the right side of the screen.
- All asterisks will be changed to the selected transportation.
- A message will appear indicating that rows have been updated.
- Ok - Click to continue.
To edit an existing code
- Complete the Setup Box options.
- Scroll through the list of students to find the student(s) whose transportation assignment needs to be changed.
- Click the code field beside the student name(s) that have the incorrect counselor name. An asterisk (*) will appear.
- Select the correct transportation type on the right side of the screen.
- The code name will be replaced and a message will appear indicating that rows have been updated.
- Ok - Click to continue.
Bottom
Setup - Click to go back to the Setup box.
Print - This will allow the user to print the report.
Help - Click to view written instructions and/or videos.

