Approval/Rejection
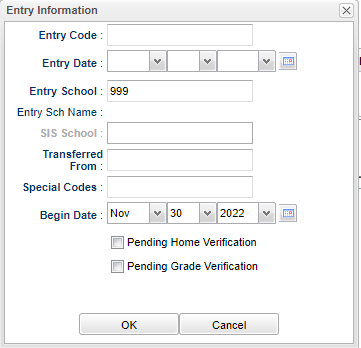
After all of the student`s information has been approved, the user will get this popup box.
Entry Code - Click to select a default entry code for the new Student Master records.
Entry Date - Click to select a default entry date for the new Student Master records.
Entry School - Click to select an entry school.
Entry School Name - Name of entry school.
SIS School - If needed, the field "Requires SIS School" in the Sponsor Site Editor> Site Demographics tab must be checked before the user can enter a SIS School in this field.
Transferred From - School student transferred from.
Grade - Student's grade of enrollment.
Special Codes - Student's Special Codes.
Begin Date - Begin date to assign the special codes selected above.
Pending Home Verification - Check this box if home verification is pending.
Pending Grade Verification - Check this box if grade verification is pending.
OK - Click to continue.
Approval Notes
- On the approval process, allow five (5) special codes to added to a student at one time. A begin date for special codes can be added when entered.
- During the approval process the "Entry Information" screen will appear. For users with sites configured in user management, the Entry School will be blank. For NON 700 users with no sites, the Entry School will default to the user's security school. For all other situations, the Entry School will default from the Zone School. When the user clicks on the Entry School to select a school, only the user's security sites that are configured in user management will be shown.
- On the approval process, student will be searched for a near match. If near match is found, a window will appear to allow the user to select the near matched record to use the sidno, or select no match.
- During the approval process, if there is an existing setup box year record that has the same first name, last name, gender and date of birth as the applicant, give user a question of whether to update the existing record with this applicant, create a new student master record with this applicant or cancel.
- When approving a student that has a relationship of Foster Parent, Foster Father or Foster Mother; it will post the program code of FOS on the Program tab of Student Master, using the start date of the ORS approval.
- After the student has been approved, and all near matches have been chosen, then display the re-enroll system that allows the user to choose the information to import along with the district standard re-enroll process.
- When the registration is approved, relationship information is added to the Student Master Record.
- If an existing student is registered through SPC: All original relationship data stays the same in Student Master. No relationship data is changed.
- If an existing student is registered through ORS: Only blank fields are updated and it does not change existing fields in Student Master.
- The flow is as follows:
- For the blank fields, the flow now depends on what was checked on the ORS Relationships page.
Online Registration System Editor
