Difference between revisions of "JCampus Student"
From EDgearWiki
Jump to navigationJump to search| Line 1: | Line 1: | ||
__NOTOC__ | __NOTOC__ | ||
'''This is the new cell phone app and the app version of the Student Progress Center for iOS and Android.''' | '''This is the new cell phone app and the app version of the Student Progress Center for iOS and Android.''' | ||
| − | :* The options, to show/not show and allow/not allow, are controlled | + | :* The options, to show/not show and allow/not allow, are controlled by district users in [[Communication Configuration|'''System > Entry > Communication Configuration''']]. If "Turn Off SPC" is checked, the user will not be able to log into JCampus Student. |
= Download the App = | = Download the App = | ||
Revision as of 10:29, 10 April 2024
This is the new cell phone app and the app version of the Student Progress Center for iOS and Android.
- The options, to show/not show and allow/not allow, are controlled by district users in System > Entry > Communication Configuration. If "Turn Off SPC" is checked, the user will not be able to log into JCampus Student.
Download the App
![]()
![]()
The app is available in Play Store for Android and App Store for iPhone.
- Go to the store for the users phone
- Search JCampus Student
- Click the JCampus Student app to download

- Continue with registration/sign in process
Login
After completing the registration process, the login screen is the first screen that the user will see.

- Enter Username and Password, then click "Sign In". The user can sign in with an existing Student Progress Center login or create a new login.
- Checking the "Remember Me" box will prompt the app to save the Username and Password via biometrics (Face ID or Finger Print).
- Use the
 button to reset the users password. Click icon for additional information.
 - Use the
 button to choose the Registration Method to create a new account. Click icon for additional information.
 - Use the
 button to select a district. Click icon for additional information.
Parent Screen

After the parent signs in it will go to the Parent Screen. The parent will be the first name and the student(s) will follow.
After the student signs in it will go to the Student Screen. Click on student name.
Parent Detail
When the user clicks on the parent name it will go to the Parent Detail Screen.
Screenshot
- JCampus Connect
- Link Students - To link a student you must enter exactly the student's first name, last name, birthdate, and then either the SSN or school the student attends and click Continue.
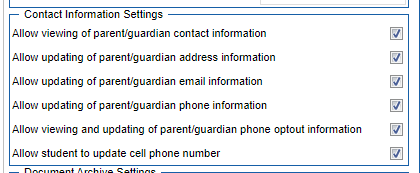
- Contact Information - If allowed by the district, the parent can update their contact information and the message delivery options, updates will automatically be updated within JCampus.
- - System >> Entry >> Communication Configuration is where the district user would select what to allow
- - If "Allow viewing of parent/guardian contact information" is not checked the parent will not see the Contact Information button
- - Other abilities depend on what the district has selected within the Contact Information Settings
- -

Student Detail
 →
→ 
When the Parent selects a student, it will go to Student Detail screen.
- Student - This will provide students demographic information, school information, and bus information.
- Grades - This will provide the student grades for all grading periods in the current school year.
- Attendance - This will provide the Attendance for the student, unexcused and excused absences, tardies, etc.
- Discipline - This will provide the Discipline record for the student, Referrals, Date, Incident, Location, Action, and Details.
- Schedule - This will provide the students schedule for each semester in the current school year.
- Transcripts - This will provide information on the transcript, GPA, Rank, Quality Points Earned, Credits Pursued, Credits Earned, Service Hours, Scholarship, Grades from previous and current years.
- Test Scores - This will provide the test scores for the student, Name of Test, Test Date, Subjects, and Scores.
- Communications - This will provide all the Communications regarding this student.
- JCampus Connect - This will provide staff, parents and students a two way messaging platform with the ability to add attachments similar to text messaging.
- Documents - This will provide all Documents for the student, Official Documents, Document Name, and Create Date.
- Fees - This will provide the fees that have been posted for a student, Subject, Description, Amount Due, Due Date, and Paid Date.