Difference between revisions of "Accommodations Import"
From EDgearWiki
Jump to navigationJump to search| Line 10: | Line 10: | ||
# Export format needs to be '''CSV (comma delimited).'''<br><br>[[File:Accommodations_detail_settings.png]]<br><br> | # Export format needs to be '''CSV (comma delimited).'''<br><br>[[File:Accommodations_detail_settings.png]]<br><br> | ||
# Click '''Add to My Reports'''. You will be taken to '''My Reports''' automatically. Click '''Save''' when the file is ready. | # Click '''Add to My Reports'''. You will be taken to '''My Reports''' automatically. Click '''Save''' when the file is ready. | ||
| − | + | #* Normally when "Save" is clicked, the file is placed in the user's "Download" folder. | |
| − | + | # Log into JCampus and go to '''Special Education''' > '''Loaders''' > '''Accommodations Import'''. | |
| − | #* | + | # On the setup box, verify that the '''Year''' and '''District''' are correct, then click '''Choose File'''. |
| − | + | # Browse to the "Downloads" folder, then select the Accommodations file downloaded from SER. | |
| − | |||
| − | |||
| − | # | ||
| − | |||
| − | |||
| − | |||
| − | |||
| − | |||
| − | |||
| − | |||
| − | |||
| − | # On the setup box, verify that the '''Year''' and '''District''' are correct, then click '''Choose File''' to select the Accommodations file downloaded from SER. | ||
# Click '''OK''' to import the file. | # Click '''OK''' to import the file. | ||
| + | # A progress message will appear. When done, the accommodations imported for each student will be listed. | ||
| + | # If an error box pops up indicating accommodations that could not be imported, the usual causes are: | ||
| + | #* Student no longer is in the current year student master. Often these can be ignored. When the SER file is created, it creates accommodations going back a calendar year. In many cases, the accommodations don't match up because the student is no longer in the current year student master. | ||
| + | #* Student does not have a State Assigned ID (eScholar). These should not be ignored. The student needs a state id per normal state reporting flow. | ||
Revision as of 13:45, 18 November 2015
The following step by step instructions will inform you how to download Testing Accommodations from SER and import them into JCampus. Importing the accommodations file into JCampus will display the Testing Accommodations within the SPED window from wherever the SPED button can be seen.
- After logging into SER, click on the Reports tab.
- Click on the folder IEP Forms.
- Click on Accommodations Detail.

- On the Accommodation Report settings, select your district if not already selected.
- Select the status of Official.
- In the first date field, select a date in the prior year. Typically, this is exactly one year prior to today.The second date field is today's date.
- Export format needs to be CSV (comma delimited).
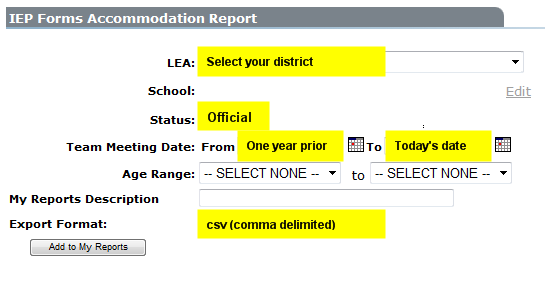
- Click Add to My Reports. You will be taken to My Reports automatically. Click Save when the file is ready.
- Normally when "Save" is clicked, the file is placed in the user's "Download" folder.
- Log into JCampus and go to Special Education > Loaders > Accommodations Import.
- On the setup box, verify that the Year and District are correct, then click Choose File.
- Browse to the "Downloads" folder, then select the Accommodations file downloaded from SER.
- Click OK to import the file.
- A progress message will appear. When done, the accommodations imported for each student will be listed.
- If an error box pops up indicating accommodations that could not be imported, the usual causes are:
- Student no longer is in the current year student master. Often these can be ignored. When the SER file is created, it creates accommodations going back a calendar year. In many cases, the accommodations don't match up because the student is no longer in the current year student master.
- Student does not have a State Assigned ID (eScholar). These should not be ignored. The student needs a state id per normal state reporting flow.

