Difference between revisions of "Approval/Rejection"
| Line 3: | Line 3: | ||
[[File:entryinfo.png]] | [[File:entryinfo.png]] | ||
| − | '''Entry Code''' - Click to select a default entry code for the new | + | '''Entry Code''' - Click to select a default entry code for the new [[Student Master]] records. |
| − | '''Entry Date''' - Click to select a default entry date for the new | + | '''Entry Date''' - Click to select a default entry date for the new [[Student Master]] records. |
'''Entry School''' - Click to select an entry school. | '''Entry School''' - Click to select an entry school. | ||
Revision as of 11:08, 1 December 2022
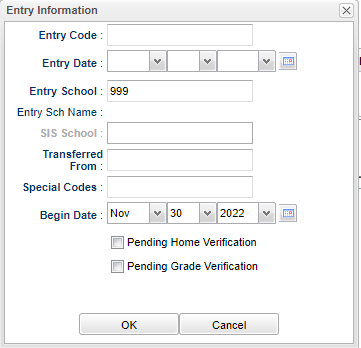
After all of the student`s information has been approved, the user will get this popup box.
Entry Code - Click to select a default entry code for the new Student Master records.
Entry Date - Click to select a default entry date for the new Student Master records.
Entry School - Click to select an entry school.
Entry School Name - Name of entry school.
SIS School - If needed, the field "Requires SIS School" in the Sponsor Site Editor> Site Demographics tab must be checked before the user can enter a SIS School in this field.
Transferred From - School student transferred from.
Grade - Student's grade of enrollment.
Special Codes - Student's Special Codes.
Begin Date - Begin date to assign the special codes selected above.
Pending Home Verification - Check this box if home verification is pending.
Pending Grade Verification - Check this box if grade verification is pending.
OK - Click to continue.
Online Registration System Editor
