Difference between revisions of "HR Location Scanning"
(→Bottom) |
(→Bottom) |
||
| Line 49: | Line 49: | ||
'''[[Standard Print Options | Print]]''' - This will allow the user to print the report. | '''[[Standard Print Options | Print]]''' - This will allow the user to print the report. | ||
| − | '''Scan''' - | + | '''Scan''' - The scanning of staff to report that they have passed a point. |
| + | |||
| + | '''Help''' - Click to view written instructions and/or videos. | ||
| + | |||
| + | |||
| + | ---- | ||
| + | [[Human Resources|'''Human Resources''' Main Page]] | ||
| + | ---- | ||
| + | [[WebPams|'''JCampus''' Main Page]] | ||
Revision as of 13:47, 24 March 2021
This program shows the scanning of staff to report that they have passed a point.
Menu Location
On the left navigation panel, select Human Resources > Entry > HR Location Scanning.
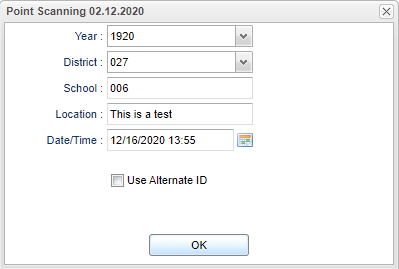
Setup Options
Year - Defaults to the current year. A prior year may be accessed by clicking in the field and making the appropriate selection from the drop down list.
District - Default value is based on the user's security settings. It will be limited to the user's district only.
School - Default value is based on the user’s security settings. If the user is assigned to a school, the school default value will be their school site code.
Location - Location of where employee was scanned.
Time/Date - Time and date of when employee was scanned.
Ok - Click to continue.
Main
Name - Employee's name.
Staff ID - Employee's identification number.
Date/Time - Date and time of employee scanning.
Top
Bottom
Setup - Click to go back to the Setup box.
Print - This will allow the user to print the report.
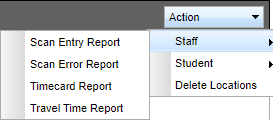
Scan - The scanning of staff to report that they have passed a point.
Help - Click to view written instructions and/or videos.


