Difference between revisions of "Manage Scheduled Calls"
From EDgearWiki
Jump to navigationJump to search (→How-to) |
|||
| Line 2: | Line 2: | ||
===How-to=== | ===How-to=== | ||
| − | + | In the left navigation pane of WebPams, click '''Communication''', then '''Lists''', then '''Manage Scheduled Calls'''. | |
| − | |||
====Setup Box Options==== | ====Setup Box Options==== | ||
Revision as of 05:52, 20 January 2014
This program will allow the user to see scheduled calls and delete them if needed.
How-to
In the left navigation pane of WebPams, click Communication, then Lists, then Manage Scheduled Calls.
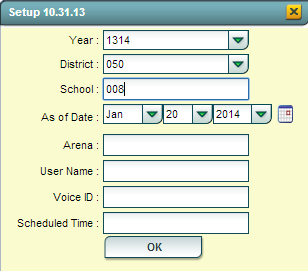
Setup Box Options
- Year: Select desired year.
- District: Verify correct district is displayed.
- School: Verify, or select, desired school.
- As of Date: Usually set to current date. Date students are enrolled.
- Arena: Leave blank to show all scheduled call types. Select to limit display of scheduled calls to a specific type: “EV” = Event, “AT” = Attendance, “DI” = Discipline, “GR” = Grade.
- User Name: Leave blank to show scheduled calls from any user. Select to limit display of scheduled calls created by a specific user.
- Voice ID: Leave blank to show scheduled calls for any ID code. Select to limit display of scheduled calls by ID number.
- Scheduled Time: Leave blank to show scheduled calls for any time. Select to limit display of scheduled calls to a desired time.
- Click OK to display a list of Scheduled Calls.
Screen Results
- On screen will be a listing of scheduled calls based on the Setup box settings.
- To delete a scheduled call, locate the column on the far left labeled Delete.
- Browse down to the row of the scheduled call to be deleted.
- Click on the red Delete cell at the start of the row. A dialog box will appear asking if the user really wants to delete the scheduled call.
- Click Yes to delete the scheduled call. Click NO to stop the deletion and return to the Manage Scheduled Calls screen.
