Difference between revisions of "Create Groups"
From EDgearWiki
Jump to navigationJump to search| Line 3: | Line 3: | ||
[[File:Classroom_Pages_Page_Selection_Manage_Groups.png]] | [[File:Classroom_Pages_Page_Selection_Manage_Groups.png]] | ||
| − | 1. When in the '''Page Selection''' area, click the button at the bottom called '''Manage Groups'''. | + | :1. When in the '''Page Selection''' area, click the button at the bottom called '''Manage Groups'''. |
[[File:Classroom_Pages_Manage_Groups.png]] | [[File:Classroom_Pages_Manage_Groups.png]] | ||
| − | 2. The '''Manage Groups''' window will open. On the top blank line, click in the cell below the column header '''Group''' and enter a name of a group. For example, if you have multiple sections of Algebra I, name the group Algebra I. Then you will only need to create one Page for all of the Algebra I classes. | + | :2. The '''Manage Groups''' window will open. On the top blank line, click in the cell below the column header '''Group''' and enter a name of a group. For example, if you have multiple sections of Algebra I, name the group Algebra I. Then you will only need to create one Page for all of the Algebra I classes. |
| − | 3. Click in the blank cell below the header '''Commen'''t to add any notes about the group. ('''Comment''' is not a required field.) | + | :3. Click in the blank cell below the header '''Commen'''t to add any notes about the group. ('''Comment''' is not a required field.) |
| − | 4. Click in the blank cell below the header '''Course/Activity''' to select all courses and/or activities that will be apart of this group. | + | :4. Click in the blank cell below the header '''Course/Activity''' to select all courses and/or activities that will be apart of this group. |
| − | 5. Click the green '''Save''' cell on the left. | + | :5. Click the green '''Save''' cell on the left. |
| − | 6. Repeat steps 2 - 5 until all groups have been created. | + | :6. Repeat steps 2 - 5 until all groups have been created. |
Revision as of 14:46, 19 August 2018
Grouping together courses and/or activities will give the user the ability to create one Page for more than one course/activity.
- 1. When in the Page Selection area, click the button at the bottom called Manage Groups.
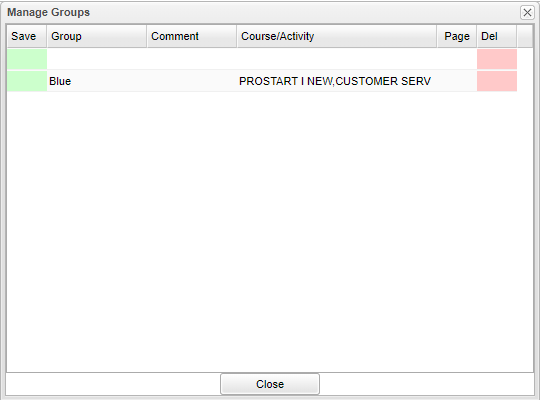
- 2. The Manage Groups window will open. On the top blank line, click in the cell below the column header Group and enter a name of a group. For example, if you have multiple sections of Algebra I, name the group Algebra I. Then you will only need to create one Page for all of the Algebra I classes.
- 3. Click in the blank cell below the header Comment to add any notes about the group. (Comment is not a required field.)
- 4. Click in the blank cell below the header Course/Activity to select all courses and/or activities that will be apart of this group.
- 5. Click the green Save cell on the left.
- 6. Repeat steps 2 - 5 until all groups have been created.

