Difference between revisions of "Create a Bell Schedule"
From EDgearWiki
Jump to navigationJump to search| Line 21: | Line 21: | ||
#* Highlight the current bell schedule row, then click the '''Copy''' button. Enter the dates to copy the bell schedule to. Highlight the new bell schedule row, edit with a new '''Name''' and other details, then click the '''Save''' button. | #* Highlight the current bell schedule row, then click the '''Copy''' button. Enter the dates to copy the bell schedule to. Highlight the new bell schedule row, edit with a new '''Name''' and other details, then click the '''Save''' button. | ||
#* Start a new bell schedule from scratch by clicking the '''Clear''' button, then enter the next bell schedule. | #* Start a new bell schedule from scratch by clicking the '''Clear''' button, then enter the next bell schedule. | ||
| + | |||
'''How to Edit a Bell Schedule''' | '''How to Edit a Bell Schedule''' | ||
| Line 28: | Line 29: | ||
# Highlight the desired current bell schedule row displayed on the right. The details will show on the left. | # Highlight the desired current bell schedule row displayed on the right. The details will show on the left. | ||
# Make any needed changes, then click the '''Save '''button at the bottom of the screen. | # Make any needed changes, then click the '''Save '''button at the bottom of the screen. | ||
| − | |||
| − | |||
| − | |||
| − | |||
| − | |||
| − | |||
| − | |||
| − | |||
| − | |||
| − | |||
| − | |||
| − | |||
| − | |||
| − | |||
| − | |||
| − | |||
Revision as of 11:04, 22 April 2013
Bell Schedules only need to be entered for schools that do attendance by period. This is commonly high schools and in some cases, middle schools.
How to Create a Bell Schedule
- On the left navigation panel, click Attendance, then Entry, then Bell Schedule Maintenance.
- At the setup box, set the Current Year and School. Click the OK button to begin.
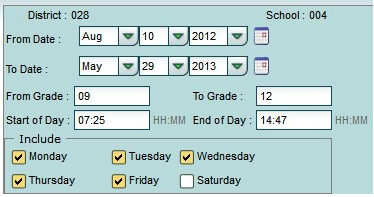
- In the upper left, enter the From Date and To Date. Usually, this is the start of school, to the end of school.
- Enter the From Grade and To Grade. This will be the grade level(s) of students that this bell schedule will apply to.
- Set the Start of Day and End of Day times. Note: Use military time in all time fields.
- Click the days of the week that the schedule will be in effect.
- Enter a Name of the bell schedule.
- For the Lunch field, enter the number of minutes the lunch period lasts.
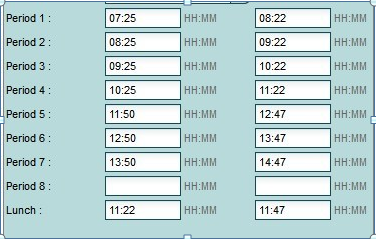
- Enter the Number of Periods the bell schedule contains.
- Enter the start and end time of each period in military time. TIP: Leave out the time in between classes.
- Enter the start and end time of the Lunch session associated with this bell schedule.
- Click the Save button on the lower portion of the screen. After doing so, you will see a row appear with some details about the bell schedule.
- To create additional bell schedules, after clicking Save, do one of the following:
- Highlight the current bell schedule row, then click the Copy button. Enter the dates to copy the bell schedule to. Highlight the new bell schedule row, edit with a new Name and other details, then click the Save button.
- Start a new bell schedule from scratch by clicking the Clear button, then enter the next bell schedule.
How to Edit a Bell Schedule
- On the left navigation panel, click Attendance, then Entry, then Bell Schedule Maintenance.
- At the setup box, set the Current Year and School. Click the OK button to begin.
- Highlight the desired current bell schedule row displayed on the right. The details will show on the left.
- Make any needed changes, then click the Save button at the bottom of the screen.


