Difference between revisions of "Employee Attendance Posting"
From EDgearWiki
Jump to navigationJump to search| Line 17: | Line 17: | ||
# '''Show All Substitutes''': Select this option to show all substitutes in the district (recommended). | # '''Show All Substitutes''': Select this option to show all substitutes in the district (recommended). | ||
# '''Show Current Pay Period Records''': Select to show only attendance records for the current month when working with a staff member. Most users select this option. | # '''Show Current Pay Period Records''': Select to show only attendance records for the current month when working with a staff member. Most users select this option. | ||
| − | # Click the '''OK''' button to begin posting attendance records for staff members. | + | # Click the '''OK''' button to begin posting attendance records for staff members.<br>[[File:Staff_atttend_setup.png]]<br> |
===Staff Attendance Entry=== | ===Staff Attendance Entry=== | ||
Revision as of 19:29, 26 March 2015
For the District Administrator:
Before posting staff attendance records, the administrative steps below should be done. Call or email Edgear Support for assistance in these steps (support@edgear.com or 800.509.7070).
- Permission Configuration: In User Management, the District Coordinator needs RW permissions for the category of Staff. Next, in Staff, a RW Program permission is to be assigned for Post Transactions. Finally, an Action permission of Insert/Update/Delete for Set District Defaults is given to this user. This will allow the District Coordinator to control District Default settings for the staff attendance program.
- Set District Defaults: The District Coordinator in charge of staff attendance needs to set the District Defaults, which in turn will be pushed out to the other users. In the Employee Attendance Posting program, click Action, then District Defaults to set items such as Vendor, default attendance code, and pay periods.
Getting Started:
- In the left navigation panel, click Human Resources.
- Under Entry, select Employee Attendance Posting.
Setup Options
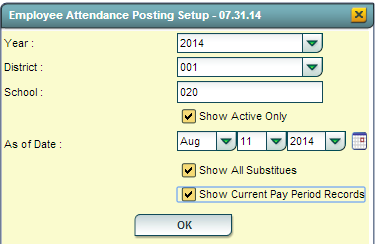
- Year / District / School: Set to desired Year, District, and School.
- Show Active Only: Select the option to limit staff selection to only those employees who are active. This will filter out staff who have left the system.
- As of Date: Set for the default date absence records will be posted for.
- Show All Substitutes: Select this option to show all substitutes in the district (recommended).
- Show Current Pay Period Records: Select to show only attendance records for the current month when working with a staff member. Most users select this option.
- Click the OK button to begin posting attendance records for staff members.

Staff Attendance Entry
- Click the Find button to bring up a listing of staff. Browse, then click on the staff member’s name that was absent.
- A Search field is provided to help browse the listing.
- Use the buttons such as TCH (teacher), BUS (bus driver), or SCH (all school staff) to filter the pick list of staff.
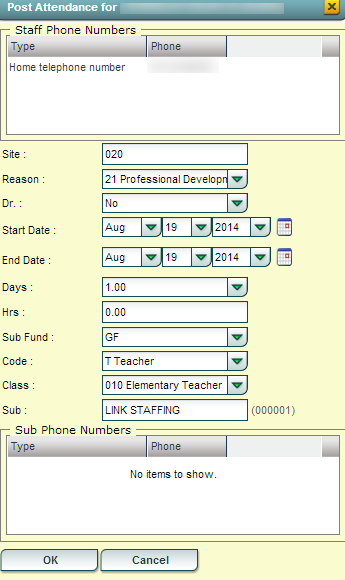
- Click the Post Attnd button. An attendance record detail screen will appear. Basic details are described below:
- Reason: A default reason such as “Sick Leave” may appear here. Click the drop down to select other reasons.
- Start Date / End Date: By default, the “As of Date” from the setup box will appear here. This will be the default day absent when a new record is created. Adjust as needed.
- Days: By default, the amount of days will be “1.00”. Use the drop down select to match the Start Date / End Date. NOTE: It is very important that the Start Date / End Date match the count of Days.
- Hrs: By default, this is “0”. If your district allows hours posting, enter the number of hours the employee was absent here. NOTE: Be sure to consult with your district coordinator if unsure whether to use “hours” or not.
- Sub Fund: Select the fund which will be paying for the substitute. If unsure, consult with the appropriate person in your district.
- Code: By default, the Code of the staff member absent should show here. If blank, and if required by your district, click the drop down arrow to select the code of the person absent.
- Class: By default, the Class of the staff member absent should show here. If blank, and if required by your district, click the drop down arrow to select the class of the person absent.
- Sub: Click to select the Substitute who is covering for the staff member.
- Click OK to store the staff attendance record.
- After entering the staff attendance record, the user will see the attendance record on screen as a row of information.
- To edit the staff attendance record, click on the row of information to be changed. The attendance record details screen will appear. Make any needed adjustments, then click the OK button to save the change.
- Click the Find button to move to the next staff member and repeat the entry steps above.

Proof List
The Proof List is run to check staff absence information for issues like Start / End Dates do not match Days, missing fund source, or other types of common errors.
Getting Started:
- In the left navigation panel, click Human Resources.
- Under Lists, select Proof List.
[[image:]]Setup Options
- District / School: Set to desired District and School.
- Date From: Set the start of the date range to check staff attendance records.
- Date To: Set the end of the date range to check staff attendance records.
- Show SSN: Select this option to show SSN information on screen and on the print out of the report.
- Click the OK button to begin.
Proof List Screen Display
- Columns showing staff with attendance records will be displayed. Details such as Teacher Name, Substitute Name, Start Date, End Date, Days, and a running count of Total Days are displayed.
- On the far right is the Err (Error) column. Review this column for any error codes listed.
- [[image:|767x95px]]TIP: Click the Err column title to sort the errors from low (no errors) to high (rows with errors).
- A Legend button is provided to look up the description of the Error code.
- If there are errors to fix, the user would go back to the Employee Attendance Posting program to resolve, then run the Proof List again to check if the errors have been cleared out.
- Print: Click the Print button to print the report, or export the results as a csv or xls (MSExcel) file.
Staff Form
The Staff Form is a report that serves two purposes:
- Provides a listing of absences for selected staff, or all staff, for a given date range.
- Creates a form for the staff member(s) to review, then sign/date confirming absences for a given date range.
Getting Started:
- In the left navigation panel, click Human Resources.
- Under Lists, select Staff Form.
Setup Options
- [[image:|331x253px]]Year / District / School(s): Set to desired Year, District, and School sites.
- Staff: If left blank, all staff with absences will be displayed. If the user wishes to limit the report to selected staff members, click in the field and select the desired staff member(s).
- Date From: Set the start of the date range to display staff attendance records.
- Date To: Set the end of the date range to display staff attendance records.
- Print SSN on Report: Select this option to show SSN information on screen and on the print out of the report.
- Print Subfund Source on Staff Form: Select this option to show funding source paying for substitute.
- Click the OK button to begin.
Staff Form Screen Display
- On screen will be a listing of the staff absence records for the date range.
- Columns showing Staff Name, Start Date / End Date, Days, Reason, SubFund, and Sub Name are displayed.
- The Days and Hours column will have totals at the bottom showing the total amount for each from the records displayed on the screen.
- Print: Click Print to make a report of the records as shown on the screen. Additionally, the user can select the file type of “csv” or “xls” to create MS Excel files of the data.
- Print Forms: Click Print Forms to create forms for staff members to review, then sign/date as confirmation of the accuracy of the information.
[[image:|388x29px]]
Sub Form
The Sub Form is a report that serves two purposes:
- Provides a listing of absences for selected Substitutes, or all Substitutes, for a given date range.
- Creates a form for the Substitutes member(s) to review, then sign/date confirming days worked for a given date range.
Getting Started:
- In the left navigation panel, click Human Resources.
- Under Lists, select Sub Form.
Setup Options
- [[image:]]Year / District / School(s): Set to desired Year, District, and School sites.
- Staff: If left blank, all Subs with work records will be displayed. If the user wishes to limit the report to selected Substitutes members, click in the field and select the desired Substitutes member(s).
- Date From: Set the start of the date range to display Sub work records.
- Date To: Set the end of the date range to display Sub work records.
- Print SSN on Report: Select this option to show SSN information on screen and on the print out of the report.
- Print Subfund Source on Sub Form: Select this option to show funding source paying for substitute.
- Print Object Function codes on Sub Form: Select this option to show Object Function code of Staff member who was absent.
- Show All Substitutes: Normally checked, this option is related to the Staff field. If Show All Substitutes is checked, on the click of Staff, a pick list of all Subs, regardless of where associated in district, is displayed.
- Click the OK button to begin.
Sub Form Screen Display
- On screen will be a listing of the Substitutes work records for the date range.
- Columns showing Sub Name, Start Date / End Date, Days, Reason, Staff ID, and Staff Name are displayed.
- The Days and Hours column will have totals at the bottom showing the total amount for each from the records displayed on the screen.
- Print: Click Print to make a report of the records as shown on the screen. Additionally, the user can select the file type of “csv” or “xls” to create MS Excel files of the data.
- Print Forms: Click Print Forms to create forms for Substitutes members to review, then sign/date as confirmation of the accuracy of the information.
[[image:|388x29px]]