Difference between revisions of "Current GPA Difference Audit"
(→Main) |
(→Bottom) |
||
| Line 101: | Line 101: | ||
==Bottom== | ==Bottom== | ||
| − | [[File: | + | [[File:curgpadifauditbottom.png]] |
'''Setup''' - Click to go back to the Setup box. | '''Setup''' - Click to go back to the Setup box. | ||
Revision as of 06:39, 24 March 2022
This report displays, for the user, students with a specified GPA difference between two specified grading periods.
Menu Location
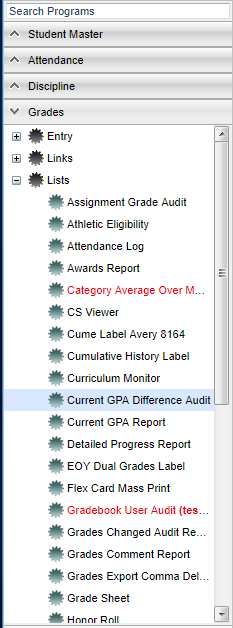
On the left navigation panel, select on Grades > Lists > Current GPA Difference Audit
Setup Options
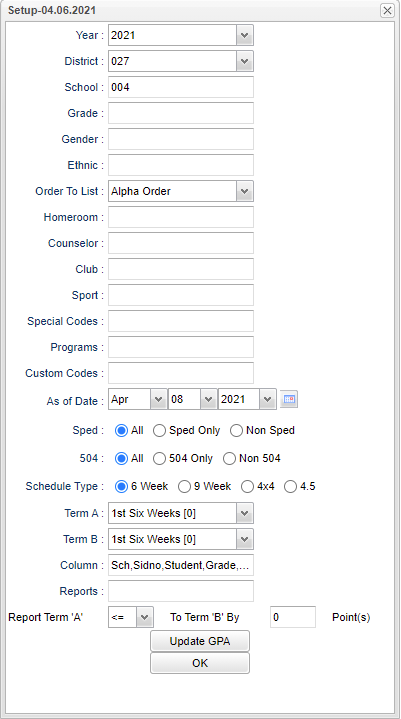
Year - Defaults to the current year. A prior year may be accessed by clicking in the field and making the appropriate selection from the drop down list.
District - Default value is based on the user's security settings. It will be limited to their district only.
School - Default value is based on the user's security settings. If the user is assigned to a school, the school default value will be their school site code.
Grade - Leave blank or select all to include all grade levels. Otherwise, choose the desired grade.
Ethnic - Leave blank or select all to include all ethnicities. Otherwise, choose the desired enthnicity.
Gender - Leave blank or select all to include both genders. Otherwise, choose the desired gender.
Order To List - Allows for the list to be sorted in the desired way upon clicking OK.
Homeroom - Leave blank or select all to include all homerooms. Otherwise, choose the desired homeroom.
Counselor - Leave blank if all counselors are to be included into the report. Otherwise, click in the field to select the desired counselor(s) to view.
Club - Leave blank if all clubs are to be included into the report. Otherwise, click in the field to select the desired club(s) to view.
Sports - Leave blank if all sports are to be included into the report. Otherwise, choose the desired sports code.
Special Codes - Leave blank if all special codes are to be included into the report. Otherwise, choose the desired special code.
Program - Leave blank if all program codes are to be included into the report. Otherwise, choose the desired program code.
Custom Codes - Select Custom Codes created in the Custom Codes Management to filter the student list.
As of Date - This choice will list only those students who are actively enrolled as of the date selected in the date field.
Sped:
All - Select to view all students.
Sped Only - Select to view only Sped students.
Non Sped - Select to view only non Sped students.
504:
All - Select to view all students.
504 Only - Select to view only 504 students.
Non 504 - Select to view only non 504 students.
Schedule Type - Choose the appropriate grading period.
Term A and Term B - Choose the grading periods that you want to compare.
Column - Leave blank to include all columns. Click to obtain a pick list columns that can be selected to view on the report.
Report - The user can click in this box to select a report that was previously created.
Report Term A To Term B - Choose greater than and equal to or less than and equal to.
By Points - Choose the amount of difference in the GPA that you want to compare.
Update GPA - Click to calculate current year grading period averages.
OK - Click to continue.
If you need instructions for setup values to be used, follow the link for Standard Setup Options.
Main
Column Headers
Sch - School site number
Sidno - Student's identification number
Student - Student's full name
Grade - Student's grade of enrollment
Term A GPA - GPAs per grading period chosen
Term B GPA - GPAs per grading period chosen
GPA Point Difference - point difference between the two grading periods
Difference Percentage - percentage difference between the two grading periods
To find definitions of commonly used columns follow this link: Common Column Headers.
Bottom
Setup - Click to go back to the Setup box.
Print - This will allow the user to print the report.
Help - Click to view written instructions and/or videos.
Save - Click save first and a box will appear to name the report. Then click to save the report.
Report - The user can click in this box to select a report that was previously created.
Sorting and other data manipulations are explained in the following link: List Programs Instructions/Video


