Difference between revisions of "Administer Medication"
From EDgearWiki
Jump to navigationJump to search| Line 57: | Line 57: | ||
<ol start="7"> | <ol start="7"> | ||
#The above codes will appear inside a calendar cell when applicable.</ol> | #The above codes will appear inside a calendar cell when applicable.</ol> | ||
| − | # Click in the current date | + | # Click in the current date '''<span style="color:blue">blue</span>''' cell, or a previous day's cell. A small gray menu will appear. Click to select '''Administer Medication'''. |
#*[[File:Administer Medication (800x394).jpg]] | #*[[File:Administer Medication (800x394).jpg]] | ||
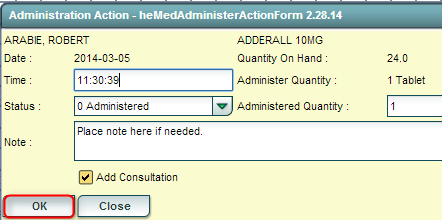
# A medication administration box will come up. Most of the time, the user simply clicks the '''OK''' button to enter the medication administration event. However, the user can click in cells to edit information if needed. | # A medication administration box will come up. Most of the time, the user simply clicks the '''OK''' button to enter the medication administration event. However, the user can click in cells to edit information if needed. | ||
| Line 67: | Line 67: | ||
#* Click the '''OK''' button to store the medication administration event. | #* Click the '''OK''' button to store the medication administration event. | ||
#*[[File:Medication Administer Window.png]] | #*[[File:Medication Administer Window.png]] | ||
| − | # The user will be returned to the calendar. The cell will now be shaded green with a count shown in the cell. | + | # The user will be returned to the calendar. The cell will now be shaded '''<span style="color:green">green</span>''' with a count shown in the cell. |
===Prescription Details=== | ===Prescription Details=== | ||
Revision as of 19:06, 16 March 2014
The directions below describe how to enter data when a student is given medication at school. Note: Before medication can be administered, it must be added to the Medication system by clicking the Add New Medication button.
Getting Started
- In the left navigation panel, click on Health.
- In the Health group, under the Entry grouping, click Medication.
Setup Options
- Year: Select the school year.
- District: This will default to the district's number based on the login of the user.
- School: This will default to the school associated with the user. If the user is associated with multiple sites, other school sites can be selected.
- Show: By default, the selection of Active Prescriptions is displayed, which filters out prescriptions no longer in effect.
- To see all prescriptions, whether active or inactive, select All Prescriptions.
- Click the OK button to begin the Medication program.
- A Medication screen listing students with current active medication prescriptions will be shown on the screen.
Administering Medication
- On the listing of students who have active medication prescriptions, click on the name of the student who will be given medication.
- A gray menu box will appear. Select Administer Medication.
- A medication calendar will be displayed. The current date will be shaded in blue.
- Details of the prescription will be found across the top of the calendar.
- Days with previous medicine administrations will be shaded in green. A count in the green cell will indicate how many administrations were given on this day.
- Days with “X” indicate weekends. Days with “H” indicate holidays. The key below shows other status indicators that may appear in the calendar cells.
Status Indicator Codes for Administer Medication A: Absent H: Holiday R: Refused CA: Count Adjustment M: Missed Dose S: Self-Administered D: Early Dismissal MP: Medication Pickup SD: Staff Dispose DC: Discontinued N: None Available W: Dose Withheld DI: EOY Dispose P: Parent Teacher Conference X: Weekend F: Field Trip PP: Parent Pickup G: Guardian PU: EOY Pickup
- The above codes will appear inside a calendar cell when applicable.
- Click in the current date blue cell, or a previous day's cell. A small gray menu will appear. Click to select Administer Medication.
- A medication administration box will come up. Most of the time, the user simply clicks the OK button to enter the medication administration event. However, the user can click in cells to edit information if needed.
- Time: The default will register the current time, however the user can click to change the time medication was administered.
- Status: The default is “Administered”, but the user can click the drop down arrow and select from other status indicators such as “Absent”. See the above table of Status Indicators for Administer Medication.
- Administered Quantity: The default quantity will be whatever the amount is indicated in the prescription details, but the user can click in the cell and enter a different amount if needed.
- Note: The user can enter a text comment in this cell.
- Add Consultation: Place a check mark here to have this medicine administration automatically create a Consultation record in the student’s Health information.
- Click the OK button to store the medication administration event.
- The user will be returned to the calendar. The cell will now be shaded green with a count shown in the cell.
.jpg)

Prescription Details
- To see details for a date in which medication was administered, click on a green cell on the calendar. A small gray menu will appear. Click on Prescription Details.
- A window will appear in which details of the medication administration will appear.

Undo Administer
- If a mistake was made, and the medication administration needs to be deleted, click on the green cell of the date to be removed. A small gray menu will appear. Click Undo Administer.
- Another window will appear. Click the red delete cell to remove the medicine administration event.

To Administer Medication for the Next Student
- Click the Close button in the lower left of the Administer Medication calendar screen.
- The user will be returned to the Medication screen listing students with prescriptions. Click on the name of the next student to be given medication and repeat the steps above.