Difference between revisions of "Student Master - Special Codes"
From EDgearWiki
Jump to navigationJump to search| Line 6: | Line 6: | ||
| − | '''Other Special Codes''' - Select the student's breakfast and lunch codes. | + | '''Other Special Codes''' - Select the student's breakfast and lunch codes for their meal plan. |
'''Other Student Information''' - | '''Other Student Information''' - | ||
| − | *'''Student Lunch ID''' | + | *'''Student Lunch ID''' - Input the student's lunch identification number. |
| − | *'''Affidavit Needed''' | + | *'''Affidavit Needed''' - Check the box if an affidavit is needed for a specific meal plan. |
| − | *'''Peer Grade''' | + | *'''Peer Grade''' - Select the peer graded from the drop down. |
| + | |||
| + | |||
| + | '''Column Header''' | ||
| + | *'''Delete''' - Click in the field to delete the row. | ||
| + | *'''Status''' - Select the lunch status of the student from the drop down. | ||
| + | *'''Begin Date''' - Select the start date from the calendar. | ||
| + | *'''End Date''' - Select the end date from the calendar. | ||
| + | *'''Save''' - Click the field to save all information on the row. | ||
| + | *'''Record''' - Once the save button has been clicked, the system will provide a record number. | ||
| + | |||
| + | |||
| + | '''Close''' - Click in the button once all information has been entered, then click on the '''Save''' button, to save all work. | ||
Revision as of 08:33, 27 June 2018
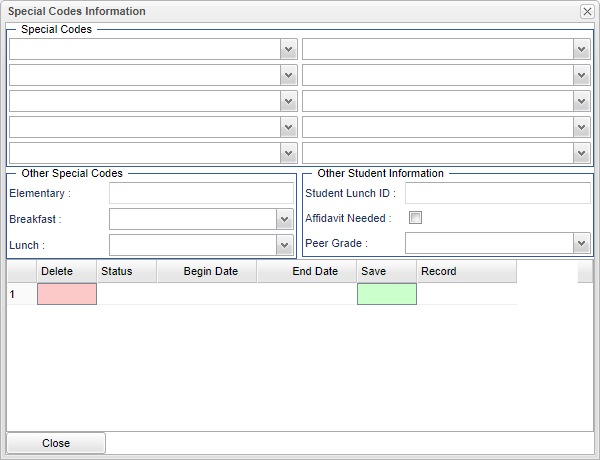
Special Codes - Fill in all relevant fields.
Special Codes - Select Code(s) that are associated with the student.
Other Special Codes - Select the student's breakfast and lunch codes for their meal plan.
Other Student Information -
- Student Lunch ID - Input the student's lunch identification number.
- Affidavit Needed - Check the box if an affidavit is needed for a specific meal plan.
- Peer Grade - Select the peer graded from the drop down.
Column Header
- Delete - Click in the field to delete the row.
- Status - Select the lunch status of the student from the drop down.
- Begin Date - Select the start date from the calendar.
- End Date - Select the end date from the calendar.
- Save - Click the field to save all information on the row.
- Record - Once the save button has been clicked, the system will provide a record number.
Close - Click in the button once all information has been entered, then click on the Save button, to save all work.
