Difference between revisions of "Gradebook"
| Line 154: | Line 154: | ||
3. '''S, N, U Alpha''': Valid grades are S, N and U. | 3. '''S, N, U Alpha''': Valid grades are S, N and U. | ||
4. '''S, N, U Numeric''': Valid grades are 0 – '''Maximum Point Value''' and can be decimal. | 4. '''S, N, U Numeric''': Valid grades are 0 – '''Maximum Point Value''' and can be decimal. | ||
| − | 5. '''Other''': Valid other grades are '''E, I, P, R, W, X''' and blank. These grades are always valid for any assignment. A | + | 5. '''Other''': Valid other grades are '''E, I, P, R, W, X''' and blank. These grades are always valid for any assignment. A blank assignment grade is equivalent to the E grade below. |
'''E''' Used to mark an assignment grade as exempt grade for a student and it is not counted as a part of the final marking period average. | '''E''' Used to mark an assignment grade as exempt grade for a student and it is not counted as a part of the final marking period average. | ||
'''I''' Used to mark an assignment as incomplete. The grading period average will include an | '''I''' Used to mark an assignment as incomplete. The grading period average will include an | ||
| Line 162: | Line 162: | ||
'''W''' Used in any assignment to signal the final marking period average as a withdrawal W grade. | '''W''' Used in any assignment to signal the final marking period average as a withdrawal W grade. | ||
'''X''' Used to mark an assignment grade as a grade where the student failed to make up an assignment. It is treated as a zero (0) in computing a final marking period average. | '''X''' Used to mark an assignment grade as a grade where the student failed to make up an assignment. It is treated as a zero (0) in computing a final marking period average. | ||
| − | |||
| − | |||
== '''Syllabus''' == | == '''Syllabus''' == | ||
Revision as of 13:52, 19 April 2012
Starting WebPams Gradebook: WebPams Version
Ask your JPams district coordinator for the web address of the WebPams gradebook in your district. It is usually in this format: http://webserveraddress/WebPams Your address: ____________________________________ Using your favorite browser, go to the address given. At the start page, enter your User ID and Password, then click Sign In.

Important for Web Gradebook: Save often and Logout when done! If stopping Web Gradebook for a moment to do some other task, be sure to save first!
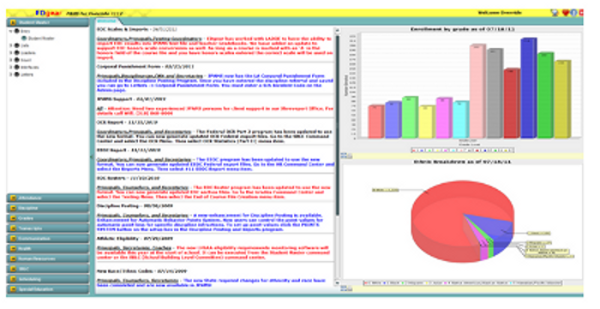
Main Screen for WebPams – 3 sections – Menu Items, Messages from Edgear, Stats for district enrollment and ethnicity breakdown
WebPams Gradebook
Click on Grades, then WebGradebook to open the gradebook. (Presently in testing mode until completion)
Setup Box appears – make changes, if necessary, and click OK.
 Only seen by non-teacher.
At the bottom of the screen, choose Year; Teacher, if necessary; Course; Marking Period.

Toolbar Icons
Tooltips are available for each icon. Just hold your mouse pointer (without clicking) over each icon and an explanation will appear.

1. Assignments: Click to display the dropdown menu to access the New item which creates a New Assignment for the class section. Once an assignment is created, you can use the Edit item to make changes or the Remove item to remove or delete an assignment.

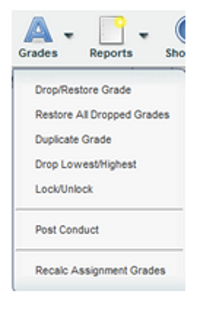
2. Grades: This menu allows you to use grades features.
3. Reports: Creates reports, logs, charts, etc. The remainder of the items all give the same type of graphs dealing with the Selected Assignments, All Assignments, and Final Grade.

4. Show Me: Allows you to see Empty Grades, LEP students, and more to come.

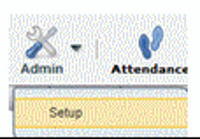
5. Admin: Allows administrators to preform tasks.
6. Attendance: Allows teachers to complete daily attendance.
7. Discipline: Allows teachers to complete their sections of the Behavioral Form.
8. Seating Chart: Creates a seating chart for the students in each class.
9. Save: A very important item used to save grades entered on each assignment. This is a must to save the grades – whether new grades or changes to existing grades.
Setting up Non Weighted Categories
Use categories to organize your gradebook, but is not mandatory. The categories creates items used as defaults and can be changed when entering a new assignment. This feature allows you to choose specific colors for the different types of assignments given in a class. (i.e. Test, Quiz, Term Paper, etc.) These categories will appear in the Assignment Type drop-down box when you create a new assignment.
1. To create categories, click on Assignments on the Menu Bar and choose Categories from the drop-down menu.
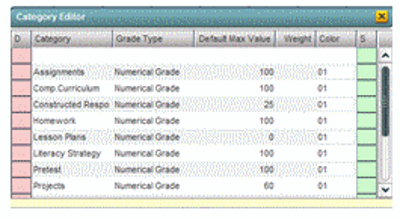
2. Click on Blank line to create a new category completing the Name of the category (i.e. Tests, Exams, Homework, etc). Select the Grade Type. Enter the default Maximum Value (this can be changed when creating an assignment) of points. Select a Color for the assignment type. When done, click Save (green box) to save the assignment category. Continue using the blank line to add additional assignments.
Setting up Weighted Categories
This feature allows you to set categories that are based on weight values of the total grade. When a user creates assignments with weighted categories, no non-weighted categories can be used in combination with these weighted categories within a class section.
1. Use the same steps as the Non-Weighted Categories above. 2. In the Weight field, enter the weight value that this category will use. 3. When done setting up weighted categories, click Save (green box).
Important Note about Categories and Weights: All categories created in WebGradebook show for all classes. A user can have categories that are non-weighted for some classes and also have weighted categories for others.
The user needs to remember that if a weighted category is used on an assignment in a particular class, then all assignments in that class must be of a weighted category type. The gradebook will not calculate weighted and non-weighted assignments in the same class.
Entering Assignment Grades
1. Click Assignments then New. 2. Enter a title for the assignment in the Assignment Title field. 3. Click the drop down arrow in the Category field to pick the category of the assignment. a. NOTE: All assignments within a given class section must be the same type - either all are non-weighted or all weighted. 4. Click the drop down arrow in the Grade Post Type to identify the assignment as a Numerical Grade, SNU Numeric, or SNU Letter grade. If categories were created, this item is entered for the category.
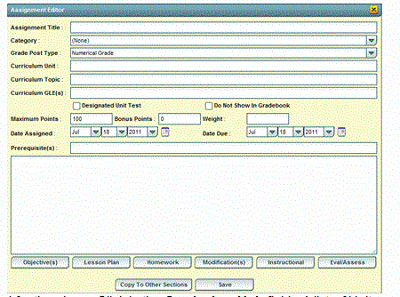
5. If the subject is a core course (Math, Lang Arts, Social Studies, Science), a user can associate GLE’s that are already preconfigured for the class. Click in the Curriculum Unit field. A list of Units specifically for the course will be displayed. Click to pick a Unit. The screen will then move to a listing of Activities for this unit of the course. A user can select one or more activities. Click the Next button to move to a listing of matching GLE’s. Click the appropriate GLE’s for the assignment. When done, click Append to Objectives, then Close Window. A nice feature of adding GLE’s is that there is a GLE report that can give results of the GLE’s covered in WebGradebook for the year.
6. If a weighted Assignment Type category was chosen, the Weight Value will be displayed.
![]()
7. Based on the Assignment Type category chosen, a default Maximum Value (Points possible) will be displayed. If the user wishes to change the Maximum Value, click in the field, backspace out the existing value, and enter the desired amount. If there are Bonus Points possible, enter them in the Bonus Points field. Enter the Date Assigned and Date Due fields.
8. If you wish to copy the assignment to other classes, click the Copy to Other Sections button, or if not, click Save to enter the assignment to this section only.
9. A new column for the assignment will now be displayed in the grade book. Click in the first cell, then begin to type the grade for the assignment. To move to the next cell, simply tap the ENTER button or the DOWN arrow and the active cell will drop down to the next student. After entering the grades, click on the Save icon (looks like a disk) at the top of the tool bar.
Entering Exam Grades in WebGradebook
Posting of exam results is done the same as posting assignments, with one variation. We pick the exam grading period to post the grade result.
Important: A. This only needs to be followed if your school/district posts exam results as a separate grade item. Example: To determine a final, a district requires an average from grading period 1, grading period 2, and an exam. These are all averaged together for a final. Contact your JPams Coordinator if you are unsure as to how exam results are posted in your district / school. B. EOC exam results are imported electronically for the teacher
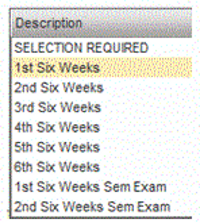
1. In WebGradebook, locate the Marking Pd field on the lower right. Click and select one of the following based on your schedule type: If unsure which to choose, check with your JPams District Coordinator.
2. Repeat the steps as described in the previous section (Entering Assignment Grades). The only difference is that you will post one assignment for the exam score.
a. On the top row of menu commands, click Assignments then New.
b. Enter a title for the exam in the Assignment Title field.
c. For the Assignment Type, leave it set to (None). Do not choose a category. This is the only score that will be posted for this “Marking Pd” of 1st Sem Exam, therefore no category or weight is needed.
d. Click the drop down arrow in the Grade Post Type to identify the assignment as a Numerical Grade.
e. Enter a Maximum Value (Points possible). If there are Bonus Points possible, enter them in the Bonus Points field. Enter the Date Assigned and Date Due fields.
3. After entering the information, click Save.
4. A new column for the exam results will be displayed in the grade book. Double click in the first cell, then begin to type the grade for the exam. To move to the next cell, simply tap the ENTER button or the DOWN arrow and the active cell will drop down to the next student. After entering the grades, click on the Save icon at the top of the tool bar.
5. TIP: Want to review the grades for the year in one place? In the menu bar, click Reports, then Term Grades Report. You will then see all students in the course with the grade averages for all grading periods and exams on one sheet.
Grade Types
1. Numerical Grade: This type will permit the entering of numeric grades such as 95, 78, 30, etc... You can post the numerical value and use a decimal if desired. The equivalent alpha grade is determined based on your grading scale as set in your pupil progression setup. See Valid Grades section below.
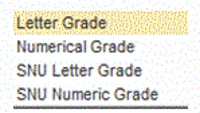
2. Letter Grade: This type will permit the entering of alpha grades such as A, B, C, etc... You would simply post the alpha or other grade. See Valid Grades section below.
3. SNU Numeric Grade: This type will permit the entering of numeric grades such as 20, 95, 80, etc…. The grade related to the score of SNU will be based on the scale setup in the Pupil Progression settings of JPams. You can use a decimal if desired. See Valid Grades section below.
4. SNU Letter Grade: This type will permit the entering of S, N, and U letters for student assignments.
Valid Grades
1. Alpha: Valid grades are A, B, C, D, and F. 2. Numeric: Valid grades are 0 to the Maximum Point Value and can be decimal. For example, you may opt to award a half point on a partially correct answer. Thus, you can post a 95.5 providing the value is within the assignment’s total points possible. 3. S, N, U Alpha: Valid grades are S, N and U. 4. S, N, U Numeric: Valid grades are 0 – Maximum Point Value and can be decimal. 5. Other: Valid other grades are E, I, P, R, W, X and blank. These grades are always valid for any assignment. A blank assignment grade is equivalent to the E grade below. E Used to mark an assignment grade as exempt grade for a student and it is not counted as a part of the final marking period average. I Used to mark an assignment as incomplete. The grading period average will include an “I” assignment in the possible points. P Used in any assignment to signal the final marking period average as a passing (P) grade. R Used in any assignment to signal the final marking period average as a readiness (R) grade W Used in any assignment to signal the final marking period average as a withdrawal W grade. X Used to mark an assignment grade as a grade where the student failed to make up an assignment. It is treated as a zero (0) in computing a final marking period average.
Syllabus
The syllabus lists all assignments and information about each one.

Duplicate a Grade
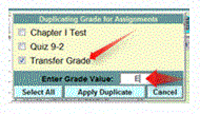
Sometimes it is handy to be able to duplicate a grade to all students on an assignment. The steps below describe how this can be done. 1. Create an assignment as described in the previous section. 2. Click Grades, then Duplicate Grade. 3. Click to select the assignment to duplicate grades to. In the Enter Grade Value field, enter the grade to be duplicated. Click Apply Duplicate. 4. The grade will now display in each student’s cell. If a single student did not make the duplicated grade, simply click in the cell, backspace the entry out, then enter the correct value, then tap the ENTER key or move down to the next student.
Posting GLE's in Gradebook
Associating assignments with GLE’s helps the teacher and school track which GLE’s have been covered before testing, and track how the students are doing on the GLE. 1. In the toolbar menu, click Grade, then New. Type in Assignment Title, Assignment Type and Grade Post type.
2. Click in box next to Curriculum Unit.

3. A box titled Curriculum Units for Section will appear. Select the appropriate unit by clicking next to the correct unit. Click the Continue button at the bottom of this window.

4. Another box will appear titled Curriculum Topics for Unit. Select one or more appropriate topic(s), then click the Continue button at bottom of screen.

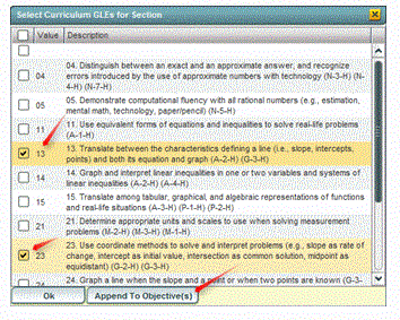
5. Another box appears titled Curriculum GLE’s For Unit. Select appropriate GLE’s for unit. When finished, click Append to Objectives button at bottom.
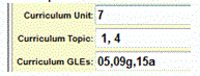
6. The system will return to the New assignment box. You will now see your Curriculum Unit, Topic, and GLE’s listed. Also, the GLE’s will appear in the Objectives field of the assignment box. When done reviewing, click the Save button to place the assignment in WebGradebook. The assignment will be displayed on your gradebook page.

GLE Reports: Curriculum Checklist
Throughout the year you may want to check to see if you have completed required GLE’s for your subject matter. This can be done by performing the following steps:
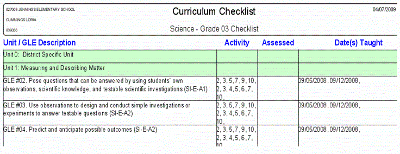
1. At the top of the gradebook page in the menu bar, click Reports, then Curriculum Checklist. 2. The Curriculum Checklist page will be displayed with the following information: a. Unit/GLE Description b. Activity c. Assessed d. Date(s) taught
Transfer Students and Assignments in WebGradebook
When a student’s schedule is changed during the middle of a grading period, or if a new student is gained in the middle of a grading period, it sometimes is necessary to take the average or points from the “old” class and make a transfer assignment in the “new” class.
There are two primary methods for accounting for the current grading period points earned in another class, whether it is in the same school, or from another school. Discuss with your district or school Principal to determine which method is desired.
Method 1: Enter a Grading Average from the Previous Class 1. In WebGradebook, create an assignment labeled “Transfer Student” or some other related title. 2. Make the assignment worth 100 points.
Note: If this is a class with weighted categories (Ex. 30% Homework and 70% Tests), make two transfer assignments, one for each category.
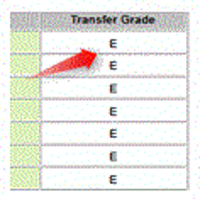
a. One for the first weighted category called “Transfer Student category name 1” b. Another for the other weighted category called “Transfer Student category name 2” c. If there are other weighted categories, repeat as needed. 3. Once the Transfer Assignment is made, duplicate a grade of E to all students. This will show that all other students are exempt from this assignment. The steps below explain how to duplicate a grade of “E” to all students. a. Click Grades, then Duplicate in the toolbar of WebGradebook. b. Click to place a check mark next to the “Transfer Student” assignment. Type an “E” in the Enter Grade Value field, then click the Apply Duplicate button. After doing this, you will see that all students will have a grade of “E” (Exempt) for the assignment “Transfer Student”.
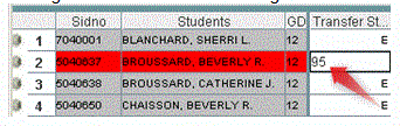
4. Optional: If a user wants to make the transfer assignment only display for the transfer student on progress reports and the student progress center, do the following steps: a. In WebGradebook, click the name (column) of the transfer assignment. The column will turn yellow. 5. Double click on the cell of the student just gained and backspace to clear the “E”. Enter the average of the student coming in. Tap the ENTER key on the keyboard or move down to confirm the entry. The student’s average will now include the average score from the previous class.
6. As other students are gained in the current grading period, the user would repeat step 5 for these new students in the “Transfer Student” assignment column.
Method 2: Enter Points Earned and Points Possible (raw score) From the Previous Class
In this scenario, the student is coming in having earned 180 out of 200 points in the previous class.
1. In WebGradebook, create an assignment labeled “Transfer studentlastname” or some other related title. 2. Make the assignment worth the number of points possible from the previous class: (Ex: 200 points) Note: If this is a class with weighted categories (Ex. 30% Homework and 70% Tests), make two transfer assignments, one for each weighted category: a. One for the first weighted category called “Transfer studentlastname category 1” b. Another for the other weighted category called “Transfer studentlastname category2” c. If there are other weighted categories, repeat as needed. 3. Once the Transfer studentlastname is made, duplicate a grade of E to all students. This will show that all other students are exempt from this assignment. The steps below explain how to duplicate a grade of “E” to all students. a. Click Grades, then Duplicate of WebGradebook. b. Click to place a check mark next to the “Transfer studentlastname” assignment. Type an “E” in the Enter Grade Value field, then click the Apply Duplicate button.

c. Now all of the students will have a grade of “E” (Exempt) for the assignment “Transfer studentlastname”.
4. Double click on the cell of the student just gained and backspace to clear the “E”. Enter the points earned (180 in this example) by the student coming in. Tap the ENTER key on the keyboard or move down to confirm the entry. The student’s average will now include the average score from the previous class.

5. As other students are gained, repeat steps 1 – 5 to create a new “Transfer studentlastname” for each student. Make the assignment worth the points possible, then enter the points earned while duplicating an “E” for all other students.
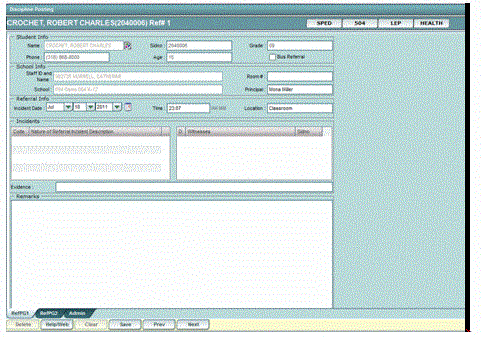
Discipline Posting
The RefPG1 and RefPG 2 are entered by the teacher – same as the paper copy of the Behavior Form.

Teacher Posting of Conduct (Comments) in WebGradebook
In WebGradebook, conduct codes can be thought of as being similar to comment codes. Conduct codes provide a way for a teacher to further communicate progress to a student/guardian.
A listing of Conduct Comment Codes is provided at the end of this section. You will notice that many of the codes appear to be listed twice. This is because there is a “Negative” and “Positive” code for many attributes. For example, there is a negative “Honesty” code of “NP” while there is also a positive “Honesty” code of “PP”.
Following the steps below will allow a teacher to post Conduct Codes in WebGradebook:
1. Open the desired class in WebGradebook.
2. Click on Grades then Post Conduct.
At least one grading assignment must be entered with grades to access the Post Conduct option.
3. A list of students will appear on the left and a listing of Conduct Codes will appear on the right. 4. Click on the column label Conduct Codes to sort them in alphabetical order. 5. The next step is best done by thinking in terms of groups of students. If a group of students are to be marked for a positive “Honesty” code, the teacher clicks in the blank area of “C1” (Conduct Code #1) for each student he/she wants to assign this code to. This places an “x” in the field next to the students.

6. Select the code to assign to these students by clicking on the code in the listing on the right. In our example, we will choose “PJ Effort”. Clicking on this code will place the positive “Effort” conduct code for each student that had an “x”. Note the three students selected now have the “Effort” code of “PJ” next to their names.

7. If a mistake is made, a code can be removed by clicking on the incorrect code. This will replace the former code with an “x”. Then, click on the “blank” conduct code at the bottom of the list. The code will be removed.

8. Up to 12 conduct codes per student can be entered. You will find it is easiest to review the conduct code listing first and try to group students by code entry, but a user can enter conduct codes for an individual one at a time. 9. To print a list of the conduct codes assigned for this class, click on “Print”. 10. Conduct codes posted will show in the following places: a. Report Cards b. Progress Reports c. Student Progress Center 11. If a teacher chooses to do so, conduct codes can be entered or changed during the nine weeks to fit the current status of the student. Doing this will allow the guardian/student to be up to date on the conduct of the student when checking progress reports or the Student Progress Center. 12. A complete listing of Conduct (Comment) codes, which can be obtained in clicking on the List button at the bottom of the screen, is contained on the next page.
Maintaining a Printed Copy of Grades
Note: All system data for all years are backed up in several locations, but it is wise to print copies of a gradebook to provide a safety check of grade data. Teachers are encouraged to print copies of the gradebook, particularly after entering a large number of grades and at key times (progress reports, end of grading period). Keeping these printouts handy in a folder or in the class record book will help if there are questions of the validity of grade data.
• Print a Gradebook Report for each class at progress report time. • Print a Gradebook Report for each class at the end of each grading period. Attach this report to the Class Record Book or place in a secure folder.
Obtaining Help for WebGradebook
1. Talk to the WebGradebook “expert” on the school staff. This will resolve many questions.
2. Email or call your district JPams Coordinator.
3. Email JPAMS support at support@edgear.com. Be precise in your description of the problem.
4. Call JPAMS directly at 800.509.7070.