Difference between revisions of "System Configuration"
| (115 intermediate revisions by the same user not shown) | |||
| Line 1: | Line 1: | ||
| − | '''This program will give a user the ability to | + | __NOTOC__ |
| + | '''This program will give a user the ability to: | ||
| + | *create the Document Archiving System (DAS) folders. | ||
| + | * export IBC credentials to eScholar. | ||
| + | *allow Print To DAS for displaying documents in the Student Progress Center. | ||
| + | ==Menu Location== | ||
| − | + | '''System > Entry > System Configuration''' | |
| + | |||
| + | ==Setup Options== | ||
| + | |||
| + | [[File:systemconfsetup.png]] | ||
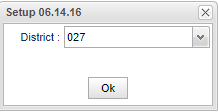
Verify the District number is correct and click '''Ok'''. | Verify the District number is correct and click '''Ok'''. | ||
| − | + | ==Main== | |
| + | |||
| + | ===Document Archiving Tab=== | ||
| + | |||
| + | [[File:docarchivetabmain.png]] | ||
| + | |||
| + | ===Settings Tab=== | ||
| + | |||
| + | [[File:settingstabmain.png]] | ||
| + | |||
| + | This setting will work in conjunction with the Weboptions table to popup an informational Exit message in [[Student Master]] when a student is dropping from the school. | ||
| + | |||
| + | ==Top== | ||
| + | |||
| + | [[File:configurestud.png]] | ||
| + | ==Creating Document Archiving System (DAS) Folders== | ||
| − | + | '''DAS''' - To begin creating the folders and sub-folders that will be used to store documents for students, select the document '''Type''' at the top of the screen. | |
| − | |||
| − | |||
| − | |||
| − | |||
| − | |||
| − | The ''' | + | The different document types refer to the program where''' Action>Doc Archive''' can be found to upload documents into the folders (see below). |
| + | :*'''Student''' - '''Student Master''' | ||
| + | :*'''Discipline''' - '''Discipline Posting''' | ||
| + | :*'''SBLC''' - '''SBLC/RTI Editor''' | ||
| + | :*'''Human Resource''' - '''Human Resource Master''' | ||
| + | :*'''Sped''' - '''Student Master''' | ||
| + | :*'''Health''' - '''Health System''' | ||
| − | + | The '''Type''' that is selected will display a folder with the name of that Type in the area below. | |
| + | :Ex. Student is selected in the Type field and, therefore, a folder appears with the name Student. | ||
| − | + | [[File:studentfile2.png]] | |
| + | #Click on the folder. | ||
| + | #Click the button at the bottom with the plus (+) sign which is the '''Add New Category''' button. | ||
| + | #The button will bring up the '''New Category''' window. Type in the '''Category Name''' (name of the folder). | ||
| + | #If this folder is for IBC`s, for '''Student''' type only, check the box '''Is IBC Category'''. | ||
| + | #The checkbox, Is IBC Category, will give a user the ability to select the year the IBC was earned and the IBC code when uploading the IBC document in the '''[[Student Master]]'''. | ||
| + | #Click '''Ok'''. Then click '''Save''' at the bottom. | ||
Repeat these steps to create as many folders as needed. To create sub-folders, click on one of the newly created folders and click the '''Add New Category''' button. To delete a folder, click on the folder to delete and click the button at the bottom with the minus (-) sign. This is the '''Delete Category''' button. | Repeat these steps to create as many folders as needed. To create sub-folders, click on one of the newly created folders and click the '''Add New Category''' button. To delete a folder, click on the folder to delete and click the button at the bottom with the minus (-) sign. This is the '''Delete Category''' button. | ||
| − | To | + | To move an existing folder, right click on the folder. See box below for options. |
| + | |||
| + | [[File:systemconfeditstud.png]] | ||
| + | ==Bottom== | ||
| − | === eScholar IBC FTP Setup | + | [[File:escholaribcsetup.png]] |
| + | == Exporting IBC Credentials to eScholar== | ||
| + | |||
| + | '''eScholar IBC''' - This program also allows the user to export IBC credentials to eScholar. | ||
| + | |||
| + | This program ensures that the following directory structure is observed: | ||
| + | |||
| + | IBC prior to 2018 will be in the original naming format in the Credential folder. | ||
| + | |||
| + | IBC after 2017 will be in <stateid>_<ibc code>_<year earned>.<extension> format in the school/year directory. | ||
| + | |||
| + | '''eScholar IBC FTP Setup''' | ||
To export IBC credentials to eScholar: | To export IBC credentials to eScholar: | ||
| − | + | *In the '''eScholar IBC FTP Setup''' enter the '''Username''' and '''Password''' | |
| − | *In the '''eScholar IBC FTP Setup''' enter the '''Username''' and '''Password''' | ||
*Enter '''louisianasecureftp.escholar.com''' in the '''URL''' field. | *Enter '''louisianasecureftp.escholar.com''' in the '''URL''' field. | ||
*Enter just a period (''' . ''') in the '''Path''' field. | *Enter just a period (''' . ''') in the '''Path''' field. | ||
*Click '''Save'''. | *Click '''Save'''. | ||
| − | *After all information is | + | *After all information is entered, a user can click '''Send IBC''' to send any unsent IBC information to eScholar. |
| + | |||
| + | |||
| + | [[File:dasallow2.png]] | ||
| + | |||
| + | ==Allowing Print To DAS for Displaying Documents in Student Progress Center== | ||
| + | |||
| + | '''Allow Print to DAS''' - Check to allow the print option of "Print to DAS" and then on "Save" to be displayed on the Report Card, Flex Card, Transcript, Progress Report, etc. setup boxes. For example, it will place a student report card in the report card area of DAS. It can also print letters to DAS. This option replaces the previously run document there even from last year. This shows only the most recent print. | ||
| + | |||
| + | [[File:savebutton.png]] | ||
| + | |||
| + | '''Save''' - Click after all areas have been entered or updated. | ||
---- | ---- | ||
[[System|'''System''' Main Page]] | [[System|'''System''' Main Page]] | ||
| − | |||
---- | ---- | ||
[[WebPams|'''JCampus''' Main Page]] | [[WebPams|'''JCampus''' Main Page]] | ||
Latest revision as of 15:04, 31 July 2023
This program will give a user the ability to:
- create the Document Archiving System (DAS) folders.
- export IBC credentials to eScholar.
- allow Print To DAS for displaying documents in the Student Progress Center.
Menu Location
System > Entry > System Configuration
Setup Options
Verify the District number is correct and click Ok.
Main
Document Archiving Tab
Settings Tab
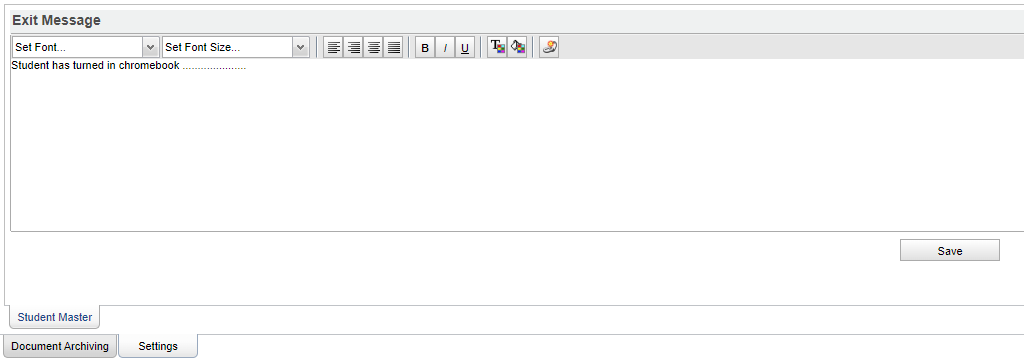
This setting will work in conjunction with the Weboptions table to popup an informational Exit message in Student Master when a student is dropping from the school.
Top
Creating Document Archiving System (DAS) Folders
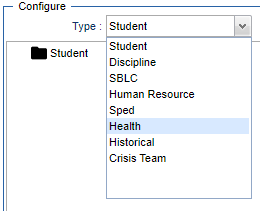
DAS - To begin creating the folders and sub-folders that will be used to store documents for students, select the document Type at the top of the screen.
The different document types refer to the program where Action>Doc Archive can be found to upload documents into the folders (see below).
- Student - Student Master
- Discipline - Discipline Posting
- SBLC - SBLC/RTI Editor
- Human Resource - Human Resource Master
- Sped - Student Master
- Health - Health System
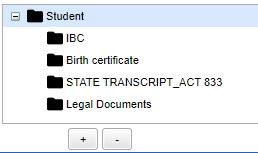
The Type that is selected will display a folder with the name of that Type in the area below.
- Ex. Student is selected in the Type field and, therefore, a folder appears with the name Student.
- Click on the folder.
- Click the button at the bottom with the plus (+) sign which is the Add New Category button.
- The button will bring up the New Category window. Type in the Category Name (name of the folder).
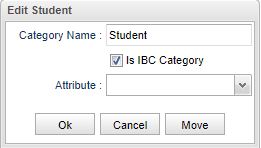
- If this folder is for IBC`s, for Student type only, check the box Is IBC Category.
- The checkbox, Is IBC Category, will give a user the ability to select the year the IBC was earned and the IBC code when uploading the IBC document in the Student Master.
- Click Ok. Then click Save at the bottom.
Repeat these steps to create as many folders as needed. To create sub-folders, click on one of the newly created folders and click the Add New Category button. To delete a folder, click on the folder to delete and click the button at the bottom with the minus (-) sign. This is the Delete Category button.
To move an existing folder, right click on the folder. See box below for options.
Bottom
Exporting IBC Credentials to eScholar
eScholar IBC - This program also allows the user to export IBC credentials to eScholar.
This program ensures that the following directory structure is observed:
IBC prior to 2018 will be in the original naming format in the Credential folder.
IBC after 2017 will be in <stateid>_<ibc code>_<year earned>.<extension> format in the school/year directory.
eScholar IBC FTP Setup To export IBC credentials to eScholar:
- In the eScholar IBC FTP Setup enter the Username and Password
- Enter louisianasecureftp.escholar.com in the URL field.
- Enter just a period ( . ) in the Path field.
- Click Save.
- After all information is entered, a user can click Send IBC to send any unsent IBC information to eScholar.
Allowing Print To DAS for Displaying Documents in Student Progress Center
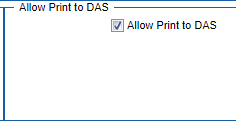
Allow Print to DAS - Check to allow the print option of "Print to DAS" and then on "Save" to be displayed on the Report Card, Flex Card, Transcript, Progress Report, etc. setup boxes. For example, it will place a student report card in the report card area of DAS. It can also print letters to DAS. This option replaces the previously run document there even from last year. This shows only the most recent print.
Save - Click after all areas have been entered or updated.
