Difference between revisions of "Post Mass Absences"
From EDgearWiki
Jump to navigationJump to search| (91 intermediate revisions by the same user not shown) | |||
| Line 1: | Line 1: | ||
| + | '''A user can post missed day(s) for a mass of students with the same code or also post a mass of missed days for a single student.''' | ||
| + | |||
===Video How-to=== | ===Video How-to=== | ||
| + | [[media:AT-PostMassAbs.mov|Post Mass Absences video]] | ||
| + | |||
| + | '''Setup Box Options''' | ||
| + | #Click on the '''Mass''' button at the bottom of the screen to get a setup box for posting mass absences. | ||
| + | #A setup box will appear. | ||
| + | #[[File:masspostsetup.png]] | ||
| + | #Choose the settings needed. | ||
| + | #*For the '''Students''' field, if ALL STUDENTS in the list are to have attendance records posted to them based on the settings selected, leave the filed blank. Leaving this field BLANK will post absences to ALL students! | ||
| + | #*If only certain students, within the options selected, are to have absences posted, click in the '''Students''' field to select the appropriate students by scrolling, using the '''Search''' box or using the [[Pass a Comma Separated List of Sidnos]] method. | ||
| + | #Click '''Next''' when all setup options are correct. | ||
| + | #An additional popup will appear in which you need to enter additional information. | ||
| + | #[[File:datemassposting.png]] | ||
| + | #*'''From Date''' and '''To Date''' should be set so that the desired attendance consecutive date range will post. | ||
| + | #*'''From Time''' and '''To Time''' should be set so that the desired attendance time range will post. Note that weekends and holiday's will not be posted to if the date range selected extends over such days. | ||
| + | #*Click in the '''Code:''' field to select the absence code. The Excuse and Reason field will be updated based on the code selected. Remember, this information will be posted to all students OR just the students chosen by the user. | ||
| + | #If you click in the '''Reason''' field, you will be able to edit the defaulted data and type a more detailed description if desired. | ||
| + | #Click '''Post''' when all setup options are correct. | ||
| + | #After clicking '''Post''', a final confirmation box will appear. Click '''Yes''' if the total number of students and the date range are correct. Click '''No''' to exit the program and not post the absences. | ||
| + | #If a mistake was made and the user needs to delete mass absences, the user can go back to the '''Mass''' button, re-choose the same settings, and then click on the '''Undo''' button. | ||
| + | #In [[User Management]], the user must have security to be able to use the '''Undo''' button. The user would need a Category of Attendance, Program of Post Attendance, Program Permission of RW, Action of Allow Mass Attendance Undo, and Action Permission of Yes. | ||
| + | #[[File:massdeletion.png]] | ||
| + | #This chart will appear showing information about the absences. | ||
| + | #Click on the row to display the student names to verify and the close window. | ||
| + | #Click the checkbox on the row to add a check and then click the '''Undo''' button. | ||
| + | #[[File:massdeletewarning.png]] | ||
| + | #It will warn the user that they are about to delete x number of attendance records. | ||
| + | #When the user clicks yes, it will display a window to record the reason for the deletion. | ||
| + | #Add reason and click OK. The absences are deleted. | ||
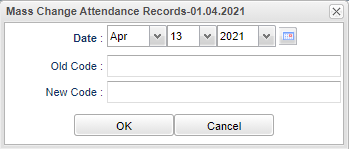
| + | #If the user wants to change an attendance posting code, they can click on the change button at the bottom and this box will appear. You can change one code for one specific date, but not for a date range. | ||
| + | #[[File:masschange.png]] | ||
| + | |||
| + | |||
| + | |||
| + | ---- | ||
| + | [[Post Attendance|'''Post Attendance''' Main Page]] | ||
| − | + | ---- | |
| + | [[Attendance|'''Attendance''' Main Page]] | ||
| − | + | ---- | |
| − | + | [[WebPams|'''JCampus''' Main Page]] | |
| − | |||
| − | |||
| − | |||
| − | |||
| − | |||
| − | |||
| − | |||
| − | |||
| − | |||
| − | |||
| − | |||
| − | |||
| − | |||
| − | |||
| − | |||
| − | |||
| − | |||
| − | |||
| − | |||
| − | |||
| − | |||
| − | |||
| − | |||
| − | |||
| − | |||
| − | |||
| − | |||
| − | |||
| − | |||
Latest revision as of 07:44, 22 March 2024
A user can post missed day(s) for a mass of students with the same code or also post a mass of missed days for a single student.
Video How-to
Setup Box Options
- Click on the Mass button at the bottom of the screen to get a setup box for posting mass absences.
- A setup box will appear.
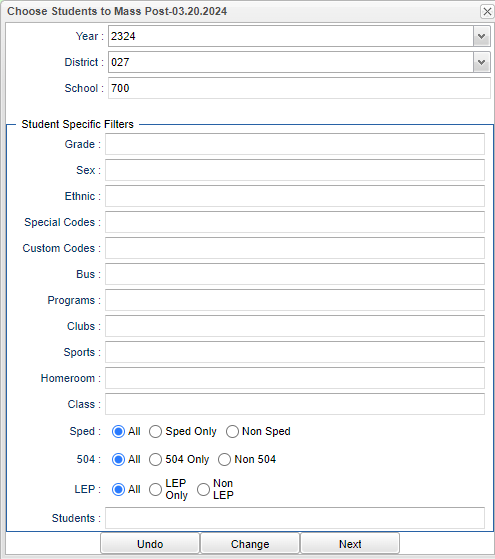
- Choose the settings needed.
- For the Students field, if ALL STUDENTS in the list are to have attendance records posted to them based on the settings selected, leave the filed blank. Leaving this field BLANK will post absences to ALL students!
- If only certain students, within the options selected, are to have absences posted, click in the Students field to select the appropriate students by scrolling, using the Search box or using the Pass a Comma Separated List of Sidnos method.
- Click Next when all setup options are correct.
- An additional popup will appear in which you need to enter additional information.
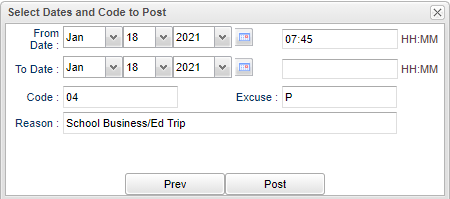
- From Date and To Date should be set so that the desired attendance consecutive date range will post.
- From Time and To Time should be set so that the desired attendance time range will post. Note that weekends and holiday's will not be posted to if the date range selected extends over such days.
- Click in the Code: field to select the absence code. The Excuse and Reason field will be updated based on the code selected. Remember, this information will be posted to all students OR just the students chosen by the user.
- If you click in the Reason field, you will be able to edit the defaulted data and type a more detailed description if desired.
- Click Post when all setup options are correct.
- After clicking Post, a final confirmation box will appear. Click Yes if the total number of students and the date range are correct. Click No to exit the program and not post the absences.
- If a mistake was made and the user needs to delete mass absences, the user can go back to the Mass button, re-choose the same settings, and then click on the Undo button.
- In User Management, the user must have security to be able to use the Undo button. The user would need a Category of Attendance, Program of Post Attendance, Program Permission of RW, Action of Allow Mass Attendance Undo, and Action Permission of Yes.

- This chart will appear showing information about the absences.
- Click on the row to display the student names to verify and the close window.
- Click the checkbox on the row to add a check and then click the Undo button.
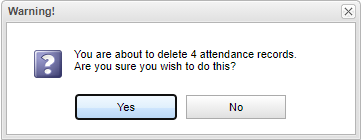
- It will warn the user that they are about to delete x number of attendance records.
- When the user clicks yes, it will display a window to record the reason for the deletion.
- Add reason and click OK. The absences are deleted.
- If the user wants to change an attendance posting code, they can click on the change button at the bottom and this box will appear. You can change one code for one specific date, but not for a date range.