Difference between revisions of "Add Or Delete A Course"
(→Video) |
|||
| (17 intermediate revisions by the same user not shown) | |||
| Line 1: | Line 1: | ||
__NOTOC__ | __NOTOC__ | ||
| − | These instructions provide an overview of how to add or remove courses in the Transcript Workstation. Transcripts can be a mixture of historical records and current year grades. Only historical records can be edited via the transcript workstation. | + | '''These instructions provide an overview of how to add or remove courses in the Transcript Workstation. Transcripts can be a mixture of historical records and current year grades. Only historical records can be edited via the transcript workstation.''' |
| − | === | + | ==Menu Location== |
| − | |||
| − | + | '''Transcripts > Transcript Workstation''' | |
| − | + | ==Setup Options== | |
| − | |||
| − | + | [[File:trascriptworkstationsetup2.png]] | |
| − | + | ||
| − | + | '''Year''' - Defaults to the current year. A prior year may be accessed by clicking in the field and making the appropriate selection from the drop down list. | |
| − | + | ||
| − | + | '''District''' - Default value is based on the user's security settings. It will be limited to their district only. | |
| − | + | ||
| − | + | '''School''' - Default value is based on the user's security settings. If the user is assigned to a school, the school default value will be their school site code. | |
| + | |||
| + | '''Grade''' - Leave blank or select all to include all grade levels. Otherwise, choose the desired grade. | ||
| + | |||
| + | '''Transcript Type''' - College, Official, Custom. | ||
| + | |||
| + | '''Show Current Year Grades''' - Grades from the current year (only available after the first semester grades have been calculated). | ||
| + | |||
| + | '''Find Active Students Only''' - This choice will list only those students who are actively enrolled as of the date selected in the date field. | ||
| + | |||
| + | '''Use SIS School''' - View SIS school assigned students routed back to setup school. | ||
| + | |||
| + | *NOTE - You can only view transcripts for students in grades 9-12. | ||
| + | |||
| + | *Make selections in the '''[[Overview#Setup_Box_Options|More Options]]''' section. After making selections in each area, click '''OK''' to return to the setup box. | ||
| + | |||
| + | ===Basic Option=== | ||
| + | |||
| + | [[File:basicsetup.png]] | ||
| + | |||
| + | ===Grades Options=== | ||
| + | |||
| + | [[File:wsgradessetup.png]] | ||
| + | |||
| + | ===Printing Options=== | ||
| + | |||
| + | [[File:wsprintingsetup.png]] | ||
| + | |||
| + | ===Official Options=== | ||
| + | |||
| + | [[File:wsofficialsetup.png]] | ||
===Creating a New Transcript Record for Courses Found in the Course Catalog=== | ===Creating a New Transcript Record for Courses Found in the Course Catalog=== | ||
| Line 45: | Line 73: | ||
#Click in the Year field and select the year earned using the spring date; i.e., a grade earned in session 1213 would have year 13. | #Click in the Year field and select the year earned using the spring date; i.e., a grade earned in session 1213 would have year 13. | ||
#Repeat the process for '''S2n''' and '''F1n''' as needed. | #Repeat the process for '''S2n''' and '''F1n''' as needed. | ||
| − | #Click the '''S cell (save cell)''' | + | #Click the '''S cell (save cell)''' - At the far right of the top line. Enter the credit values for '''S1''', '''S2''', and/or '''F1'''. |
| − | #Click on '''Course Type''' | + | #Click on '''Course Type''' - To select if a course is - "01 Core" or "02 Elective". |
#If the grade was earned at a different school, select the '''Credit Site''' for each of the credit value entries. | #If the grade was earned at a different school, select the '''Credit Site''' for each of the credit value entries. | ||
| − | #Click '''Save''' | + | #Click '''Save''' - The window will return to the workstation screen and the new entry will be found in the appropriate transcript group. |
===Deleting a Transcript Record=== | ===Deleting a Transcript Record=== | ||
| − | #Click the '''Find''' | + | #Click the '''Find''' - Button at the bottom of the screen and select the student name needs a record deleted. |
| − | #Click the '''Red''' | + | #Click the '''Red''' - Cell to the left of the record that needs part or all of the record deleted. |
| − | #A '''Warning''' | + | #A '''Warning''' - Box will appear. The name of the course will be included above the three items listed. The value in parentheses is the alpha grade that that record. Only the existing record type(s) will have an active check box. |
| − | #Click the '''Cancel''' | + | #Click the '''Cancel''' - Button if the is the wrong course; or |
#Select the record(s) to be deleted and click '''OK'''. | #Select the record(s) to be deleted and click '''OK'''. | ||
| Line 60: | Line 88: | ||
| + | ---- | ||
| + | [[Transcript Workstation|'''Transcript Workstation''' Main Page]] | ||
| + | |||
| + | ---- | ||
| + | [[Transcripts|'''Transcripts''' Main Page]] | ||
---- | ---- | ||
| − | + | [[WebPams|'''JCampus''' Main Page]] | |
| − | |||
| − | |||
Latest revision as of 09:09, 6 June 2024
These instructions provide an overview of how to add or remove courses in the Transcript Workstation. Transcripts can be a mixture of historical records and current year grades. Only historical records can be edited via the transcript workstation.
Menu Location
Transcripts > Transcript Workstation
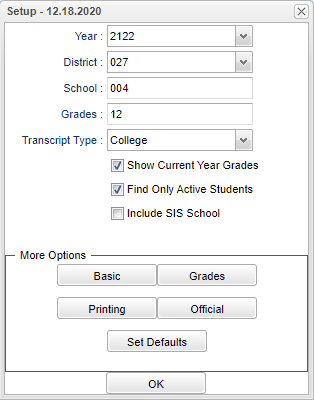
Setup Options
Year - Defaults to the current year. A prior year may be accessed by clicking in the field and making the appropriate selection from the drop down list.
District - Default value is based on the user's security settings. It will be limited to their district only.
School - Default value is based on the user's security settings. If the user is assigned to a school, the school default value will be their school site code.
Grade - Leave blank or select all to include all grade levels. Otherwise, choose the desired grade.
Transcript Type - College, Official, Custom.
Show Current Year Grades - Grades from the current year (only available after the first semester grades have been calculated).
Find Active Students Only - This choice will list only those students who are actively enrolled as of the date selected in the date field.
Use SIS School - View SIS school assigned students routed back to setup school.
- NOTE - You can only view transcripts for students in grades 9-12.
- Make selections in the More Options section. After making selections in each area, click OK to return to the setup box.
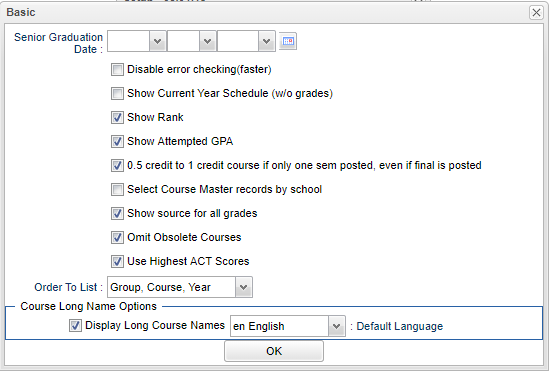
Basic Option
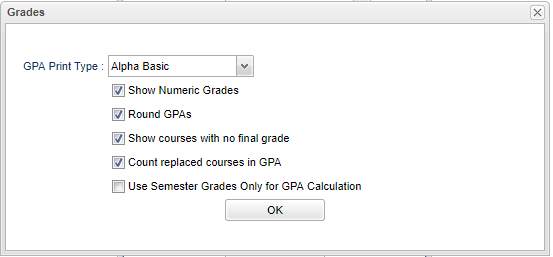
Grades Options
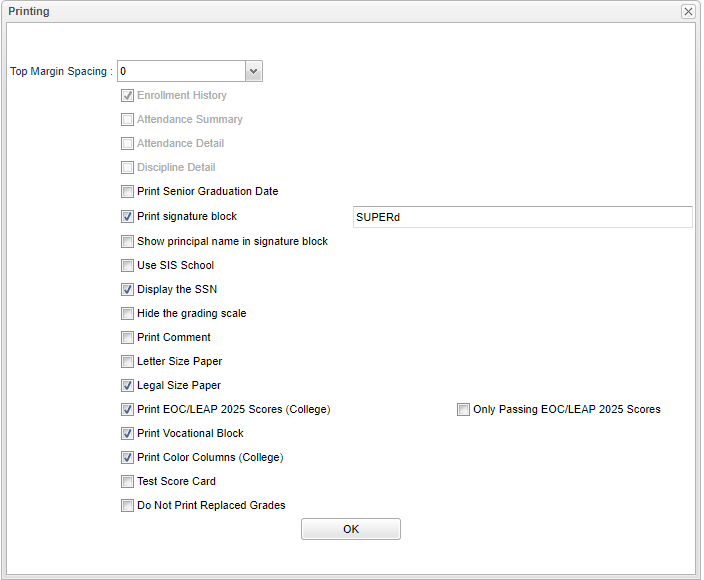
Printing Options
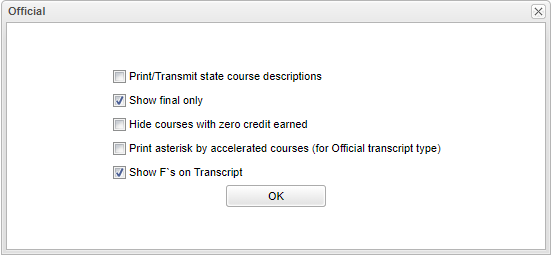
Official Options
Creating a New Transcript Record for Courses Found in the Course Catalog
- Click the Find button at the bottom of the screen and select the student name whose transcript needs to be edited.
- Use the top blank line to enter the new record.
- To use the Course Catalog do a single left mouse click in the course name field and a course list will appear.
- Use the Search field to scroll quickly through the list of courses; or, use the vertical scroll bar at the right of the popup to scroll to the desired course.
- After selecting the course from the list, it will appear in the top line of the transcript display along with the Group Number and the State Code.
- If your transcript uses numeric grades enter the numeric value in the S1n field. The alpha grade will automatically appear based on the grading scale for your school/district.
- If your transcript uses alpha grades skip the S1n field and enter the S1a for (alpha). There is no need to enter a numeric grade.
- Click in the Year field and select the year earned using the spring date; i.e., a grade earned in session 1213 would have year 13.
- Repeat the process for S2n and F1n as needed.
- Click the S cell (save cell) at the far right of the top line. If you selected a course from the courses file, click the Save button on the next window. If you did not select the course from the courses file, enter the credit values for S1, S2, and/or F1.
- If the grade was earned at a different school, select the credit site for each of the credit value entries.
- Click Save. The window will return to the workstation screen and the new entry will be found in the appropriate transcript group.
Creating a New Transcript Record for Courses NOT Found in the Course Catalog
- Click the Find button at the bottom of the screen and select the student name whose transcript needs to be edited.
- Use the top blank line to enter the new record.
- Click in the GRP field on the top blank line. Select the appropriate group from the drop down list.
- Click in the Course field. When the course list shows, close the list using the X at the top right.
- The cursor will now be flashing the Course name field. Type the name of the course. Follow the remaining steps to complete the entry of this transcript record.
- Click in the S-code field. The state course catalog will appear. Sort by the course name; then type the name in the search field to move to the desired course. Or, use the vertical scroll bar to move to the course name.
- Select the state code.
- Enter the information for the different record types according to the next steps.
- If your transcript uses numeric grades enter the numeric value in the S1n field. The alpha grade will automatically appear based on the grading scale for your school/district.
- If your transcript uses alpha grades skip the S1n field and enter the S1a for (alpha). There is no need to enter a numeric grade.
- Click in the Year field and select the year earned using the spring date; i.e., a grade earned in session 1213 would have year 13.
- Repeat the process for S2n and F1n as needed.
- Click the S cell (save cell) - At the far right of the top line. Enter the credit values for S1, S2, and/or F1.
- Click on Course Type - To select if a course is - "01 Core" or "02 Elective".
- If the grade was earned at a different school, select the Credit Site for each of the credit value entries.
- Click Save - The window will return to the workstation screen and the new entry will be found in the appropriate transcript group.
Deleting a Transcript Record
- Click the Find - Button at the bottom of the screen and select the student name needs a record deleted.
- Click the Red - Cell to the left of the record that needs part or all of the record deleted.
- A Warning - Box will appear. The name of the course will be included above the three items listed. The value in parentheses is the alpha grade that that record. Only the existing record type(s) will have an active check box.
- Click the Cancel - Button if the is the wrong course; or
- Select the record(s) to be deleted and click OK.
Transcript Workstation Main Page
