Difference between revisions of "Student Demographic Fast Loader"
From EDgearWiki
Jump to navigationJump to search| Line 10: | Line 10: | ||
# In the upper left, locate the '''Student Master''' category. Underneath, click on “'''Loaders'''”, then “'''Student Demographic Fast Loader'''”. | # In the upper left, locate the '''Student Master''' category. Underneath, click on “'''Loaders'''”, then “'''Student Demographic Fast Loader'''”. | ||
| − | # | + | #If you need instructions for setup values to be used, follow the link for '''[[standard setup options]]'''. |
| − | + | #The next items are not found on the standard setup options document. | |
| − | |||
| − | # | ||
| − | |||
| − | |||
| − | |||
#** '''Show Parent’s Security Code''': Select to show the 5 digit code (PSN) needed for the Parent / Guardian to create a Student Progress Center Account. | #** '''Show Parent’s Security Code''': Select to show the 5 digit code (PSN) needed for the Parent / Guardian to create a Student Progress Center Account. | ||
#** '''Show JCOMM Permissions''': Use only if the district uses the Edgear Call System. Select to show a place for the parent / guardian to indicate that a call is not to be placed to a given phone number. | #** '''Show JCOMM Permissions''': Use only if the district uses the Edgear Call System. Select to show a place for the parent / guardian to indicate that a call is not to be placed to a given phone number. | ||
Revision as of 11:23, 7 April 2014
Video How-to
Student Demographic Fast Loader video
This program will do the following:
- Create a form for parents to review demographic information about a student, then return with any corrections.
- Allow a user to update the demographic information of the student, then print an updated copy of the form if needed.
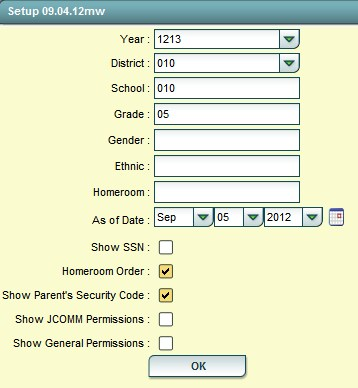
Directions for Printing a Demographic Page to Send Home:
- In the upper left, locate the Student Master category. Underneath, click on “Loaders”, then “Student Demographic Fast Loader”.
- If you need instructions for setup values to be used, follow the link for standard setup options.
- The next items are not found on the standard setup options document.
- Show Parent’s Security Code: Select to show the 5 digit code (PSN) needed for the Parent / Guardian to create a Student Progress Center Account.
- Show JCOMM Permissions: Use only if the district uses the Edgear Call System. Select to show a place for the parent / guardian to indicate that a call is not to be placed to a given phone number.
- Show General Permissions: Deselect (no check) to show the Comments from Student Master at the bottom of the form. Select to show Permissions check boxes at the bottom of the form.
- Click OK.
- Shown below are typical Settings for Student Progress Center confirmation.
- A listing of students with a select box will be displayed. Click in the select box of the desired students to create a form, or to select all students displayed, click the square in the upper left. You will then notice that a check mark is placed to the left of the name of the student(s).
- To print the forms, click the Print Short Form button on the lower right of the screen. A print preview will be displayed to review the report before printing. Note: If a large school, it may take a minute or two to get the report.

Directions for Updating Student Demographics When the Form Is Returned
Note: This is not the only way to update demographics. If the user is more comfortable updating demographics in the Student Master module, that is certainly a good option. The advantage here is that all of the demographic information is on one screen that roughly fits the form that was printed out.
- When the forms are returned, go to the Student Demographics Fast Loader as detailed earlier in steps 1 and 2 on the previous page.
- At the student listing, click on a student’s name or ID number. Give it two or three seconds, then you will see a demographic screen that will appear as shown below. Generally, you will find that the fields match the layout of the printed demographic page.
- Update the information on the screen to match the form returned by the parent/guardian.
- Important! Click the “Save” button located on the lower left to store the changes.
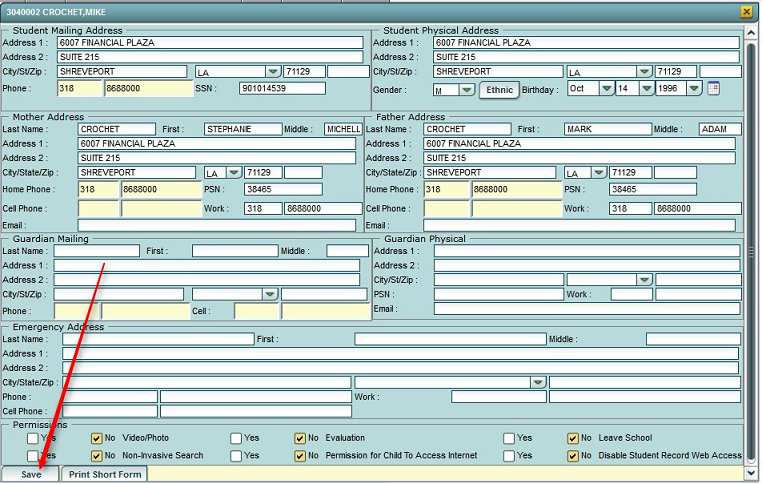
- Tip: If the user wishes to print an updated form of demographic information on the student, click the “Print Short Form” button located in the lower left.
- Click the yellow “x” in the upper right to close the screen. You will be returned to the student listing.
- To work on the next student, browse the listing to the desired student, click on the student name or ID, and repeat the steps above.
