Difference between revisions of "Consultation"
From EDgearWiki
Jump to navigationJump to search| Line 3: | Line 3: | ||
[[File:consulteditordialog2.png]] | [[File:consulteditordialog2.png]] | ||
| − | #First, find the student by clicking on the '''Find''' button. The school and grade level of the student are brought over from the Student Master module. | + | #First, find the student by clicking on the '''Find''' button. The school and grade level of the student are brought over from the [[Student Master]] module. |
| − | # | + | #Click in the top blank top row and a "Consultation Editor Dialog" box will display to add results of a new '''Consultation'''. |
| − | |||
#*Click in the '''Date''' box to enter the date of the consult. | #*Click in the '''Date''' box to enter the date of the consult. | ||
#*The '''Time''' cell will be defaulted to the current time. The '''Time''' can be changed by clicking inside the cell. Remember to use military time – HH : MM. | #*The '''Time''' cell will be defaulted to the current time. The '''Time''' can be changed by clicking inside the cell. Remember to use military time – HH : MM. | ||
| Line 15: | Line 14: | ||
#*Click in the “'''ICD'''” box. A window containing diagnosis codes will be displayed. '''A search bar has been added for a quick search in the ICD Codes'''. Choose the appropriate code by clicking in the check box. This brings in the '''ICD Code''' and the '''Reason'''. You can add text to the reason, if needed. | #*Click in the “'''ICD'''” box. A window containing diagnosis codes will be displayed. '''A search bar has been added for a quick search in the ICD Codes'''. Choose the appropriate code by clicking in the check box. This brings in the '''ICD Code''' and the '''Reason'''. You can add text to the reason, if needed. | ||
#*Enter the '''Action Taken'''. The name of the nurse who logged will appear under the '''Nurse'''’s column. | #*Enter the '''Action Taken'''. The name of the nurse who logged will appear under the '''Nurse'''’s column. | ||
| − | # | + | #Click '''Save'''. |
| − | #To edit an existing row, click on the | + | #To edit an existing row, click on the row, edit the data. Click '''Save''' button. |
#To delete a row, click the red '''Delete''' cell at the start of the row to be removed. | #To delete a row, click the red '''Delete''' cell at the start of the row to be removed. | ||
| − | + | #At the end of each row there is a '''Print''' icon. Now each consultation can be printed individually. | |
| − | |||
| − | At the end of each row there is a '''Print''' icon. Now each consultation can be printed individually. | ||
Revision as of 07:27, 10 September 2021
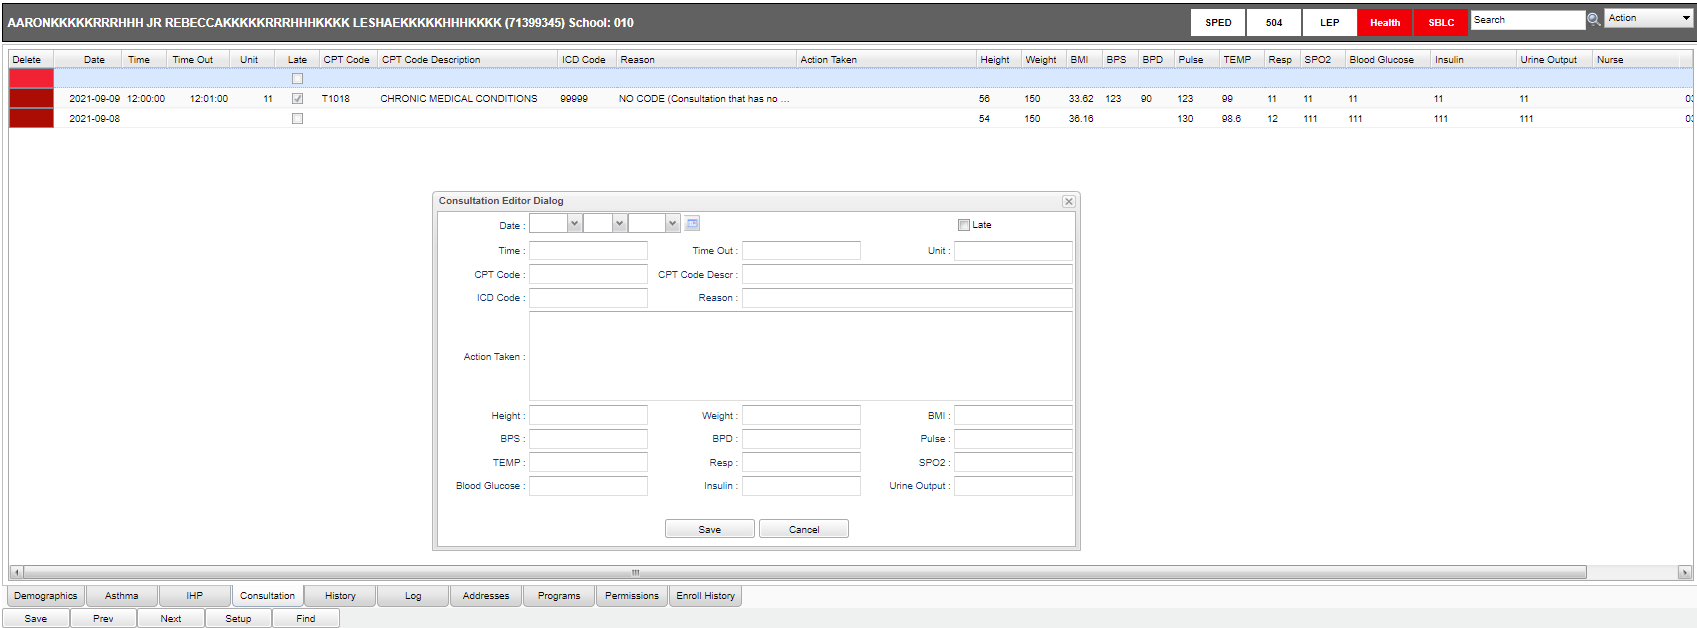
The "Consultation" tab is used to enter the nurse consults. This can serve as the electronic version of a paper log for nurses.
- First, find the student by clicking on the Find button. The school and grade level of the student are brought over from the Student Master module.
- Click in the top blank top row and a "Consultation Editor Dialog" box will display to add results of a new Consultation.
- Click in the Date box to enter the date of the consult.
- The Time cell will be defaulted to the current time. The Time can be changed by clicking inside the cell. Remember to use military time – HH : MM.
- The Time Out cell has time as military time with the format as HH:MM.
- Unit-The number of units that the nurse spent with a student.(A unit is defined as being 15 minutes and is used for Medicaid billing.)
- A Late column has been added to the headers.
- A CPT Code column has been added to the headers. Click in the column and a pick list of T Codes will populate. Make your selection by clicking in the square to the left of the code.
- A CPT Code Description will appear in this column corresponding to the T-Code.
- Click in the “ICD” box. A window containing diagnosis codes will be displayed. A search bar has been added for a quick search in the ICD Codes. Choose the appropriate code by clicking in the check box. This brings in the ICD Code and the Reason. You can add text to the reason, if needed.
- Enter the Action Taken. The name of the nurse who logged will appear under the Nurse’s column.
- Click Save.
- To edit an existing row, click on the row, edit the data. Click Save button.
- To delete a row, click the red Delete cell at the start of the row to be removed.
- At the end of each row there is a Print icon. Now each consultation can be printed individually.
JCampus / Health / Health System / Tabs at the Bottom of the Health Screen
