Difference between revisions of "Teacher Quick Guide"
From EDgearWiki
Jump to navigationJump to search| (54 intermediate revisions by the same user not shown) | |||
| Line 1: | Line 1: | ||
| + | __NOTOC__ | ||
=='''Startup'''== | =='''Startup'''== | ||
| + | * Use Firefox, Google Chrome, or Internet Explorer 9 to go to WebPams (https://jpams.avoyellespsb.com/WebPams). Login with your login / password. | ||
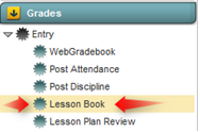
| − | + | * On the left navigation pane, click the link for “Lesson Book”. | |
| − | |||
| − | |||
| + | * The current week will open. To choose a different week, click on the left / right arrows or on the calendar. [[File:Lessonbook_Red4.png|link=]] | ||
| − | [[File:Lessonbook_Teacher_1.png|link=]] | + | [[File:Lessonbook_Teacher_1.png|link=]] |
| + | [[File:Lessonbook-Toolbar.png|link=]] | ||
=='''Create a Plan'''== | =='''Create a Plan'''== | ||
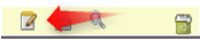
| − | + | *Click on the “New” icon to start a lesson plan. Enter the details. [[File:Lessonbook_Red1.png|link=]] | |
| − | + | ||
| − | + | *Pick the section, then give the plan a title. Set the date range, then set GLE’s if applicable. Enter Objectives. | |
| − | + | ||
| − | + | *For “Template”, click to choose the desired template. A template of text will be entered into the “Lesson” field. Add in additional text to the “Lesson” area. | |
| − | + | ||
| + | *Enter the desired Homework, Modifications, Instructional Methods, and Eval/Assessment areas. | ||
| + | |||
| + | *To save, click the “Save” (disk) icon. [[File:Lessonbook_Teacher_4.png|link=]] | ||
| + | |||
| + | *If the user would like to copy the plan to other sections, click the “Copy” icon and choose the other sections to post identical plans to. After selecting other sections, click OK to complete the copy and save action. [[File:Lessonbook_Teacher_5.png|link=]] | ||
=='''Edit a Plan'''== | =='''Edit a Plan'''== | ||
| + | *Hover over the cell of the plan to be edited. Tiny icons will appear at the bottom of the plan. Click the pencil/tablet icon. [[File:Lessonbook_Teacher_6.png|link=]] | ||
| − | + | *Change the desired information, then click the “Save” (disk) icon. | |
| − | |||
| − | |||
=='''Delete a Plan'''== | =='''Delete a Plan'''== | ||
| − | + | *Hover over the cell of the plan to be edited. Click on the little trashcan icon. [[File:Lessonbook_Teacher_7.png|link=]] | |
=='''Printing'''== | =='''Printing'''== | ||
| − | + | *To Print a Single Lesson: Hover over the cell of the plan to print. Click the little printer icon at the bottom of the cell. [[File:Lessonbook_Teacher_8.png|link=]] | |
| − | + | ||
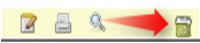
| + | *To Print a Week’s set of Lessons: Click the Printer icon on the top of the page. [[File:Lessonbook_Red2.png|link=]] | ||
=='''Display Only Lessons'''== | =='''Display Only Lessons'''== | ||
| − | + | *Lessons are light blue. Assignments are peach. To show only blue Lessons, click the “Tools” button. [[File:Lessonbook_Red3.png|link=]] | |
| − | [[File: | + | |
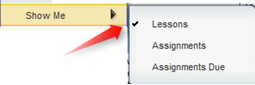
| + | *Then “Show Me”,then set to have only “Lessons” checked as shown on right. [[File:LB_edit.png|link=]] | ||
=='''Submit Lessons for Review'''== | =='''Submit Lessons for Review'''== | ||
| + | * When lessons for week are complete, click the “Submit” icon. [[File:Lessonbook_Teacher_11.png|link=]] | ||
| + | * Circles in the lesson cells will turn from white to gray. | ||
| + | * After review by the school administrator, circles will be either green or red. If red, click to view any comment from school administrator. | ||
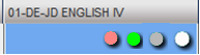
| + | * Circle Color Index: | ||
| + | White: Lesson(s) not submitted. | ||
| − | |||
| − | |||
| − | |||
| − | |||
| − | |||
Gray: Lesson submitted, but not reviewed by school administrator. | Gray: Lesson submitted, but not reviewed by school administrator. | ||
| − | Green: Lesson approved by school administrator | + | |
| + | Green: Lesson approved by school administrator | ||
| + | |||
Red: Lesson not approved by school administrator. Click red circle to view comment. | Red: Lesson not approved by school administrator. Click red circle to view comment. | ||
| + | |||
[[File:Lessonbook_Teacher_12.png|link=]] | [[File:Lessonbook_Teacher_12.png|link=]] | ||
Latest revision as of 10:25, 12 February 2014
Startup
- Use Firefox, Google Chrome, or Internet Explorer 9 to go to WebPams (https://jpams.avoyellespsb.com/WebPams). Login with your login / password.
- On the left navigation pane, click the link for “Lesson Book”.
- The current week will open. To choose a different week, click on the left / right arrows or on the calendar.


Create a Plan
- Click on the “New” icon to start a lesson plan. Enter the details.

- Pick the section, then give the plan a title. Set the date range, then set GLE’s if applicable. Enter Objectives.
- For “Template”, click to choose the desired template. A template of text will be entered into the “Lesson” field. Add in additional text to the “Lesson” area.
- Enter the desired Homework, Modifications, Instructional Methods, and Eval/Assessment areas.
- To save, click the “Save” (disk) icon.

- If the user would like to copy the plan to other sections, click the “Copy” icon and choose the other sections to post identical plans to. After selecting other sections, click OK to complete the copy and save action.

Edit a Plan
- Hover over the cell of the plan to be edited. Tiny icons will appear at the bottom of the plan. Click the pencil/tablet icon.
- Change the desired information, then click the “Save” (disk) icon.
Delete a Plan
- Hover over the cell of the plan to be edited. Click on the little trashcan icon.
Printing
- To Print a Single Lesson: Hover over the cell of the plan to print. Click the little printer icon at the bottom of the cell.

- To Print a Week’s set of Lessons: Click the Printer icon on the top of the page.

Display Only Lessons
- Lessons are light blue. Assignments are peach. To show only blue Lessons, click the “Tools” button.

- Then “Show Me”,then set to have only “Lessons” checked as shown on right.
Submit Lessons for Review
- When lessons for week are complete, click the “Submit” icon.

- Circles in the lesson cells will turn from white to gray.
- After review by the school administrator, circles will be either green or red. If red, click to view any comment from school administrator.
- Circle Color Index:
White: Lesson(s) not submitted.
Gray: Lesson submitted, but not reviewed by school administrator.
Green: Lesson approved by school administrator
Red: Lesson not approved by school administrator. Click red circle to view comment.