Difference between revisions of "Vision/Hearing Loader"
(→Bottom) |
|||
| Line 86: | Line 86: | ||
[[File:visionbottom1.png]] | [[File:visionbottom1.png]] | ||
| − | '''Setup''' | + | '''Setup''' - Click to make desired selections for running the program, such as change the school or homeroom. |
| − | '''Save''' | + | '''Save''' - Saves the data on the table to each student’s Health-Vision or Health-Hearing tabs. |
| − | '''Defaults''' | + | '''Defaults''' - user may set all columns to Not Tested before the start of testing |
| − | '''Print Table''' | + | '''Print Table''' - To find the print instructions, follow this link: '''<span style="background:yellow">[[Standard Print Options]]</span>'''. |
'''Delete''' - This button only deletes the rows selected with the row selection columns. | '''Delete''' - This button only deletes the rows selected with the row selection columns. | ||
Revision as of 03:40, 29 May 2018
Menu Location
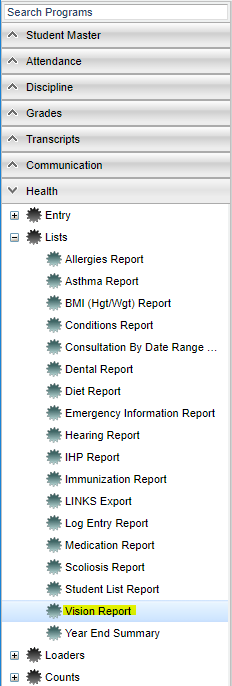
On the left navigation panel, select Health > Loaders > Hearing/Vision Loader.
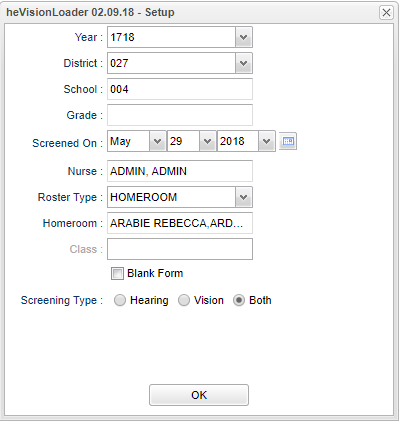
Setup Options
Year and District - Should default to current year and user`s district.
School - Select the desired school. and the school needed for the report
Grade - Select grade level(s) of students. This selection can be left blank if choosing students by homeroom or class. Click OK at the bottom of the page to move back to the main setup box, once the selection(s) has been made.
Screened On - Date of the screening. Normally is defaulted to current date, but can be changed by clicking the drop down date fields or by clicking on the calendar icon on the far right.
Nurse - Name of nurse saving records. Defaults to the nurse associated with the login.
Roster Type - Select either Homeroom, #Class: A selection from the Roster Type must be selected to activate the selections listed below.
Homeroom - To pull a listing of students in a teacher’s homeroom.
Class - To pull a listing of students by class roster.
Home Room - If Roster Type of Homeroom was selected, click in this cell. A list of homerooms will appear. Select the desired homeroom.
Class - If Roster Type of Class was selected, click in this cell. A list of classes will appear. Browse or Search the listing, then click on the row of the class of students needed.
- To search the listing by Teacher, click on the column header for Teacher, then type in the Search field.
- To search the listing by Course (Class), click on the column header for Course, then type in the Search field.
Blank Form - If selected, the student listing will show blank fields for the screening results.
- This is often used when a paper listing of students is desired. Failures are noted by hand, and then the results are put into the loader at a later time.
Screening Type - Select Hearing to show fields associated with Hearing screening only. Select Vision to show fields associated with Vision screening only. Select Both to show fields associated with both kinds of screenings.
OK - Click to continue
Setting the Vision/Hearing Defaults
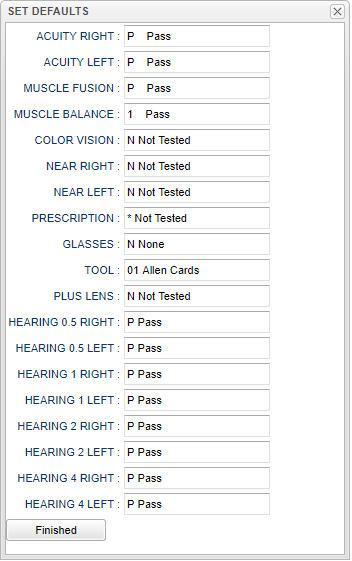
- Before Saving data to students, the user should set the Defaults for the Vision/Hearing display. This is normally done only once. These settings will be used for any future use of the loader.
- On the Vision/Hearing Loader screen, click the Defaults button located at the lower left of the screen.
- Go through each field and select the default result that will be posted for students.
- Note: If a field is not used, choose “N Not Tested”.
- A mass deletion of defaults may be done by selecting all of the students and then selecting the fields and making the blank selection. All of the defaults will be removed at this time.
- Click the Finished button.
- The listing of students will be refreshed with the Defaults values now appearing in each cell for each student.
- In the future, if needed, the Defaults can be changed.
- Defaults - Are associated with the Nurse’s login. One nurse can have different Defaults than another Nurse.
Vision/Hearing Loader Screen Features
- On screen will be a listing of students with Defaults filled in each cell.
- Vision columns are shaded green. Hearing columns are shaded blue.
TIP - To make the screen display more columns, “hide” the navigation panel by clicking on the little arrow on the separator bar as shown below.
- Column headers are listed across the top of the page. Hover over the column header to see a tool tip describing the column.
- Students who are absent on the Screening Date from the Setup options will have “Not Tested” automatically displayed across all data cells in the row.
- As students are tested, if the default results apply to the student, then no change is needed.
- If a student has results that are different than the default, click in the cell and select the desired result.
- If any kind of “Fail” result is selected, the Nurse will see a Suspected Condition box appear as shown below.
Condition Type - Normally this will default to either "B Vision" or "C Hearing". If additional Condition Types are desired, click to add up to three more. Referral Type - Normally this will default to "U Under Care". Click to change if needed. Referral Reason - Click in the field to obtain a listing of Diagnosis Codes/Condtions. Browse the listing and select the most appropriate. OK - To return to the Vision / Hearing Loader screen.
- The student will now have a “Fail” result showing, as well as data in the SC V (Suspected Condition Vision) or SC H (Suspected Condition Hearing) cell.
Comments - Can be entered in the CommentsV (Comments for Vision) or CommentsH (Comments for Hearing) fields.
- When done posting any Fail results or variations from the Defaults, click the Save button.
- The screening results will be stored in each student’s History–Vision tab Link Here or History–Hearing tab Link Here of the Health System Link here.
Bottom
Setup - Click to make desired selections for running the program, such as change the school or homeroom.
Save - Saves the data on the table to each student’s Health-Vision or Health-Hearing tabs.
Defaults - user may set all columns to Not Tested before the start of testing
Print Table - To find the print instructions, follow this link: Standard Print Options.
Delete - This button only deletes the rows selected with the row selection columns.


