Difference between revisions of "Employee List"
| Line 158: | Line 158: | ||
[[#top|Top of Page]] | [[#top|Top of Page]] | ||
| − | |||
===<u>Buttons at the Bottom of the Employee List Screen</u>=== | ===<u>Buttons at the Bottom of the Employee List Screen</u>=== | ||
Revision as of 04:44, 18 April 2018
This program will provide users with a list of employees from Human Resource records. Numerous filters are provided to refine the list to meet the needs of the user.
Menu Location

On the left navigation panel, Human Resources > Lists > Employee List.
Setup Options

Year - Defaults to the current year. A prior year may be accessed by clicking in the field and making the appropriate selection from the drop down list.
District - Default value is based on your security settings. You will be limited to your district only.
School - Default value is based on your security settings. If you are assigned to a school, the school default value will be your school site code. You will not be able to change this value. If you are a supervisor or other district office employee with access to the Student Information System, you will be able to run programs for one school, a small group of schools, or all schools in your district.
NOTE - Empty For All Sites - Leave this school selection box blank to see employees regardless of their district/school number. If this box is blank, then the site code listed in HR Master will be skipped.
Home Base - Clicking the in the Home Base field will give the user the following three choices:
- All - This option will give the user all the records whether they have a Home Base or not.
- Yes - This option will give the user the employees who have an assigned Home Base.
- No - This option will give the user the employes who do not have an assigned Home Base.
Gender - The user can filter the list by gender. Select Female, Male, or both. Leaving the field empty will select both Female and Male.
Ethnic - The user can filter the employee list by Ethnicity by the appropriate choice from the pick list. Leaving the field blank or selecting All will select all ethnic groups.
Status - The user can filter the employee list by the employee's status:
- All - Select to see all Active and Separated employees.
- Active - Select to see only Active employees.
- Separated - Select to see only Separated employees.
NOTE - If Status is All or Yes, then the From and To Separation dates will become grayed out.
Sep Date From - The Separation Date From value paired with the Separation Date To value is used to limit the list of employees to those that have separation dates within that range.
Sep Date To: - The Separation Date From value paired with the Separation Date To value is used to limit the list of employees to those that have separation dates within that range.
Hire Date From - The Hire Date From value paired with the Hire Date To value is used to limit the list of employees to those that have separation dates within that range.
Hire Date To: The Hire Date From value paired with the Hire Date To value is used to limit the list of employees to those that have separation dates within that range.
Active As Of Hire Date - If this option is selected, Hire Dates To and From will be grayed out and the list will be all of the employees who are active as of the Hire Date value.
Hire Date - The Hire Date is used in conjunction with the Active As of Hire Date to generate a list of employees who were active as of the Hire Date.
Column - This field is used to determine which columns are displayed or printed. (See the Columns section below)
Show Salary - Check the box to see employee salaries based on the criteria set above. NOTE - The user MUST have a profile of AD to view employee salaries.
![]()
Filters

Cert Type: Select the Certificate Type (A, B, C, etc.). Leave blank to select all.
Cert Expire By: Enter the date the certificate expires.
Cert Area: Select the certification area. Leave blank to select all.
HQ Area: Select the HQ Area & Methods. Leave blank to select all.
Degree: Select the highest degree earned.
Object Code: Select the object code from the list. Leave blank to select all.
Function Code: Select the function code from the list. Leave blank to select all.
Job Class: Select the Job Class form the list. Leave blank to select all.
OK - Click to continue.
Displayed Column Headers


- Last Name: Employee's last name.
- First Name: Employee's first name.
- Middle Name: Employee's middle name.
- SSN: Employee's social security number
- SIDNO: Staff ID Number.
- Payroll ID: Employee's payroll ID
- School: Employee's site code.
- Object Function: Employee's Object/Function code. The first 3 digits are the object code and the last 4 digits are the function code.
- Job Class: Emp;oyee's Job Class (Teacher, Administrator, Nurse, etc.).
- Emp Type: Employee's type (Status: Active or Separated)
- Hire Date: The date for the Employee's first day of employment.
- Sep Date: The first work day after the employee's last day of employment.
- Sep Code: The reason the employee has left.
- Address: The employee's street address.
- Apt: The employee's appartment number, if applicable.
- City: The city associated with the employee's address.
- State: The state associated with the employee's address.
- Zip: The zip code associated with the employee's address.
- Country: The country associated with the employee's address.
- Home Phone: The employee's home phone number.
- Cell Phone: The employee's cellular phone number.
- Email: The employee's work email address.
- Birth Date: The employee's date of birth.
- Gen: The employee's gender.
- Eth: The employee's ethnicity group.
- Degree: The employee's level of education.
- Cert Type: The employee's certificate type, if applicable.
- Cert No: The identification number on the employee's certificate.
- Cert Suf: The suffix of the employee's certificate number.
- Cert Area: The employee's area of certification.
- Cert Issue: The date the employee's certificate was issued.
- Cert Exp: The expiration date of the employee's certificate.
- HQ Areas & Methods: The employee's highly qualified area.
- Years Exp: The employee's years of experience.
- Home Base: The site code for the employee's home base.
- Tenure Status: Four options are available.
- 00 Not applicable
- 01 Has tenure
- 02 Does not have tenure
- 03 Had tenure but lost it
- Tenure Reason: Two options are available.
- 01 Lost due to effectiveness
- 02 Lost due to felony/other reason
- Tenure Added: Date tenure was added.
- Tenure Lost: Date tenure was lost.
- Demand Salary: Salary amount for Demand Pay.
- Performance Salary: Salary amount for Performance Pay.
NOTE: The Column field on the setup box will allow the user to select the specific columns to be displayed/printed.
Buttons at the Bottom of the Employee List Screen
Setup
- Clicking the Setup button will display the original setup box with the previously selected settings displayed.
- Clicking the Print button will bring up the Print Dialog box that allows the user to choose from various formats. See below:
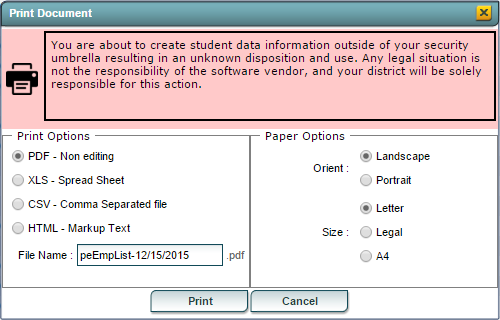 Employee List Print Dialog Box

To find the print instructions, follow this link: Standard Print Options.
Communicate
- Clicking the Communicate button will bring up an Email setup box. The created email will be sent to all employees in the list if they have a valid email address. (See Below)
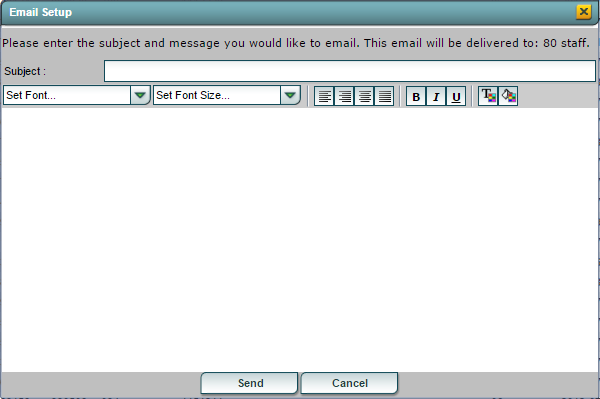 Employee List Email Setup Window

- Help: Clicking the Help button will take the user to the Main Human Resources help screen.