Difference between revisions of "Google Chrome"
From EDgearWiki
Jump to navigationJump to search| Line 19: | Line 19: | ||
:#Choose settings below: | :#Choose settings below: | ||
:#Obliterate the following items from: the beginning of time | :#Obliterate the following items from: the beginning of time | ||
| − | + | :#*check - Clear browsing history | |
| − | + | :#*check - Clear download history | |
| − | + | :#*check - Empty the cache | |
| − | + | :#*check - Delete cookies and other site and plug-in data | |
| − | + | :#*no check - Clear saved passwords | |
| − | + | :#*no check - Clear saved Autofill form data | |
| − | + | :#*no check - Clear data from hosted apps | |
| − | + | :#*no check - Deauthorize content licenses | |
:#Click on “Clear Browsing Data” | :#Click on “Clear Browsing Data” | ||
Revision as of 09:13, 22 October 2013
Note: After settings are adjusted on your browser, be sure to close and re-open the browser for the new settings to apply.
Unblock Popups For WebPams (Print jobs do not display)
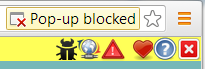
- The user will see a popup blocker icon in the upper right corner as shown below.
 OR
OR 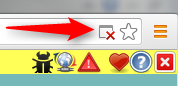
- Click on the popup icon. In the dialog box, (1)Click "Always allow popups from...." and (2)Click the hyperlink as shown below.
- The print preview will now be displayed.
- From now on, the print jobs will show in Google Chrome.
- The user will see a popup blocker icon in the upper right corner as shown below.


Clear Browsing Data
- Top right corner of screen
- Click on the 3 bars (or wrench)
- Choose “Settings”
- Scroll down and Click on “Show Advanced Settings”
- Under Privacy click on “Clear Browsing Data”
- Choose settings below:
- Obliterate the following items from: the beginning of time
- check - Clear browsing history
- check - Clear download history
- check - Empty the cache
- check - Delete cookies and other site and plug-in data
- no check - Clear saved passwords
- no check - Clear saved Autofill form data
- no check - Clear data from hosted apps
- no check - Deauthorize content licenses
- Click on “Clear Browsing Data”
Set the Home Page to WebPams
- Top right corner of screen
- Click on the 3 bars (or wrench)
- Choose “Settings”
- Under On Startup, choose “Open a Specific Page or Set of Pages”
- Click on the blue “Set Pages”
- Click in the box by “Add New Page”
- Type in your WebPams URL Address
- Click “OK”
Disable Toolbars and Extensions
- Top right corner of screen
- Click on the 3 bars (or wrench)
- Choose “Tools”
- Choose "Extensions"
- A list of toolbars will be displayed. On the right of each will be a check box by "Enable". Click to remove the check or delete using the trash can.
- A dialog box will ask if you want to remove the toolbar. Click "Yes" to finish the removal.

Magnification
- Top right corner of screen
- Click on the 3 bars (or wrench)
- Look at Zoom
- Magnification of the screen should be set to 100%.
Maximize the Screen
- Locate the "square" in the top right corner of screen.
- Click on the "square" to make the browser fill the entire screen.

Display Screen Resolutions
- The best display screen resolution is 1024 X 768 or higher.