Difference between revisions of "Photo File Creator"
From EDgearWiki
Jump to navigationJump to search| Line 1: | Line 1: | ||
| − | '''This program will create a csv file for the photographer in advance of the picture taking sessions. The file will help the photographer create photos that import into | + | '''This program will create a csv file for the photographer in advance of the picture taking sessions. The file will help the photographer create photos that import into JCampus for students.''' |
Revision as of 09:20, 26 February 2018
This program will create a csv file for the photographer in advance of the picture taking sessions. The file will help the photographer create photos that import into JCampus for students.
Note: Please do not use Excel to open or save the file created from this utility. Excel will trim off the leading zero on a student's ID.
- Reason: Excel will trim off the leading 0’s on a student’s ID and cause problems for the photographer.
How-to
- In the left navigation pane, click Student Master, then Interfaces, then Photo File Creator.
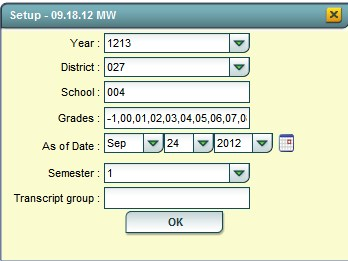
- At the setup box, set the Year, School, Grades, and As of Date.
- To create a file by Homeroom:
- Semester: Set to desired semester. Typically at the start of the year, this is “1”.
- Transcript group: Set to “blank” as shown below.
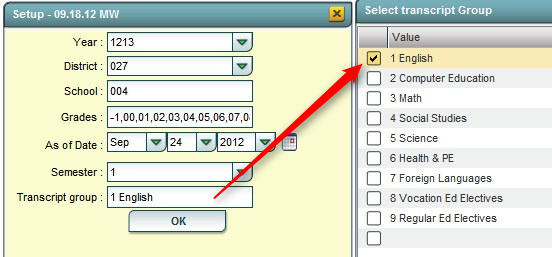
- To create a file by Transcript group, such as “English” classes:
- Semester: Select the desired semester. Typically at the start of year, this is “1”.
- Transcript group: Select the desired group, such as “English”.
- Click the OK button to continue.
- Review the results, then click the Print / Export button on the lower left of the screen.
- At the Print options screen, click to select “CSV – Comma Separated file”. You will see that the system has created a File Name for you. Click the Print button to create the file.
- Google Chrome users:
- A new window will open that will be mostly blank. In the lower left will be a link to the file. Click the arrow on the right of the file name. A menu will open. Choose Show in folder.
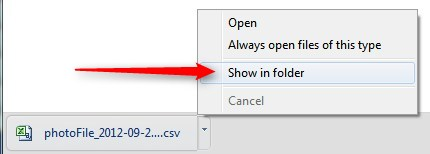
- Browse the listing of files to locate the “photoFile….csv” file. Send this file to your photographer.
- Remember: Please do not use Excel to open or save the file created from this utility. Excel will trim off the leading zero on a student's ID.


