Difference between revisions of "Action Menu"
From EDgearWiki
Jump to navigationJump to search| Line 12: | Line 12: | ||
| − | ''' | + | '''Print Options''' |
| − | + | ||
| − | + | To find the print instructions, follow this link: '''<span style="background:yellow">[[Standard Print Options]]</span>'''. | |
| − | |||
| − | |||
| − | |||
| − | |||
Revision as of 15:53, 11 January 2016
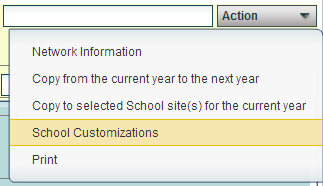
The Action button is found on the top right of the Sponsor Site Editor screen.
Items found on the Action button list.
- Network Information--These settings are provided by the client and entered here during the initial setup of the system. Network changes in the district may require editing of this information.
- Copy from current year to the next year
- Copy to selected school site(s) for the current year
- Draw Attendance Zone--For the school displayed, the system will indicate the number of students found in JCampus that have a physical address located in that zone
- School Customizations--selection of primary and secondary school colors and the school's website will allow for the colors to become part of the school's SPC site. There will be an option for including/excluding a watermark that will print as part of any document printed from this site.
- Print Site Demographics--Refer to the print instructions below.
Print Options
To find the print instructions, follow this link: Standard Print Options.
