Difference between revisions of "Load Student Course Requests"
| Line 85: | Line 85: | ||
#To delete a single request, click the red cell to the left of the course | #To delete a single request, click the red cell to the left of the course | ||
#To delete auto loaded requests for the school: | #To delete auto loaded requests for the school: | ||
| − | # | + | ##Click on the menu item "Action" |
| − | # | + | ##A menu will drop down. Select the option "Delete All Auto Loaded Unsched Requests For School". All auto loaded and unscheduled requests will be deleted |
#To delete unscheduled requests for the selected student only: | #To delete unscheduled requests for the selected student only: | ||
| − | # | + | ##Click on the menu item "Action" |
| − | # | + | ##A menu will drop down. Select the option "Delete All Unsched Requests For Student" |
[[#top|Top of Page]] | [[#top|Top of Page]] | ||
| Line 97: | Line 97: | ||
Courses can be specified as "Alternate" courses, that is, courses that can be scheduled if the primary courses cannot be scheduled. | Courses can be specified as "Alternate" courses, that is, courses that can be scheduled if the primary courses cannot be scheduled. | ||
There are two types of Alternate Courses: | There are two types of Alternate Courses: | ||
| − | + | #'''Parent/Alternative''': In this case, the alternate course is a substitution for a specific 'parent' course. | |
| − | + | ##''Specify the '''Parent''' course. | |
| − | + | ##''Specify the '''Alternative''' course. | |
::::''Note: A "Parent" course may have multiple "Alternative" courses. | ::::''Note: A "Parent" course may have multiple "Alternative" courses. | ||
| − | + | #'''Generic Alternative''': In this case, the alternative course can be substituted for any other course. | |
Below are examples of how to create Parent/Alternative course requests and a "Generic Alternative" course request: <br> | Below are examples of how to create Parent/Alternative course requests and a "Generic Alternative" course request: <br> | ||
Revision as of 15:39, 9 April 2015
Video
Load Student Course Requests video
Accessing the Load Student Course Requests Program
The Load Student Course Requests program can be accessed via the following path: JCampus -> Scheduling -> Entry -> Load Student Course Requests
Load Requests Setup Options
- Year: Select the appropriate school year. For this program, select the Year for the upcoming school year.
- District: Default value is based on your security settings. You will be limited to your district only.
- School: Default value is based on your security settings. If you are assigned to a school, the school default value will be your school site code. You will not be able to change this value. If you are a supervisor or other district office employee with access to the Student Information System, you will be able to run programs for one school, a small group of schools, or all schools in your district
- Stu Grades: Select the grade level(s) of the students that need course requests.
- Active Only: Check to include only those students who were active as of the date indicated in the date field below the Active Only button.
- Show: All, Sped Only, Non Sped: Check the appropriate option button to filter the students as follows:
- All: This options will show All student - both Special Education and Regular Education.
- Sped Only: This option will show only the Special Education students.
- Non Sped: This option will show only the Regular Education students.
- Spec Codes: This field will filter the list based on Special Codes. Special Codes must have been entered into the Student Master record for students. Leave blank if all special codes are to be included into the report. Otherwise click in the field to right to get a list of Special Codes to choose from.
- Programs: This field will filter the list based on Programs. Programs must have been entered into the Student Master record for students. Leave blank if all Program codes are to be included into the report. Otherwise click in the field to right to get a list of Program Codes to choose from.
- Include Scheduled Requests: Check this option to show student requests that have already been scheduled. Leave unchecked to view only unscheduled requests.
- Allow Multiyear Requests: Check this option to enter student requests up to five years in advance.
- Skip Obsolete Courses: Check this option to exclude courses that are marked as obsolete in the course selection list.
- Course Grades: Click in this field to get a list of grades. Click on the grades in the list to limit the course selection list to those grade levels.
- Create Courses From Master Schedule: Check this option to limit the course selection list to only those courses in the master schedule.
- Show Master Schedule Comments: Check this option if the comments entered in the Master Schedule Editor need to be displayed in the course list.
- Course Long Name Options: Complete this section regarding the options for displaying the Long Course Names:
- Display Long Course Names: Check this option if you want the Long Course Names" to be displayed in the course pick list.
- Default Language: Click on the drop-down arrow in the language selection field to choose the language to use to display the Long Course Name.
Click the Ok button when the setup box is correct.
Note: The Setup Options can be revised at any time by clicking on the Setup button at the bottom of the screen and making changes to the appropriate options.
Loading Course Requests for a Single Student
Finding the Student
- Find: Use the "Find" button at the bottom of the screen to bring up the Find box and search for the specific student.
- Scrolling: Use the "Prev" or "Next" button at the bottom of the screen to scroll through the list of students.
Loading the Course Requests
- Load Student: Use the "Load Student" button at the bottom of the screen to bring up the form below to load the course requests.
 Load Requests For The Current Student Form
- Select Standard/Priority Codes
- The user can select one, multiple, or all of the following options:
- All Courses(*): Select this option to load "*" standard courses to students.
- Female Courses (F): Select this option to load "F" standard courses to females.
- Male Courses (M): Select this option to load "M" standard courses to males.
- 1 Elective Courses: Select this option to load priority code 1 courses to students.
- 2-5 Elective Courses: Select this option to load priority codes 2-5 courses to students.
- 6-9 Elective Courses: Select this option to load priority codes 6-9 courses to students.
- SELECT COURSES (overrides standard/priority selections)
- Clicking on this button will bring up the Course List and will allow the user to select one or more courses to add as requests to the selected students.
- Select Year(s) To Load
- The user can select one or more of the school years displayed.
- Click on the "OK" button to process the selected operations and close the window or click on the "Cancel" button to cancel the operations and close the window.
- Manual Procedure: Click on a course in the right panel of the screen and it will appear as a request in the left panel. (See below)
- Load Student: Use the "Load Student" button at the bottom of the screen to bring up the form below to load the course requests.


Loading Course Requests for Multiple Students
- Load School: Auto loads requests for all students for the selected grade(s)

- Select Standard/Priority Codes
- The user can select one, multiple, or all of the following options:
- All Courses(*): Select this option to load "*" standard courses to students.
- Female Courses (F): Select this option to load "F" standard courses to females.
- Male Courses (M): Select this option to load "M" standard courses to males.
- 1 Elective Courses: Select this option to load priority code 1 courses to students.
- 2-5 Elective Courses: Select this option to load priority codes 2-5 courses to students.
- 6-9 Elective Courses: Select this option to load priority codes 6-9 courses to students.
- SELECT COURSES (overrides standard/priority selections)
- Clicking on this button will bring up the Course List and will allow the user to select one or more courses to add as requests to the selected students.
- Select Year(s) To Load
- The user can select one or more of the school years displayed.
- Click on the "OK" button to process the selected operations and close the window or click on the "Cancel" button to cancel the operations and close the window.
Deleting Course Requests for a Student
- To delete a single request, click the red cell to the left of the course
- To delete auto loaded requests for the school:
- Click on the menu item "Action"
- A menu will drop down. Select the option "Delete All Auto Loaded Unsched Requests For School". All auto loaded and unscheduled requests will be deleted
- To delete unscheduled requests for the selected student only:
- Click on the menu item "Action"
- A menu will drop down. Select the option "Delete All Unsched Requests For Student"
Alternate Course Requests
Courses can be specified as "Alternate" courses, that is, courses that can be scheduled if the primary courses cannot be scheduled. There are two types of Alternate Courses:
- Parent/Alternative: In this case, the alternate course is a substitution for a specific 'parent' course.
- Specify the Parent course.
- Specify the Alternative course.
- Note: A "Parent" course may have multiple "Alternative" courses.
- Generic Alternative: In this case, the alternative course can be substituted for any other course.
Below are examples of how to create Parent/Alternative course requests and a "Generic Alternative" course request:
Parent/Alternative: Step 1

Parent/Alternative: Step 2

Generic Alternative

Print Student Course Requests
Use the "PrtStu" button at the bottom of the screen to print the student(s) Course Request Forms
- PrtStu: Clicking on the "PrtStu" button displays the Print Course Request Forms setup/print box.

- Print Options
- Include Scheduled Requests: Select this option to show both scheduled and unscheduled requests. Leave unchecked to show unscheduled requests only.
- Print Course Offerings: Select this option to print all course offerings at the end of each student request form. The Master Schedule must exist for the base year.
- Print Stu Short Form: Select this option to print a student short form with each student request sheet.
- Course Listing Layout: Select to have the course listing printed in a horizontal or vertical format.
- HomeRoom and Grade Range
- Use Homeroom Order: Select to have the forms printed by HomeRoom Teacher and then alpha by student within the homeroom.
- Homeroom Teacher: Click in the Homeroom Teacher field to select the Homeroom Teachers to print.
- Grade: Click in the Grade field to further filter the grade level for the students in the selected homerooms.
- Student Selection
- Special Codes: This field will filter the list based on Special Codes. Special Codes must have been entered into the Student Master record for students. Leave blank if all special codes are to be included into the report. Otherwise click in the field to right to get a list of Special Codes to choose from.
- Programs: This field will filter the list based on Programs. Programs must have been entered into the Student Master record for students. Leave blank if all Program codes are to be included into the report. Otherwise click in the field to right to get a list of Program Codes to choose from.
- Select Student(s): Click in this field to select the student or students to print. NOTE: In some cases, there be no students to choose from due to the choices in the previous fields. For instance, if select homeroom teacher "A" and grade "10", but there are no 10th grade students in teacher A's homeroom, there will be no students in the list. The following field all combine to determine the students listed in the Select Student(s) field: Homeroom Teacher, Grade, Special Codes, and Programs.
- Year and Credit Options
- Add Alt Course Credit to Total Credits: Select this option to add the Alternate course credits to the Total credits for the student.
- Print Year 1516: Print the information for school year 1516. (Current school year plus 1).
- Print Year 1617: Print the information for school year 1617. (Current school year plus 2).
- Print Year 1718: Print the information for school year 1718. (Current school year plus 3).
- Print Year 1819: Print the information for school year 1819. (Current school year plus 4).
- Comment
- Text Box: Type in any comment you want to appear on the Course Request Forms.
- Print Comments: Select this option if you want the Comments in the above Text Box to appear on the Course Request Forms.
- Buttons At Bottom of Form
- Print Forms: Clicking on this button will print the Course Request Forms based on the above specifications.
- Cancel: Cancels the PrtStu operation and closes the window.
- Print Options
Course Request Alert
When a course is loaded where the student already has grades posted and/or a transcript record, the user will get the following warning message advising them of this fact. (See below)

If the user clicks "Cancel" on the warning message, the warning will disappear and the selected course will NOT be added to the Request List. If the user clicks "OK" on the warning message, a screen will pop up to display the grades and/or the transcript information. (See below)

If the user clicks "Close" on the Grades/Transcript display, the window will close and the selected course will NOT be added to the Request List. If the user clicks "OK" on the warning message, the window will close and the selected course WILL be added to the Request List.
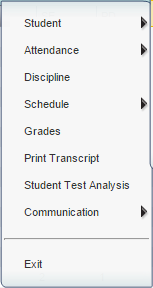
Action Menu
There are several items on the Action Menu that may assist with the Load Student Course Requests Program

- Gear Box: The iGear Box has tools that can provide relevant information when making decisions regarding scheduling. Using iGear
 iGear Menu
- Master Schedule: Clicking this will display the Master Schedule.
- Graduation Template Scheduler: Clicking this will bring up the Graduation Template Scheduler for the student currently being displayed.
- Delete All Unsched Requests for Student: Clicking this option will delete all the unscheduled requests for the displayed student. The user will get a confirmation message prior to the actual deletion.
- Delete All Auto-Loaded Unsched Requests For School: Based on the options selected on the following screen, all auto-loaded, unscheduled requests will be deleted.
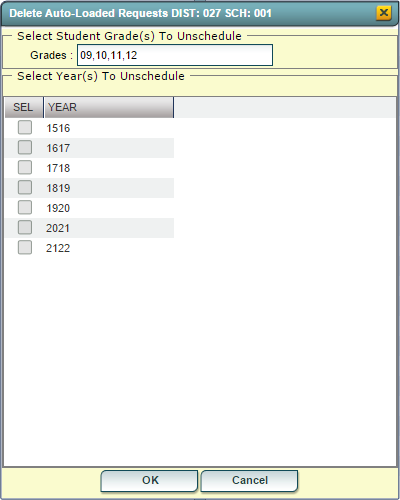 Delete Auto-Loaded Requests Options
- Select the grade(s).
- Select the year(s).
- Click "OK" to continue.
- The user will get a confirmation screen prior to the actual deletion.


Buttons at the Bottom of the Screen
- Help: Takes the user to the Scheduling help screen.
- MSched: Displays the Master Schedule selection screen.