Difference between revisions of "EDIT Tracking"
| (13 intermediate revisions by the same user not shown) | |||
| Line 4: | Line 4: | ||
==Menu Location== | ==Menu Location== | ||
| − | + | '''SBLC > Reports > EDIT Tracking''' | |
| − | |||
| − | |||
| − | |||
==Setup Options== | ==Setup Options== | ||
| − | [[File: | + | [[File:edittrackingsetup3.png]] |
'''Year''' - Defaults to the current year. A prior year may be accessed by clicking in the field and making the appropriate selection from the drop down list. | '''Year''' - Defaults to the current year. A prior year may be accessed by clicking in the field and making the appropriate selection from the drop down list. | ||
| − | '''District''' - Default value is based on | + | '''District''' - Default value is based on the user's security settings. It will be limited to their district only. |
| − | '''School''' - Default value is based on | + | '''School''' - Default value is based on the user's security settings. If the user is assigned to a school, the school default value will be their school site code. |
| − | |||
| − | |||
| − | '''Grade''' - | + | '''Grade''' - Leave blank or select all to include all grade levels. Otherwise, choose the desired grade level. |
| − | |||
'''Stats At Risk Points Limit''' - Defaults to 0, this my be changed by clicking in the cell, deleting 0, and typing the number for the report. | '''Stats At Risk Points Limit''' - Defaults to 0, this my be changed by clicking in the cell, deleting 0, and typing the number for the report. | ||
| Line 29: | Line 23: | ||
'''Show Students with Points>''' - Cell defaults to blank. User must type a minimum point(s) in the cell. | '''Show Students with Points>''' - Cell defaults to blank. User must type a minimum point(s) in the cell. | ||
| + | |||
| + | '''[[Report]]''' - The user can click in this box to select a report that was previously created. | ||
'''Ok''' - Click to continue | '''Ok''' - Click to continue | ||
| − | To find definitions for standard setup values, follow this link: | + | To find definitions for standard setup values, follow this link: [[Standard Setup Options]]. |
[[File:studentmasteroptions.png]] [[File:weightoptions.png]] | [[File:studentmasteroptions.png]] [[File:weightoptions.png]] | ||
| Line 42: | Line 38: | ||
'''Include''' - Check the box if the user wants the "Percent", "Threshold Points" and "Older Student Years" to be used in the calculations of the at risk points. Then the user must fill in the blanks to fit their needs for the report. | '''Include''' - Check the box if the user wants the "Percent", "Threshold Points" and "Older Student Years" to be used in the calculations of the at risk points. Then the user must fill in the blanks to fit their needs for the report. | ||
| − | '''Percent''' - Set this to what you want the | + | '''Percent''' - Set this to what you want the Percentage of these Student Master options to be used to calculate the at risk points. |
'''Threshold Points''' - Include students with the student points greater than this value in the at risk points calculations. | '''Threshold Points''' - Include students with the student points greater than this value in the at risk points calculations. | ||
| Line 60: | Line 56: | ||
'''Include''' - Check the box if the user wants the "Percent", "Year to Date" Referrals and/or "Period to Date" Referrals to be used in the calculations of the at risk points. Then the user must fill in the blanks to fit their needs for the report. | '''Include''' - Check the box if the user wants the "Percent", "Year to Date" Referrals and/or "Period to Date" Referrals to be used in the calculations of the at risk points. Then the user must fill in the blanks to fit their needs for the report. | ||
| − | '''Percent''' - Set this to what you want the | + | '''Percent''' - Set this to what you want the Percentage of these Discipline options to be used to calculate the at risk points. |
'''From''' - Defaults to today`s date. This may be changed by clicking on the down arrows or by clicking on the calendar to the right of the row. | '''From''' - Defaults to today`s date. This may be changed by clicking on the down arrows or by clicking on the calendar to the right of the row. | ||
| Line 186: | Line 182: | ||
==Main== | ==Main== | ||
| − | [[File: | + | [[File:edittrackingmain3.png]] |
===Column Headers=== | ===Column Headers=== | ||
| Line 212: | Line 208: | ||
'''Stats Pts''' - Student's total at risk points | '''Stats Pts''' - Student's total at risk points | ||
| − | To find definitions of commonly used column headers, follow this link: | + | To find definitions of commonly used column headers, follow this link: [[Common Column Headers]]. |
==Bottom== | ==Bottom== | ||
| − | [[File: | + | [[File:edittrackingbottom3.png]] |
'''Setup''' - Click to go back to the Setup box. | '''Setup''' - Click to go back to the Setup box. | ||
| − | '''Print''' - | + | [[Standard Print Options | '''Print''']] - This will allow the user to print the report. |
| + | |||
| + | '''Help''' - Click to view written instructions and/or videos. | ||
| + | |||
| + | '''[[Save]]''' - Click save first and a box will appear to name the report. Then click to save the report. | ||
| + | |||
| + | '''[[Report]]''' - The user can click in this box to select a report that was previously created. | ||
| − | |||
| − | |||
| − | |||
[[SBLC/RTI|'''SBLC/RTI''' Main Page]] | [[SBLC/RTI|'''SBLC/RTI''' Main Page]] | ||
---- | ---- | ||
[[WebPams|'''JCampus''' Main Page]] | [[WebPams|'''JCampus''' Main Page]] | ||
Latest revision as of 14:48, 31 July 2023
This program will help track early at risk students.
Menu Location
SBLC > Reports > EDIT Tracking
Setup Options
Year - Defaults to the current year. A prior year may be accessed by clicking in the field and making the appropriate selection from the drop down list.
District - Default value is based on the user's security settings. It will be limited to their district only.
School - Default value is based on the user's security settings. If the user is assigned to a school, the school default value will be their school site code.
Grade - Leave blank or select all to include all grade levels. Otherwise, choose the desired grade level.
Stats At Risk Points Limit - Defaults to 0, this my be changed by clicking in the cell, deleting 0, and typing the number for the report.
Limit Students by Points - Defaults to an empty square to not limit students by points. The user may check the box to limit students by points.
Show Students with Points> - Cell defaults to blank. User must type a minimum point(s) in the cell.
Report - The user can click in this box to select a report that was previously created.
Ok - Click to continue
To find definitions for standard setup values, follow this link: Standard Setup Options.
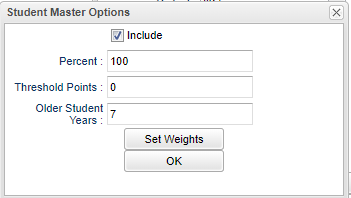
Student Master
Click on the Student Master tab and a "Student Master" box populates
Include - Check the box if the user wants the "Percent", "Threshold Points" and "Older Student Years" to be used in the calculations of the at risk points. Then the user must fill in the blanks to fit their needs for the report.
Percent - Set this to what you want the Percentage of these Student Master options to be used to calculate the at risk points.
Threshold Points - Include students with the student points greater than this value in the at risk points calculations.
Older Student Years - Years added to the student's grade to constitute older student.
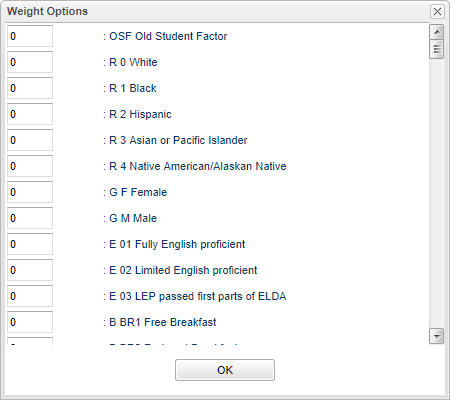
Set Weights - Click on Set Weights and a pick box appears with weight options. A weight may be set by the user in the Weight Options categories. It must total 100%.
OK - Click to go back to the original setup box.
Discipline
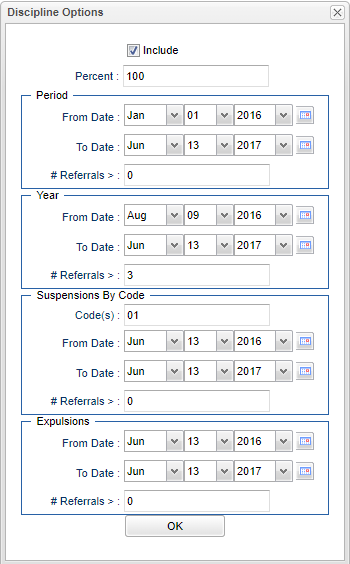
Click on Discipline tab and a "Discipline Options" box populates.
Include - Check the box if the user wants the "Percent", "Year to Date" Referrals and/or "Period to Date" Referrals to be used in the calculations of the at risk points. Then the user must fill in the blanks to fit their needs for the report.
Percent - Set this to what you want the Percentage of these Discipline options to be used to calculate the at risk points.
From - Defaults to today`s date. This may be changed by clicking on the down arrows or by clicking on the calendar to the right of the row.
To - Defaults to today`s date. This may be changed by clicking on the down arrows or by clicking on the calendar to the right of the row.
#Referrals > - Include students with referrals greater than this chosen value for the Year to Date values in the at risk points calculation.
Year:
From - Defaults to today`s date. This may be changed by clicking on the down arrows or by clicking on the calendar to the right of the row.
To - Defaults to today`s date. This may be changed by clicking on the down arrows or by clicking on the calendar to the right of the row.
#Referrals > - Include students with referrals greater than this chosen value for the Period to Date values in the at risk points calculation.
Suspensions by Code:
Code(s) - Include students with referrals including suspension info for these incident types in the At Risk Points calculation.
From - Defaults to today`s date. This may be changed by clicking on the down arrows or by clicking on the calendar to the right of the row.
To - Defaults to today`s date. This may be changed by clicking on the down arrows or by clicking on the calendar to the right of the row.
#Referrals > - Include students with referrals greater than this chosen value for the Period to Date values in the at risk points calculation.
Expulsions:
From - Defaults to today`s date. This may be changed by clicking on the down arrows or by clicking on the calendar to the right of the row.
To - Defaults to today`s date. This may be changed by clicking on the down arrows or by clicking on the calendar to the right of the row.
#Referrals > - Include students with referrals greater than this chosen value for the Period to Date values in the at risk points calculation.
Click OK to move back to the original setup box.
Attendance
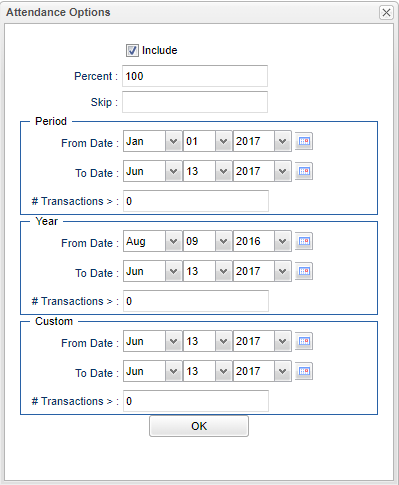
Click on Attendance button and a "Attendance Options" box populates.
Include - Check the box if the user wants the "Percent", "Skip", "Year to Date" and/or "Period to Date" to be used in the calculations of the at risk points. Then the user must fill in the blanks to fit their needs for the report.
Percent - Set this to what you want the percent of these Attendance options to be used to calculate the at risk points.
Skip - Choose attendance codes to skip.
Period:
From - Defaults to today`s date. This may be changed by clicking on the down arrows or by clicking on the calendar to the right of the row.
To - Defaults to today`s date. This may be changed by clicking on the down arrows or by clicking on the calendar to the right of the row.
#Transactions > - Include students with referrals greater than this chosen value for the Period to Date values in the at risk points calculation.
Year:
From - Defaults to today`s date. This may be changed by clicking on the down arrows or by clicking on the calendar to the right of the row.
To - Defaults to today`s date. This may be changed by clicking on the down arrows or by clicking on the calendar to the right of the row.
#Transactions> - Include students with transactions greater than this chosen value for the Year to Date values in the at risk points calculation.
Custom:
From - Defaults to today`s date. This may be changed by clicking on the down arrows or by clicking on the calendar to the right of the row.
To - Defaults to today`s date. This may be changed by clicking on the down arrows or by clicking on the calendar to the right of the row.
#Transactions > - Include students with transactions greater than this chosen value for the Period to Date values in the at risk points calculation.
Click OK to move back to the original setup box.
Grades
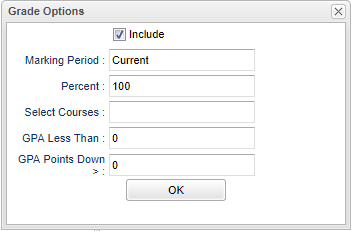
Click on Grades button and a "Grade Options" box populates.
Include: Check the box if the user wants the "Marking Period", "Percent", "GPA Less Than" and/or "GPA Points Down" to be used in the calculations of the at risk points. Then the user must fill in the blanks to fit their needs for the report.
Marking Period' - Select Marking Period.
Percent - Set this to what you want the percent of these Grades options to be used to calculate the at risk points.
Select Courses - Include students who have failed these courses in the At Risk Points Calculation.
GPA Less Than - Include students with GPA less than this chosen value in the At Risk Points calculation.
GPA Points Down - Include students with GPA points down greater than this chosen value in the At Risk Points calculation.
Click OK to move back to the original setup box.
SBLC
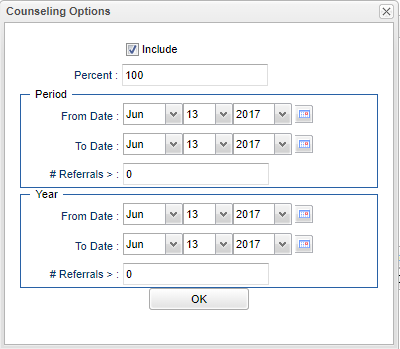
Click on SBLC button and a "Counseling Options" box populates.
Include: Check the box if the user wants the "Percent", "Year to Date" Referrals and/or "Period to Date" Referrals to be used in the calculations of the at risk points. Then the user must fill in the blanks to fit their needs for the report.
Percent - Set this to what you want the percent of these SBLC options to be used to calculate the at risk points.
Period:
From - Defaults to today`s date. This may be changed by clicking on the down arrows or by clicking on the calendar to the right of the row.
To - Defaults to today`s date. This may be changed by clicking on the down arrows or by clicking on the calendar to the right of the row.
#Referrals > - Include students with referrals greater than this chosen value for the Year to Date values in the at risk points calculation.
Year:
From - Defaults to today`s date. This may be changed by clicking on the down arrows or by clicking on the calendar to the right of the row.
To - Defaults to today`s date. This may be changed by clicking on the down arrows or by clicking on the calendar to the right of the row.
#Referrals > - Include students with referrals greater than this chosen value for the Period to Date values in the at risk points calculation.
Click OK to move back to the original setup box.
OK - Click to continue
Main
Column Headers
Student Name - Student's full name
Sidno - Student's identification number
GD - Student's grade of enrollment
Age - Student's age
Student Pts - Student's at risk points
Att - Student's attendance transactions period/year/custom
Disc - Student's discipline transactions period/year/susp/expul
Grades - Count of failed courses selected by user
GPA - Student's current GPA/last period GPA
SBLC - Student's SBLC transactions period/year
Stats Pts - Student's total at risk points
To find definitions of commonly used column headers, follow this link: Common Column Headers.
Bottom
Setup - Click to go back to the Setup box.
Print - This will allow the user to print the report.
Help - Click to view written instructions and/or videos.
Save - Click save first and a box will appear to name the report. Then click to save the report.
Report - The user can click in this box to select a report that was previously created.
